Rainbow Black Bean Salad

Hello everyone,

This quick and easy salad is refreshing, healthy and ecstatically pleasing. You can enjoy it as a meal or serve it to accompany another entrée.

As a bonus, 1/2 of this recipe boasts nearly 50% of your daily required fibre intake!

It feels good to eat something fresh and healthy!

Bon appetit,

Julie


Click here to view printable Word version of recipe:
Rainbow Black Bean Salad

__________________________________________________________

Rainbow Black Bean Salad

Serves 2-4

INGREDIENTS

1 cup black beans
1/2 cup corn (canned or frozen)
1 avacado, diced
1 large tomato, diced
1/2 orange pepper,  diced
1/4 bunch cilantro, chopped
1/2 lime,  juiced
1/2 tsp cumin
Chili flakes to taste
Salt and pepper to taste

DIRECTIONS

Combine all ingredients

Keeps well in the fridge

Asian Style Turkey Meatball in Broth

Hello everyone,

I try to cook with turkeyoften as an alternative to chicken to stay out of the red-meat-zone. Unfortunately, I have no idea how to cook with large pieces of turkey, so I usually opt for ground turkey.

Some recipes I use ground turkey for include meatloaf, burritos and chili. Basically, anywhere you can substitute for ground beef.

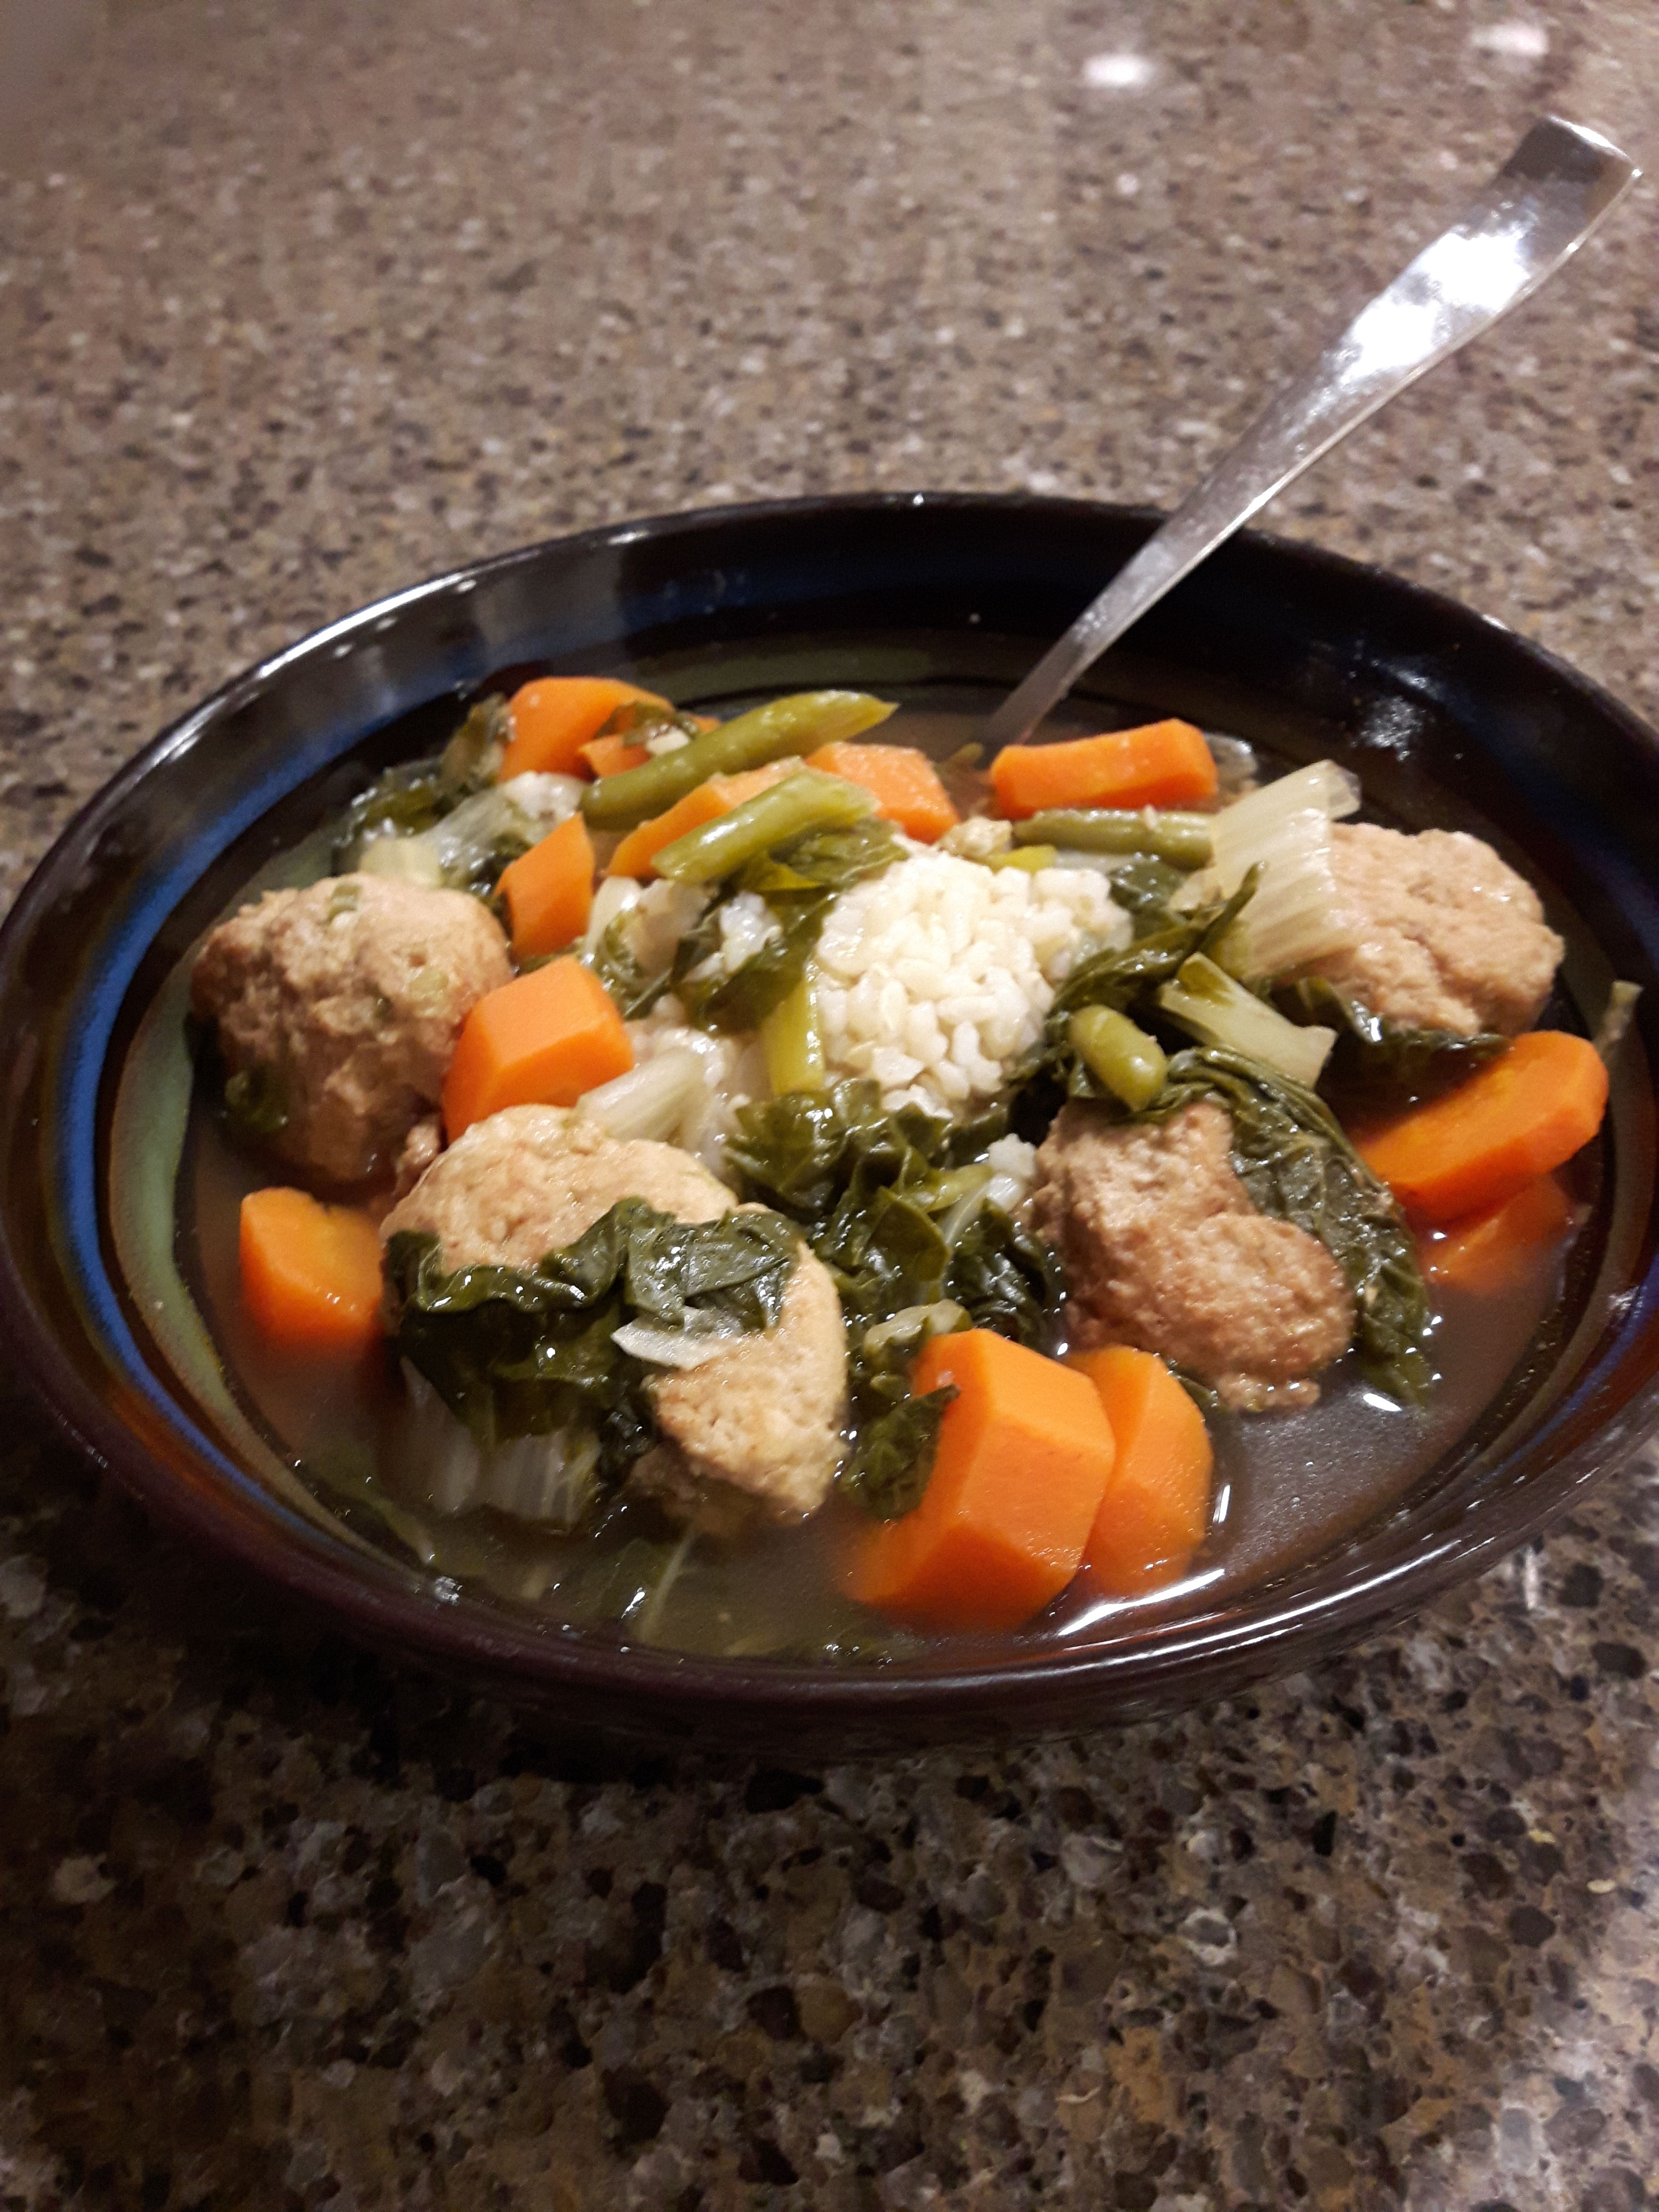
This meatball soup is really nice! I love it because it is hearty and fills you up as a whole meal, but when you break it down it is actually very light – brown rice, vegetables and ground turkey meatballs.

In my opinion, the two reasons why this soup is so nice is 1) the meatballs are browned in a frying pan and then cooked in the broth, making them nice and succulent, and 2) the soy sauce in the broth makes it oh so satisfying.

Bon appetit,

Julie

Click here for printable Word version of recipe:
Asian Turkey Meatballs In Broth

_______________________________________________________

Asian Style Turkey Meatballs In Broth

Serves 4-6, depending on how hungry you are

INGREDIENTS:

Meatballs:

500g ground turkey (around half a pound)
1/3 cup bread crumbs or quick oats
2 green onions, minced
3 cloves garlic, minced
2+3 tsp fresh grated ginger
2 tsp soy sauce
1 egg
1 tbsp oil (for frying)

Broth:

1 head of bok choy, chopped – or use baby bok choi
4 large carrots, peeled sliced
3 green onions, thinly sliced
3 cloves garlic, minced
1 fresh bird’s eye chili pepper, minced. Alternatively ¼ tsp bird’s eye chili powder,
3-4slices of ginger
1 L (4 cups) chicken or vegetable broth, + 1 cup extra if needed
2 cups cut green beans – fresh or froven
¼ cup soya sauce – add more to taste
Juice of ½ lime + more to taste

Cooked white or brown rice for serving.

DIRECTIONS:

Meatballs:

Combine all meatball ingredients in a bowl and mix well. To help meatballs stick better, throw mixture against bottom of mixing bowl repeatedly until mixture sticks together nicely.

Form into 1.5 inch meatballs – about 16-18 total

Heat oil in a skillet on medium heat. Cook meatballs, flipping at least once and stirring, until browned, about 5 minutes.

Broth:

In a soup pot, heat oil on medium heat.

Sauté carrots for a couple of minutes. Add bok choi, green onion. Saute for a few more minutes.

Add ginger, garlic and chili pepper. Saute for 1 minute.

Stir in chicken broth, meatballs, green beans and 1 cup extra of broth if needed. Bring to a boil. Reduce heat and simmer, until meatballs are cooked, about 20 minutes.

Stir in soy sauce and lime juice.

Divide rice into 4 bowls, cover with broth, meatballs and vegetables.


Freezer Breakfast Burritos

Hello everyone,

To-go breakfasts are always great for busy or unorganized mornings. However, I find a lot of these options are either lower in protein (ex: oatmeal, various baked goods) or higher in sugar (ex: yogurt, pastries) then I would like.

When I want to feed my busy husband quickly in the morning, a bowl of oatmeal or a scone often just doesn’t cut it. I want to give him something that will sustain him for more then an hour. Enter the freezer breakfast burrito.

This baby is packed with protein (beans, sausage and eggs) and boasts virtually no sugar. Also, the beans and whole wheat tortilla shells pack a decent fiber punch.

You can follow this recipe, but feel free to add/subtract/substitute for anything you want. Perhaps you want to add sautéed vegetables or black beans in lieu of potatoes or refried beans respectively. Maybe sausage isn’t your thing and you’d prefer to substitute bacon or go vegetarian with extra eggs. Go with whatever floats your boat!

Ready in 2-4 minutes, these burritos great quick microwave-ready breakfast for a hungry person in the morning. Make a bunch and stock your freezer!

Bon appetit,

Julie

Click here for printable Word version of recipe:
Freeze and Heat Breakfast Burritos

_______________________________________________

Freeze and Heat Breakfast Burritos

Serves 8

INGREDIENTS:

8 large whole wheat tortilla shells
1 can refried beans
3 cups frozen hashbrowns, or hashbrown mix
1 cup frozen corn
1 package seasoned fresh sausage, cut into pieces – try Italian or chorizo
10 eggs
2 tsp tex mex or taco seasoning – or use a combination chili powder, cumin and garlic powder
Salt and pepper to taste.
2 cups grated cheddar cheese
Hot sauce of your choice – we like Valentina’s

Tin foil

DIRECTIONS:

  1. In a large frying pan, cook hashbrown mix according to package. Add corn near the end. Remove from pan and store in a bowl.
  2. Slice sausage and fry on medium heat until cooked through. Add eggs: scramble and cook until done, mixing well with the sausage. While eggs are cooking, add seasoning/spices, salt and pepper.
  3. Lay out 8 squares of tin foil, large enough to accommodate and wrap your burritos.
  4. Lay a tortilla shell on each square of foil.

To assemble:

  1. Keep ingredients in center of the tortilla so you can wrap up both ends.
  2. Divide refried beans amongst tortilla shells. Divide hasbrown mix.
  3. Divide sausage/egg mixture. Top all with cheese and hotsauce.
  4. Roll into a burrito, rolling up both ends. Wrap in foil before continuing on to the next one.
  5. Place wrapped burritos in freezer.

To reheat:

Unwrap burrito, place on a plate. Microwave between 2-4 minutes, until burrito is cooked. Flip halfway through.

Rainbow Root Vegetable Fries

Hello everyone,

Potatoes are great. However, when it comes to root vegetables, I generally opt for something that I deem to have more nutritional value – beets, sweet potatoes, etc. Gotta get that extra fiber and anti-oxidants into your diet!

I sometime make oven fries, so this time I decided to use a variety of root vegetables in lieu of potatoes. Not only are baked the beet, sweet potato and rutabaga fries delicious, but they look so nice as well.

TIPS:

  • For best results, flip each fry halfway through baking. I am lazy and just shook my pan. As a result they were a little dark on one side but still delicious.

I dipped mine in ketchup (except the beets) but any sour cream or mayo/aioli dip would work great too! Serve as a hearty side with anything you like!

Bon appetit,

Julie

Click here for printable Word version of recipe:
Rainbow Root Vegetable Fries

________________________________________________________

Rainbow Fries

Serves 3-4

INGREDIENTS:

3 medium/large beets
1 medium orange fleshed sweet potato (yam)
½ rutabaga – use whole to serve 4
3 cloves garlic, crushed
3 tsp dried rosemary
Olive oil
Salt and pepper

DIRECTIONS

  1. Preheat oven to 425
  2. Peel beets. Cut into ½ inch fries and place in a mixing bowl. Toss with 1 cloves garlic, 1 tsp rosemary, salt, pepper and olive oil.
  3. Peel sweet potato and rutabaga. Cut into ½ inch fries. Place in mixing bowl. Toss with 2 cloves garlic, 2 tsp rosemary, salt, pepper and olive oil.
  4. Line 2 baking sheets with parchment paper. Place fries individually on baking sheet so they are not overlapping.
  5. Bake for 40-45 minutes on two levels of oven. After 20 minutes, move vegetables around with a spatula. For best results, flip each fry individually. Switch top and bottom pans and bake for an additional 20-25 minutes until done.

Grits with Bacon, Broccoli and Cheese

Hello everyone,

Ever since John and I traveled to the deep south, we have fallen in love with grits. Instead of just eating them on their own, we often use various meats, veggies, cheeses and eggs into our grits, sometimes cooked fresh, sometimes leftovers. Asparagus, mushrooms, sausage, steak and green onions are just some of the ingredients that find their way into our breakfast grits concoctions, often topped with a poached or fried egg and grated cheese. Although I have posted a specific recipe here, feel free to get creative with your grits!

The other day I had a bunch of bacon and broccoli in the fridge, so thought we would incorporate them into our breakfast grits! While John fried the bacon and made the grits, I steamed the broccoli and grated the cheese. In the end, we had a decadent, delicious and satisfying breakfast! Alternatively, serve as a tasty side dish.

Have some fun the next time you have breakfast!

Bon appetit,

Julie

Click here for printable Word version of recipe:
Grits with Broccoli, Bacon and Cheese

_____________________________________________

Breakfast Grits with Bacon, Broccoli and Cheese

(Makes 1 large or 2 small servings depending on your appetite

INGREDIENTS:

1-1.5 cups cooked grits, salted
2 slices bacon, cooked to your liking, cut into pieces
3+ florets steamed broccoli, chopped
¼ cup grated cheddar cheese – use more to serve 2
1 egg, fried or poached, with soft yolk (optional) Cook a second egg to serve 2
DIRECTIONS:

To steam broccoli in microwave:

  • Put broccoli in ceramic bowl, add 3 tbsp water, cover with a plate.
  • Microwave on high for 2 minutes

Dish/divide grits in a bowl/bowls. Top with, bacon pieces, broccoli and grated cheese. Add egg on top if using.

TRY THESE SUBSTITUTIONS:

  • Substitute broccoli with asparagus and mushrooms.
  • Substitute bacon with breakfast sausages, also, cut into pieces. Leftover steak or chicken are also great options.
  • Try any kind of cheese that suits you!

Quick Cassoulet – French chicken, sausage and white bean stew


Hello everyone,

Confession: I have never made a real cassoulet. I have had it at restaurants, yes! And it is always wonderful. From what I have heard and read it’s a lot of work and time. Using ingredients such as duck fat and gelatin, it looks as though this thing needs to be cooked for 5-6 hours. Delicious yes, but not your average week night meal!

So here is a quick version of cassoulet. No duck fat, but yes to sausage and chicken! The recipe keeps it simple and allows you to make it in less then an hour. Chicken, sausage, white kidney/cannelli beans, carrots, fennel are all simmered together in a quick stove-top stew. Simple, quick and tasty.

The key to this recipe is the buttery breadcrumb topping.

So enjoy some French cooking without the hassle!

Bon appetit,

Julie

Click here for printable Word version of recipe:
Quick Cassoulet

____________________________________________________________

Quick Cassoulet

Serves 4 -5 Prep: 30 mins Cooktime: 15 mins Total: 45 minutes

INGREDIENTS:

6 boneless skinless chicken thighs, cut into bite sized pieces
1 cup cured sausage, thinly sliced – pork, turkey, chicken – your choice
1 onion, chopped
4 cloves garlic, minced
½ fennel bulb, cored and thinly sliced
4 carrots, peeled and sliced
2 ribs celery, chopped
4 sprigs thyme, or 1 tsp dried
1 tbsp flour
1 tsp chopped fresh rosemary, or dried
1 can white kidney beans, drained
¼ white wine
1 x 14 oz can diced tomatoes
Parsley, finely chopped
Salt and pepper to taste

½ cup breadcrumbs
2 tbsp butter

DIRECTIONS:

  1. Season chicken with salt and pepper
  2. Heat large pan or dutch oven on medium high.
  3. Sauté chicken for about 3-5 minutes, add sausage and continue to cook until chicken is browned. Remove meat from pan
  4. Add onions, cook until they start to soften.
  5. Add garlic, fennel bulb, carrots and celery. Cook until vegetables start to soften.
  6. Add herbs. Cook for a minute.
  7. Add chicken and sausage. Add four and stir well.
  8. Add beans, wine, diced tomatoes and salt and pepper. Stir weill.
  9. Bring to a boil. Reduce heat and simmer for 10-15 minutes, until chicken is cooked.
  10. Meanwhile heat a small pan on medium. Add butter and breadcrumbs and cook for about 5 minutes.
  11. To serve, top with parsley and breadcrumbs.

Breakfast Zucchini Pancakes

Hello everyone,

If you have ever planted zucchini in your garden, I’m sure you’ve encountered the problem of having way too many gigantic zucchinis. Luckily for you, they seem to last forever.

This year, I didn’t plant zucchinis but managed to acquire a zucchini the size of a small child. This thing was crazy big. I used about half of it to make four batches of zucchini muffins, but even after that endeavour, I still had so much zucchini left.

After some brainstorming, John and I tried making zucchini pancakes for breakfast. They were such a huge success that I decided to grate and freeze the rest of the zucchini in 2 cup portions and have been thawing them overnight and repeatedly making zucchini pancakes for breakfast! It has become quite the breakfast staple in our household.

These zucchini pancakes remind us a bit of the green onion cakes you can buy at Chinese restaurants. The good news about these zucchini pancakes though is that you actually know what ingredients are going in.

Whether you have some zucchinis still left over from your garden or see one at your grocery store, this recipe is worth a shot one morning!

Bon appetit,

Julie

Click here for printable Word version of recipe:
Breakfast Zucchini Pancakes

_____________________________________________

Breakfast Zucchini Pancakes

Serves 2-3

INGREDIENTS:

2 cups grated zucchini
2 eggs
2 green onions, thinly sliced
½ cup flour
¼ cup parmesan cheese
½ tsp baking powder
½ tsp salt
Pepper to taste
¼ tsp dried oregano or basil

Oil for cooking

DIRECTIONS:

  1. Lightly salt grated zucchini. Let sit for 30 minutes, then wring out excess water. This step can be done the night before. Alternatively, just try to wring as much water as you can out of the zucchini right after grating if you don’t have time to let it sit.
  2. In a medium mixing bowl, beat eggs with fork. Add grated zucchini, green onions and mix well.
  3. Add flour, parmesan cheese, baking powder, salt, pepper and herbs. Mix well.
  4. Heat oil in a frying pan on medium heat. Put about 1/3 –half of batter on pan and flatten into a pancake if needed. Cook 2-3 minutes per side until pancake turns golden brown.
  5. Serve with your favourite hot sauce.

Chicken with Balsamic Tarragon Mushroom Sauce

Hello everyone,

Typically, one may associate mushroom sauce with adjectives such as creamy, high-calorie and delicious.

Personally, I love mushroom sauce. But when you make it with all that butter and cream, you can’t help but feel your arteries scream at you, regardless of how pleased your stomach may be.

So instead of avoiding my beloved mushroom sauce in the best interest of my heart and waistline, I instead opt for a much healthier and lower-calorie mushroom sauce recipe.

This recipe uses much lighter ingredients to create the sauce, with chicken broth as the liquid and only a ¼ of sour cream added right at the end (which you can even substitute with the healthier  greek yogurt.)

This specific recipe uses balsamic and tarragon to flavour the sauce, but you can really remove or substitute anything to change the flavour of the sauce – mustard, sun dried tomatoes, thyme to name a few ideas!

Try this recipe and enjoy a delicious mushroom sauce without all the guilt!

Bon appetit,

Julie

Click here for the printable Word version of recipe:
Chicken with Balsamic Tarragon Mushroom sauce

________________________________________________________

Chicken With Balsamic Tarragon Mushroom Sauce
Serves 4-5

1 tbsp oil
8 boneless skinless chicken thighs
½ cup onion, sliced
2 cloves garlic, minced
16-20 mushrooms, sliced
1-2 tbsp balsamic vinegar
1 tbsp dried terragon
1 tsp dried thyme
¼ cup white wine
¾ cup chicken or vegetable broth
Salt and pepper to taste
1 tbsp cornstarch
1 / 4 cup sour cream or greek yogurt
Fresh parsley for garnish

Cooked brown rice for serving

DIRECTIONS:
1. Cut chicken  thighs into bite sized pieces (about 3 pieces per thigh) Season with salt and pepper.
2. In a large pan, sauté chicken thighs in oil until lightly browned. Remove.
3. Add onions cook until softened. Add garlic, cook for a minute.
4. Add mushrooms, cook until tender, mixing occasionally.
5. Stir in balsamic vinegar, tarragon and thyme.
6. Add salt, pepper, white wine and broth. Add chicken and mix well.  Bring to a boil.
7. Reduce heat to medium low, cover and simmer for 15 to 20 minutes.
8. Mix cornstarch in just enough water to dissolve, about ¼ cup. Add to pan. Mix well and cook uncovered until sauce thickens.
9. Turn off heat. Mix in sour cream/yogurt.
Serve on a bed of brown rice and garnish with fresh parsley.

Peach Cobbler

Hello everyone,

It’s finally those two magical weeks of the year when peaches are actually in season! I got about 16 big perfect peaches on sale, and made an attempt to eat as many as I could as they ripened. However, I am only one person and couldn’t accomplish this task, so I decided to make a peach dessert.

When I was in Austin, Texas at the Salt Lick restaurant years ago, I remember trying both their blackberry and peach cobblers, and both were great! So when my mom said she was going to make a peach cobbler with her extra peaches, I thought I would give it a try as well as this solved my too-many-peaches problem. She sent me the Salt Lick peach cobbler recipe that she found online, and after a few tweaks (including reducing the sugar,) I gave it a shot too!

COBBLER VS. CRISP

My mom has been making rhubarb crisp for years. As a result, I was very familiar with the concept of a crisp but not so much a cobbler. After some internet research and actually making a cobbler, this is my verdict:

 A crisp (or crumble) is baked fruit topped with a sugar and oatmeal mixture that turns (you guessed it) crispy. A cobbler is fruit baked with a biscuit/cakey batter.

When making a cobbler, you typically top the fruit with the batter. This recipe is different, as you put the fruit on top of the batter instead! I like it this way, and think it looks very pretty with the peaches sitting on top of the batter.

This recipe is super quick and would be great dessert for any BBQ.

So quick! Get some peaches while you can and enjoy this summer dessert!

Bon appetit,

Julie

Click here for the printable Word version of recipe:
Peach Cobbler

__________________________________________

Peach Cobbler
Inspired by Salt Lick

Serves 6-8

INGREDIENTS:

½ cup butter, melted

Batter:

1 cup flour
2/3 cups sugar
2 tsp baking powder
1/4 tsp salt
2/3 cups milk
1 egg, beaten
1 tsp vanilla

Peaches:

4 large peaches, thinly sliced
2/3 cups sugar
½ tsp cinnamon
Pinch of nutmeg

DIRECTIONS:

  1. Preheat oven to 350 F.
  2. Cover 9×13 inch baking pan with melted butter
  3. Make peach mixture. Combine peaches, 2/3 cups sugar and spices.
  4. In a medium mixing bowl, combine flour, 2/3 cups sugar, baking powder, and salt. Mix well. In a separate bowl, beat egg with a fork and mix with milk and vanilla. Mix wet ingredients with dry.
  5. Pour batter on top of butter in baking pan. Try to spread the batter as evenly as possible.
  6. Scoop peaches evenly over batter. DO NOT MIX!!
  7. Bake for 35-45 minutes until batter comes to top and is golden brown.
  8. Serve with vanilla ice cream or whipping cream.


Brown Rice Pilaf with Mushrooms and Thyme


Hello Everyone,

In the height of the summer, John and I are taking advantage of the nice weather with lots of grilling and BBQing. In predictable gender defined roles, John takes care of the grilling and I handle the sides.

For my sides, I usually alternate between something potato, bean or rice related, depending on the style of meal and the meat John is making.

The other day, we decided to grill some chicken thighs with peppers from our garden as well as asparagus and corn.I fell back to my trusty brown rice pilaf recipe.

I have been making this rice pilaf for ages, and as a lighter and healthy dish, it is my go-to side for most chicken and fish entrees. Unless we’re doing some sort of curry or stir fry, I never make just plain rice, and usually opt for this easy rice dish.

Mushrooms, onion/leek, garlic and thyme are key ingredients, and feel free to add some spinach for colour if you have some on hand. Personally, I love the nuttier taste of brown rice, and will sometimes even substitute a little wild rice as well.

I really hope you try out this recipe as it is one of my staples. Jazz up any meat entrée any time of year with this little gem.

Bon appetit,

Julie

For the printable Word version of this recipe, click here:
Brown Rice Pilaf with Mushrooms and Thyme

_______________________________________________________________

Brown Rice Pilaf with Mushrooms and Thyme

Serves 4-6

INGREDIENTS:

1 cup brown rice – try substituting ¼ brown for ¼ wild rice
1 leek or small onion, thinly sliced
8 mushrooms, halved and thinly sliced
1 tbsp cooking oil
2 cloves garlic, minced
2 tsp dried thyme, or 1 tbsp fresh thyme, minced
1 handful fresh spinach or frozen – optional
1 cup vegetable broth
1 ½ cups water
1 tsp salt
Pepper to taste
1 tbsp butter – optional
Fresh parsley for garnish – optional

DIRECTIONS:

  1. Heat oil in a medium-large pot on medium heat.
  2. Cook onions/leek until softened, 3-5 minutes.
  3. Add mushrooms, cook for 2-3 minutes, mixing periodically
  4. Add garlic, thyme and spinach, cook for 1 minute.
  5. Add rice, cook for a minute while stirring.
  6. Add water, broth, salt and pepper.
  7. Bring to a boil. Reduce heat to medium low and simmer for 35-40 minutes.
  8. When rice is done, add the optional tbsp of butter and mix well. Garnish with fresh parsley.

20170730_195829