Julie, Julie & Julia – The French Cooking Chronicles: Boeuf Bourguignon (beef with red wine stew)

Beef Served

 “I enjoy cooking with wine, sometimes I even put it in the food…” – Julia Child

Hello everyone,

Apart from being a more then competent chef, Julia Child is a very amusing TV personality. Watching old clips of her cooking show The French Chef, she is very candid, funny and makes you feel right at home. But after watching Julie & Julia, it is clear that there is much more to Julia Child then her entertaining on-screen persona. She has a passion for life that transcends to her love for cooking, and it is completely contagious. Evidenced by my recent French cooking posts, I am very inspired by her enthusiasm, determination and bigger-then-life personality.

In Julie & Julia, Julie Powell is told that she will be having Judith Jones as a dinner guest. Judith Jones was the woman who first published Julia Child’s “Mastering the Art of French Cooking.” The first recipe Judith tried from the cookbook? Today’s recipe of course!

Spoiler alert! Well what happens? Julie falls asleep through the timer, and over-cooks the stew! There’s more to it than that, but you will have to watch the movie to find out more!

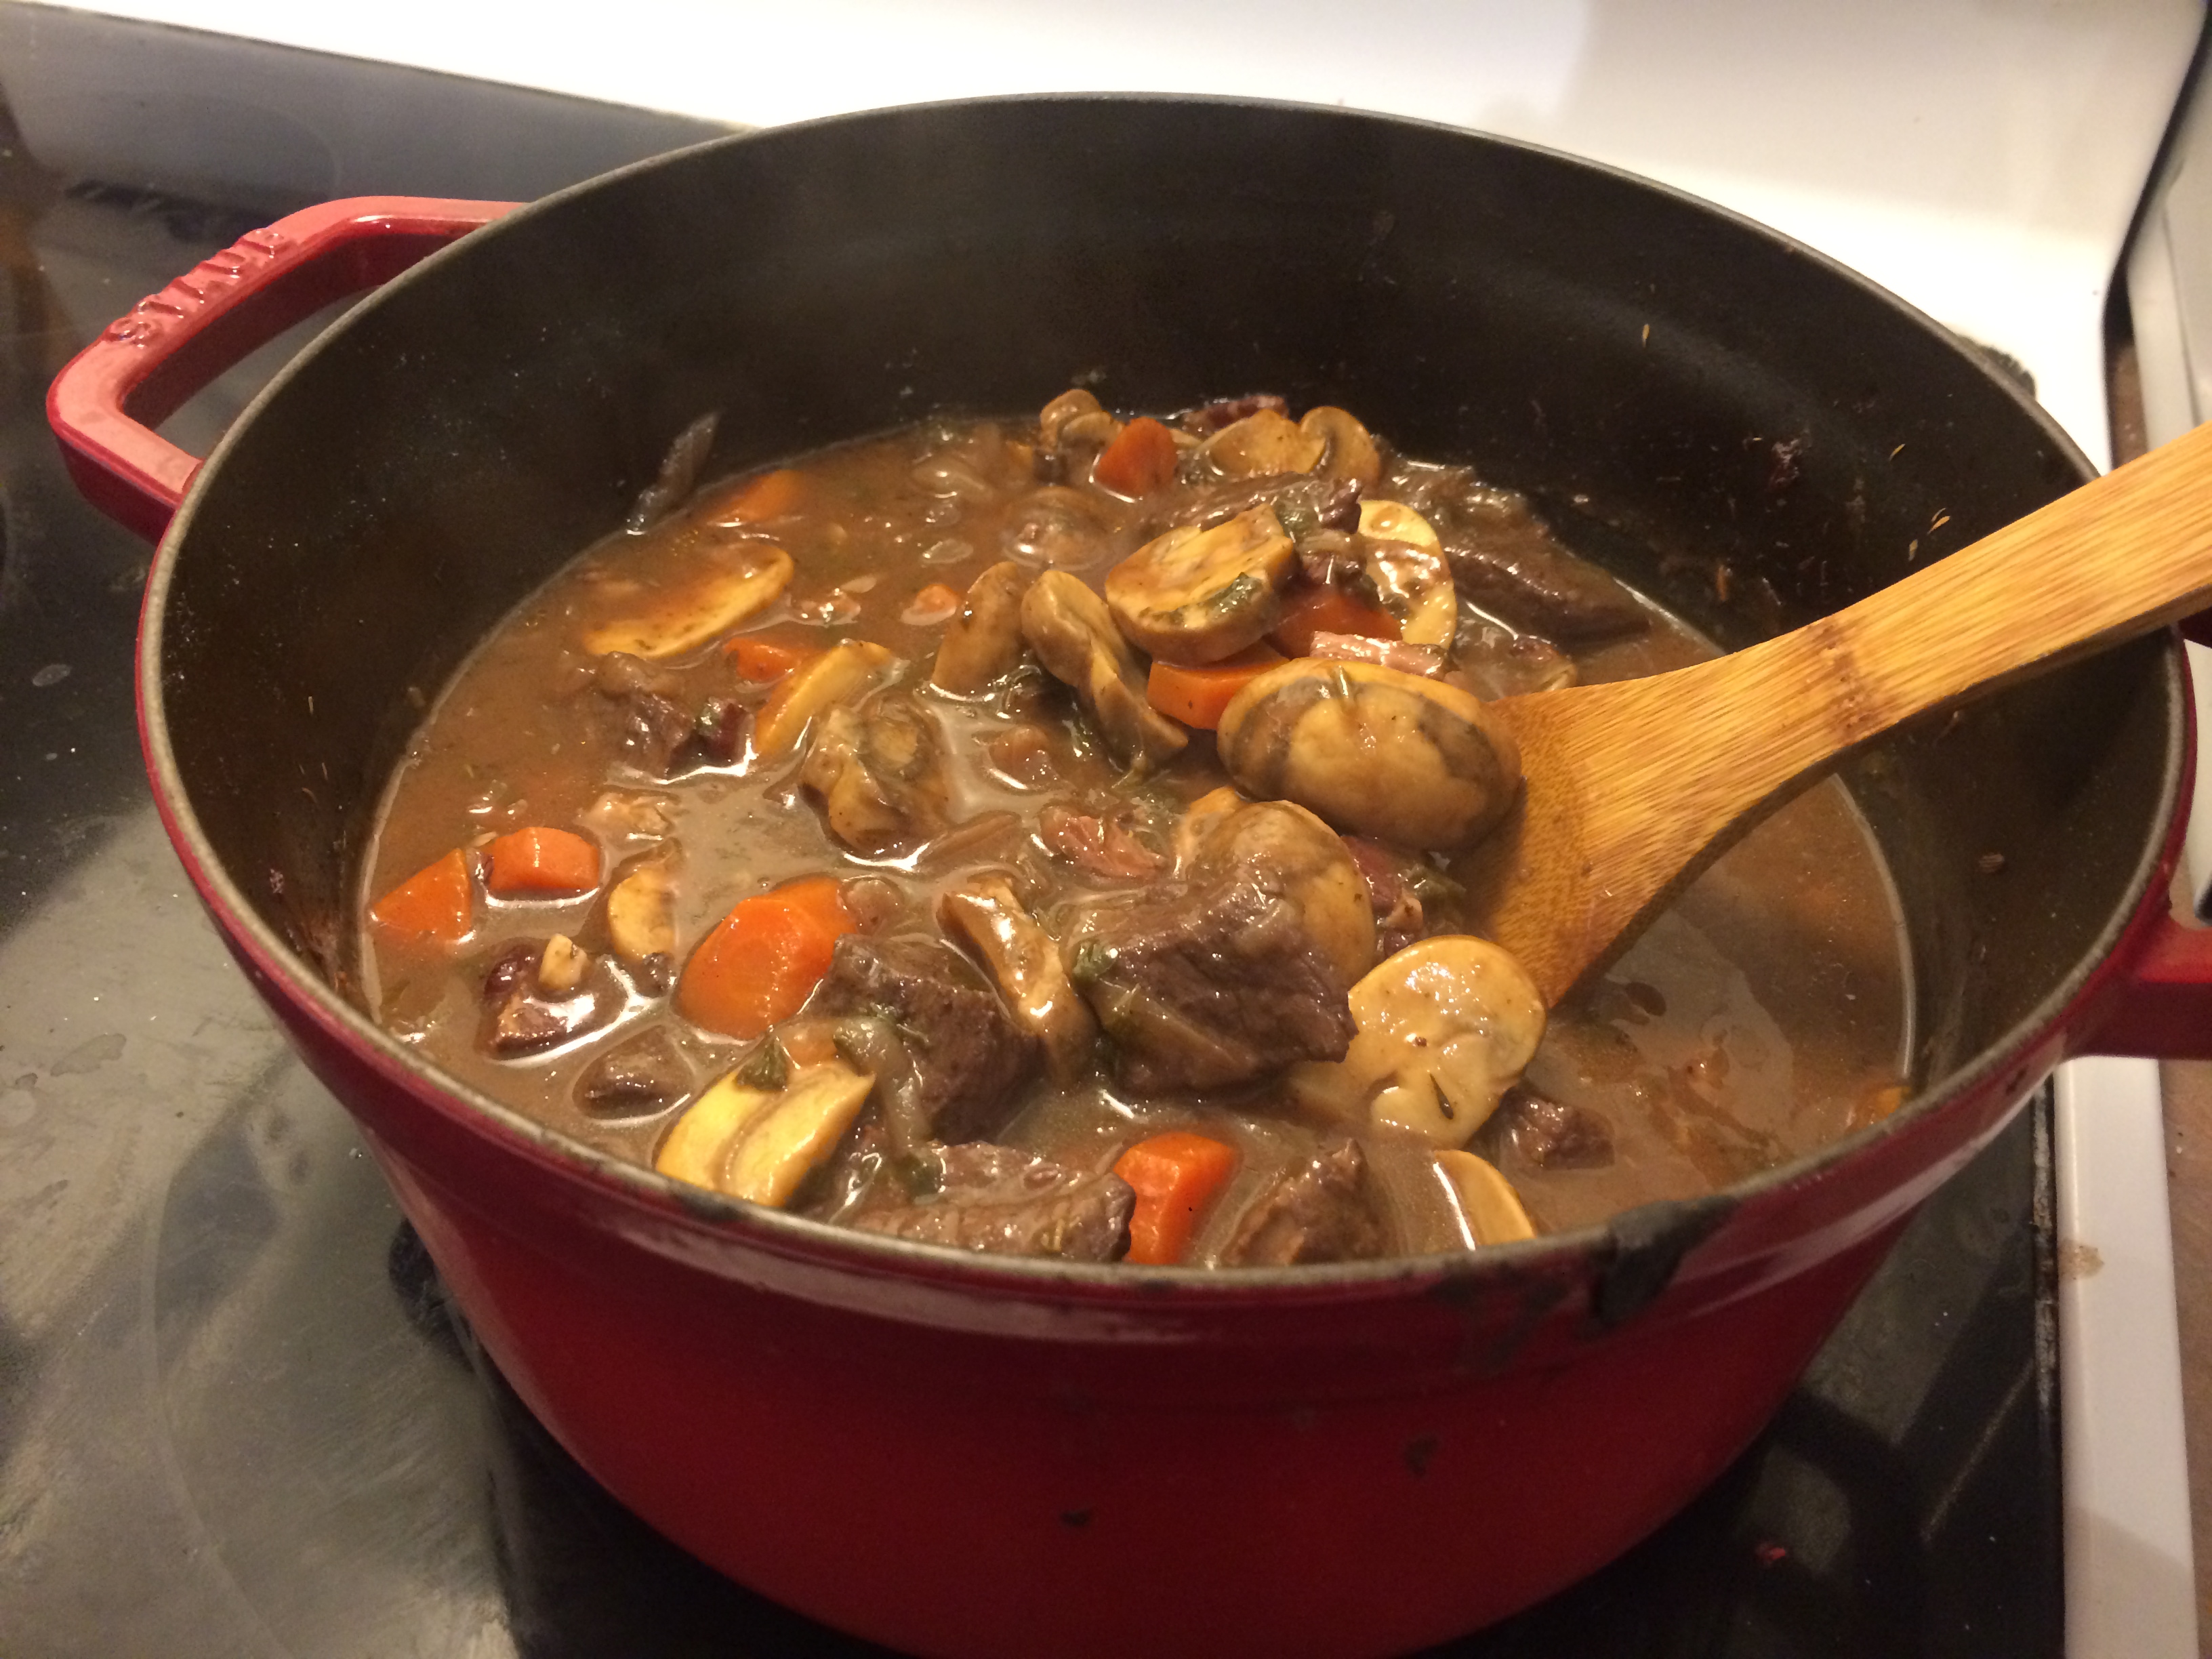
So in honour of Julia Child, my fourth and final recipe for this series is the one we have all been waiting for. It’s the king of French dishes, the piece du resistance if you will. I present to you the fabulous boeuf bourguignon.

Boeuf Bourguignon

Boeuf bourguignon is a simple beef stew with one key distinction from your regular beef stew. The distinction – this stew contains one full bottle of red wine. That’s right – a FULL bottle. Not a splash. Not a cup. Not even a generous free-pour.  But the whole nine yards. Don’t be skimping out on the wine, as it cooks down into a rich and delicious sauce that can’t be rivaled by any other stew you will ever have. The only downside to this arrangement is that it doesn’t really leave any wine for drinking, so you may want to make sure you have a second bottle on hand, just in case you get a little thirsty from all the cooking!  Bourguignon means Burgundy, named for the region in France where this dish originated. If you want to be very authentic, you can use Burgundy red wine, however my understanding is that this is kind of an expensive option, so perhaps just opt for a bottle of red that you enjoy.

Beef StewJohn tells me boeuf bourguignon is his favourite stew of all time, and I love to make it for the two of us on a nice Sunday evening where I have a few hours to spare. When this happens, there are plenty of leftovers, and any people who happen to wander to or even near our house for the next day or two will likely leave with some stew for lunch.

With all these leftovers, boeuf bourguignon is much more ideal to serve at a dinner party or family dinner (for more than two people.) One of the best things about this dish is that you can make it in advance and re-heat it right before you serve. You can go as far as making it the day before if that’s what best suits your schedule.  It’s a great big dish that everyone can dig into, and your guests will likely be going for seconds.

Like the coq au vin, I have made some alterations to Julia’s more involved version of this recipe to make it a little more approachable. But if you are feeling more ambitious, go for it and try Julia Child’s full version – it is more complex with some extra steps, and it is all over the internet waiting for you to find it if you like. But if you’re like me and don’t feel like putting your stew through a sieve then my simpler version will work just fine for you (and did I mention delicious?)

If you want to cook Julia’s full recipe, click below to view The French Chef – the beef bourguignon episode. This also happens to be the very first show of Julia’s series. She also has directions on how to brown the onions and mushrooms, and how to separate and thicken the sauce right at the end.

TIPS:

  • Julia Child suggests using chuck roast as the cut of preference
  • You can make this dish in advance and re-heat right before serving
  • Serve with mashed potatoes, boiled potatoes, polenta or French bread
  • Use a good bottle of red wine to enhance the flavour and quality of your stew, one that you actually like to drink
  • The small onions are some extra work but simply delectable! If your timeline allows it, try them out. If not, don’t worry – I’ve made the stew numerous times without them and it is still outstanding!

Ingredient I can’t live without:

RED WINE
Wait … this was supposed to be an ingredient? My bad.

Boeuf bourguignon is the perfect dish to conclude my French Cooking Chronicles. I hope you have enjoyed reading these posts as much as I have enjoyed eating what’s featured on them. Be sure to treat yourself and give one or two of these French dishes a shot! Although this is the end of this series, I know that French cuisine will find its way back to my blog again.

(as Julia Child would say) Bon appetit!

Julie

Click here to view the printable Word version of the recipe:
Beef Bourguignon

Other posts from Julie, Julie & Julia – The French Cooking Chronicles
Coq au Vin
Raspberry Bavarian Cream
Beurre Blanc

______________________________________________________________

Boeuf Bourguignon

INGREDIENTS:

4 slices bacon, cut into half inch pieces
3 pounds of beef, cubed
1 cup chopped carrots
1 large onion, chopped
2 garlic cloves, minced
1 / 3 cup flour
3 cups dry red wine (1-750 mL bottle)
2 cups beef broth
1 and 1 / 2 tsp thyme
Salt and pepper
1 bay leaf
Parsley
2 tbsp Tomato paste (add with mushrooms)

4 cups of quartered fresh mushrooms (halve them if they are smaller)
Butter and oil

Optional:
18 to 24 small onions (whole)
(see instructions for braised pearl onions at end of recipe)

Serve with mashed potatoes, boiled potatoes, polenta or French bread

DIRECTIONS:

  1. Preheat oven to 350, set rack to lower third of oven
  2. Sauté bacon in Dutch oven. Remove.
  3. While bacon is cooking, pat cubed beef dry with paper towel – this will allow the beef to brown properly.
  4. Add cubed beef to Dutch oven. Sauté in bacon fat and cooking oil, browning on all sides. For optimal results, cook only a few pieces of beef at a time as to not crowd the pan Remove beef from pot as they are browned.
  5. Add carrots, onion, garlic and sauté for a few minutes.
  6. Stir in flour, coat vegetables well and cook for one minute.
  7. Gradually stir in wine and broth. De-glaze pot by scraping the bottom of the pot as you add the wine, ensuring that all the bits stuck to the pot loosen up so they will cook into your sauce. Once you have added all the liquid, bring to boil.
  8. Reduce heat and simmer for about 5 minutes.
  9. Stir in bacon, beef, thyme, salt and pepper, bay leaf and parsley.
  10. Cover and bake at 350, stirring occasionally for 2 hours.
  11. Meanwhile, in a frying pan, sauté mushrooms in butter and oil.
  12. After the timer is done, stir mushrooms and tomato paste into beef mixture and cover and bake for another 30 minutes.
  13. If adding braised small onions (recipe below) mix them in once stew comes out of the oven

Do not freeze.
Bake for a total of 2 – 2.5 hours.

___________________________________________________________

Julia Child’s Braised Small Onion – Optional

INGREDIENTS:

18-24 small onions
1 and ½ tbsp. butter
1 and ½ tbsp. oil
½ cup brown stock, beef boullion, dry white wine or red wine
Salt and pepper
A medium herb bouquet tied in cheesecloth:
– 4 parsley sprigs
-1/2 a bay leaf
-1/2 tsp thyme

DIRECTIONS:

  1. Heat the butter and oil so they are bubbling in the skillet. Add onion.
  2. Sauté onions over moderate heat for about 10 minutes, rolling the onions around so they will brown as evenly as possible. Try not to break their skins
  3. Pour in the liquid, season to taste and add herb bouquet.
  4. Cover and simmer for 40-50 minutes, until liquid is evaporated and onions are perfectly tender but keep their shape.

Julie, Julie & Julia – The French Cooking Chronicles: Beurre Blanc (white butter sauce)

Update – I have added a new page! Please visit my new Recipe Index to view a full alphabetized list of all my recipes. This will make it easy to browse through every recipe ever posted on my blog.

Beurre Blanc with Halibut“The day there’s a meteorite heading towards the earth and you have 30 days to live, I’m going to spend it eating butter.” – Julie Powell from Julie & Julia

Hello everyone,

In case you haven’t noticed, butter seems to be a somewhat reoccurring theme in French cooking. I think this not-so-secret ingredient could be the secret ingredient in so many delicious things.

One of my favourite moments in Julie & Julia is Julie Powell’s expose about butter. Here is the clip:

Buerre Blanc

So in honour of butter, I decided to tackle beurre blanc (or white butter sauce) this week. Beurre blanc is a truly magical creamy butter sauce accented by the tangy flavours of white wine vinegar, lemon and/or wine. There is a scene in the movie where Julia and her husband Paul are swooning over the greatness of beurre blanc, and at that moment I knew I had to try making it for myself.

I decided to serve my beurre blanc with fish, but you could also try it with chicken or any vegetable. The simplicity of the meat or vegetable is key as you are really using either or as an excuse to eat beurre blanc. In this case, think of the fish as an accessory to the feature: your white butter  sauce.

While baking some asparagus in the oven, John took on the task of pan-frying the halibut, while I made the beurre blanc.

As you know, usually when you heat butter, it turns into a kind of oily, melted, clear substance. This is not what we are going for when we make the beurre blanc sauce. The key to beurre blanc is to heat the butter slowly so it maintains that magical creamy consistency.

I began by reducing the white wine vinegar, lemon juice and shallots into a kind of syrupy substance. Once I achieved this consistency, I melted cubes of cold butter into the pot, one by one, mixing very consistently and very slowly, waiting for each cube of butter to melt before adding the next. John was watching me and couldn’t help but grow impatient as I went through this disciplined task. I had to swat his hand away when he tried to sneak extra butter cubes into the pot to speed up the process. But my patience paid off, and the sauce was nice and creamy once I was done.

Don’t be afraid of attempting this sauce. It is actually not very hard to make. A little of patience is required to do this properly, but don’t worry – it is very easy!

We served our beurre blanc over pan-fried halibut on a bed of asparagus

TIPS:

  • Follow the instructions carefully. It seems like it will be tedious to melt in one cube of butter at a time, but I assure you, it’s less work then it seems. You don’t want to rush things and over-cook the butter!
  • We served our beurre blanc on halibut and asparagus, but try whatever white fish or vegetable you have on hand. .
  • Keep your fish simple! The beurre blanc is so delicious and tangy you don’t need to add much to your pan-fried fish fillets. John seasoned our halibut with only salt and pepper, and that’s all that was needed.

WARNING: DO NOT OVER-CONSUME!!!

There is a scene in Julie & Julia where we cut between Paris in the 1960s and New York in the 2000s. We view alternate shots of the husbands of Julia Child and Julie Powell reaching into the medicine cabinet for antacids. At first this scene just seemed comical, but after over-indulging in beurre blanc, I understand.

There is just over 1 cup of butter that goes into this recipe. To serve, John and I had doled out a reasonable amount over our fish. But when we started eating our beurre blanc, we freaked out and all self-control was lost (it was THAT good!) We went back to the pot and continued to serve the sauce to ourselves, ignoring the quantity which we devoured. When we looked in the pot, we saw that there was only a small amount left. Panic set in as we realized that we had shared a nearly a cup of butter between the two of us. This is not normal for John and I, and was  BAD NEWS.

As you can imagine, I did not feel so good for the rest of the evening – lesson learned.

Moral of the story – portion control! But don’t let this tale deter you from such a key life experience as enjoying beurre blanc. Just be sure not to over-indulge.

John and I agree that this is our new go to sauce. Yes, of course, we will make efforts not to over-do it next time, but I know for a fact this delicious sauce will find its way on to our plates in the near future. I can’t even describe how wonderful it is.

Beurre blanc is a truly delightful culinary experience! An easy dish that can be turned into a special and memorable dinner. Do yourself a favour and try it – I guarantee that it will be a meal you won’t forget!

(as Julia Child would say) Bon appetit!

Julie

Click here to view printable Word version of recipe:
Beurre Blanc

Other posts from Julie, Julie & Julia – The French Cooking Chronicles
Coq au Vin
Raspberry Bavarian Cream

_____________________________________________________________

Beurre Blanc – White butter sauce

By Julia Child

INGREDIENTS:

Step 1 ingredients: Flavour base
2 and ½ tbsp. white wine vinegar
2 and ½ tbsp. dry white wine, vermouth or lemon juice
1 tbsp very finely minced shallots or green onion
½ tsp salt
1/8 tsp white pepper
2 tbsp butter

Step 2 ingredients:
1 cup butter, cut into 16 cubes and chilled
Salt, pepper to taste
Lemon juice as needed

DIRECTIONS:

The trick is keeping the butter from becoming oily like melted butter. It must keep its creamy consistency. You can add more butter if you like, but if you use less than the flavour may be too acidic.

Prep: Start by cutting the 1 cup butter into 16 cubes.

  1. Boil step 1 ingredients: the liquid with shallots, seasonings and the 2 tbsp butter until reduced to a syrupy consistency. About 1.5 tbsp should remain
  2. Cut butter in cubes (16 pieces – do this in advance) Remove saucepan from heat and immediately beat in 2 pieces of chilled butter. As the butter softens and creams into the liquid, beat in another piece of butter. Set the saucepan over very low heat, and beating constantly continue adding each successive pieces of butter as each previous piece has almost creamed into the sauce. The sauce will be thick and ivory colored, the consistency of light hollandaise. Immediately remove from heat as soon as all the butter has been used. Beat in additional seasonings to taste.

Variation: Beurre Citron – Lemon butter sauce (try with  fish, asparagus, broccoli, cauliflower)

¼ cup lemon juice
1/8 tsp salt
Pinch of white pepper
½ cup butter  – cut into 8 pieces
2-3 tbsp hot vegetable stock or water

  1. Bowl down lemon juice with salt and pepper until it has reduced to 1 tbsp.
  2. Remove from heat and immediately beat in 2 pieces of chilled butter. Set over very low heat and beat in the rest of the butter a piece at a time. Immediately remove from heat.
  3. Just before serving, beat in the hot liquid by driblets to warm the sauce. Correct seasoning and serve in a barley warmed sauceboat.

Julie, Julie & Julia – The French Cooking Chronicles: Raspberry Bavarian Cream

All Desserts 1

 “The only time to eat diet food is when you’re waiting for the steak to cook.”
– Julia Child

Hello everyone,

After the successful release of her cookbook, Julia Child managed to win the hearts of Americans with her wit, charm and (as I have discovered as I google Julia Child quotes) her brilliant one-liners. You can’t help but fall in love with her infectious personality and genuine enthusiasm for cooking while watching clips of her cooking show The French Chef.

In true Meryl Streep fashion, she does a tip-top job of portraying Julia Child in Julie & Julia. Here is a great clip comparing Meryl’s portrayal with the real Julia:

My mom and I watched Julie & Julia a few years back for the first time. We were both so excited about French cooking after the movie that my brother and I decided to surprise my mom with a copy of Julia Child’s landmark cookbook “Mastering the Art of French Cooking” for her birthday.

I really wanted to take a crack at one of Julia’s desserts for this series. In the movie, there is a shot of this lovely and delicious-looking pink creamy thing that Julie Powell refers to as raspberry Bavarian cream. Based on this brief clip, that is what I decided I wanted to make. My mom and I cracked open the cookbook and saw recipes for many different types of Bavarian creams, including orange and almond, but we had to opt for the lovely pink raspberry version.

CookbookAs I learned reading through Julia’s recipe, Bavarian cream is similar to a custard but thickened with gelatin and lightened with whipped cream. The recipe is fairly intricate and specific, with many precise steps. My mom and I sometime shy away from recipes that are on the finicky side, but for the sake of this French cooking series we were up for the challenge! We did our best to follow the directions as closely as possible. The hardest part was determining when the custard mixture had adequately thickened over the heat. Like hollandaise sauce, you don’t want to over-heat the custard or the eggs will scramble and ruin everything (your mood, your dessert, your weekend, etc.) We didn’t have a candy thermometer on hand, so we awkwardly poked a meat thermometer into the custard trying to get a temperature to register in a timely manner. Navigating elevated levels of stress through this process, we removed the custard from the heat just on time!

Julia’s instructions called to gel the dessert in a mold before serving (I’ve included these instructions as well) but we decided to pour the dessert directly into the dessert bowls before letting them cool in the fridge. I thought the final product looked just lovely!

Bavarian Cream 2TIPS

  • As mentioned above, be very careful when thickening the custard over the heat. I would suggest using a candy thermometer.
  • Be sure to follow the steps very carefully. The intricate steps may not make much sense at times, but there is method to the madness – have faith in Julia.
  • Make sure the raspberry puree is mixed nicely through the dish. We didn’t do this very well, and I ended up with quite the raspberry jackpot in my serving at the expense of everyone else!

The attached recipe is pretty much Julia Child’s, but I reworded some of the directions. This is my attempt to make it as simple as possible while still emphasizing Julia’s technique.

The dessert turned out great – nice and light, and not too sweet. Or at least I think it turned out great – I had never had Bavarian cream before so am not exactly sure what Bavarian cream is supposed to taste like so there is a chance this was completely botched. Botched or perfect, I enjoyed it (and it looks  so pretty!) But I won’t deny it, this dessert took some work and patience. But give it a try, just follow the steps carefully and see what happens!

(as Julia Child would say) Bon appetit,

Julie

Click here to view printable Word version of recipe:
Raspberry Bavarian Cream

Other posts from the Julie, Julie & Julia – The French Cooking Chronicles
Coq au Vin
Beurre Blanc

_______________________________________________________________

Raspberry Bavarian Cream

INGREDIENTS:

500 grams frozen raspberries in light syrup
1 ½ Tbsp gelatin
½ cup whipping cream
5 eggs separated
2 tsp cornstarch
1 ½ cups boiling milk
1 cup + 1TBSP white sugar

Raspberries to garnish

DIRECTIONS:

  1. Thaw frozen raspberries. Reserve ½ cup liquid. Pour reserved liquid in bowl and sprinkle with gelatin. Set aside.
  2. Put remaining raspberries through a sieve to remove excess liquid. Reserve ¾ – 1 cup of the berries for the main dessert.
  3. Whip the cream until it doubles in volume. Set aside.
  4. Separate eggs.
  5. Whip egg whites to soft peaks. Add 1 tbsp of sugar and whip to firm peaks. Set aside.
  6. Custard:
    a. In a medium mixing bowl, beat egg yolks with electric mixer.
    b. Slowly add the sugar, beating continuously for a total of 2-3 minutes until mixture is pale yellow and forms a ribbon.
    c. Beat in cornstarch.
    d. Heat milk to boil on the stove. Pour milk into egg yolk mixture in a thin stream of droplets, beating as you pour (so as to not cook the eggs).
    e. Pour mixture into saucepan and set over medium heat, stirring constantly until wooden spoon coats lightly. This happens around 170 degrees – you can use a candy thermometer. Do not overcook or egg yolks will scramble. Remove from heat.
  7. While still hot in saucepan, quickly beat raspberry-gelatin mixture into custard until gelatin is completely dissolved.
  8. Transfer mixture to a mixing bowl.
  9. Using a rubber spatula, delicately fold in the egg whites. Set over ice. Fold mixture with spatula frequently while mixture is cooling to keep it from separating.
  10. When mixture is cold and not quite set, fold in the whipped cream and measured raspberry puree.
  11. Rinse mold. Turn mixture into mold, cover with wax paper and chill 3-4 hours or overnight. Alternatively, pour into dessert bowls and chill.
  12. When removing dessert from mold, dip mold into hot water for 1 second. Run knife along edge of mold and then invert onto chilled serving platter.
  13. Garnish with raspberries

Julie, Julie & Julia – The French Cooking Chronicles: Coq au Vin (chicken and red wine stew)

Coq au Vin

“I could write a blog. I have thoughts.” Julie Powell from the movie Julie & Julia (2009)

Hello everyone,

Have you seen the charming 2009 movie Julie & Julia?

Well I have, several times, and it has inspired me on more than one level.

Based on two true stories, the movie follows two characters. The first (played by Meryl Streep) is the famous Julia Child, the woman who brought French cooking to America in the 1960s. Set primarily in Paris, the film documents Julia’s pursuit to learn French cooking. Julia discovers a passion for cooking in her life as she battles language barriers and many doubters in a man’s world as she hones her craft. Julia goes on to co-author her masterpiece “Mastering the Art of French Cooking,” the brilliant and timeless cookbook that would later bring French cooking to America.

Now fast forward to modern day New York where Julie Powell (played by Amy Adams) is an aspiring writer and avid cook. Julie decided to challenge herself as she attempts to create and complete all 500+ recipes in Julia Child’s cookbook in a single year, all the while blogging about her journey. Julie captures and blogs about her successes, meltdowns and the personal connection she feels with Julia Child as she completes this daunting task. (This very very daunting task.)

A movie about French cooking? And blogging about French cooking? And the obvious fact we all have the same/similar first names? It’s like it was made just for me!

I, the other Julie, French cuisine lover and food-blogger, can’t help but be inspired by Julie and Julia as I look up to the accomplishments of these two women.

I have enjoyed cooking French cuisine from time to time, so I thought it would be fun to do a little French cooking to share with you! So get ready – I am embarking on a series dedicated to Julia Child, Julie Powell and a love for French cuisine.

Watching the movie, you can’t help but salivate at all the wonderful French dishes that these two ladies create. All the dishes I will be doing for this series are either featured, discussed or mentioned in the movie.

So let’s get started with part 1 – the French classic Coq au Vin

Coq au Vin

Coq au vin combines chicken with all the good things in the world. And all the good things in the world happen to be wine, butter and bacon. Kudos to the French for recognizing these three wonderful ingredients and using them to their full potential in their cuisine. Yes, of course there are other ingredients in this dish (mushrooms, carrots, thyme etc.) but let’s face it, there are really only three that matter.

One thing I love about this dish is the simplicity. I have been making this dish for a while now, and the prep is quick, and the dish is nice and easy. The recipe I typically use is not Julia Child’s recipe. The one I use is a quicker and simpler version. I like it as it is less fussy when I want dinner on the table – I can be practical that way. But if you’re feeling ambitious you can easily find her version online of course!

TIPS:

  • Serve with roasted or mashed potatoes
  • Try substituting the dried thyme with herbs du province. The lavender in the herbs du provance blend is a lovely touch
  • I would suggest enjoying a glass of red wine from the bottle you just opened for the recipe – a nice way to enjoy yourself while your coq au vin is simmering!

Herb/Spice of the week:

HERBS DU PROVANCE
A French herb blend that changes depending on who makes it. I find it is a great substitute for thyme for many recipes. The key for me is the lavender in the blend. This powerful herb only needs to be added in very tiny amounts to taste its unique and exciting flavour. Try roasted your potatoes in herbs du province.

So this is only the beginning! Get ready to tickle your taste buds with the help of Julie, Julie & Julia, as I take you on a French cooking adventure!

(as Julia Child would say) Bon appetit!

Julie

Click here to view printable Word version of recipe:
Coq au Vin

Other posts from the Julie, Julie & Julia – The French Cooking Chronicles:
Raspberry Bavarian Cream
Beurre Blanc

__________________________________________________________________

Coq au Vin

INGREDIENTS:

1 tbsp olive oil
1 tbsp butter
8-12 boneless skinless chicken thighs
4 slices of bacon, cut into pieces
1 onion chopped
2-4 carrots
2 cloves garlic, minced
Salt and pepper
1 tsp dried thyme/herbs du province
1 bay leaf
1 and 3/4 cup chicken stock
1 cup red wine
10 mushrooms quartered
Butter
1-2 tbsp tomato paste
Parsley for garnish

DIRECTIONS:

1. In Dutch oven, brown chicken in oil and butter. Remove and put aside.
2. Saute bacon until crisp. Add onions, garlic, carrots, salt, pepper, thyme/herbs du provance and bay leaf.
3. Add chicken. Add chicken stock and wine. Bring to a boil. Cover, reduce heat and simmer for 30-45 minutes..
4. While dish is simmering, saute mushrooms in butter.
5. After timer is done, add mushrooms, and tomato paste. Simmer 15-20 minutes more.
6. Garnish with parsley.

Serve with roasted or mashed potatoes

A Flashback to Summer: Jamaican Peas and Rice

Jamaican

Jamaican

Hello everyone,

For those of you living in Edmonton and area, you are probably basking in the unseasonable warmth of the delightful weather we are having. It feels as though spring has sprung at the end of January here, with sunshine and slush adorning the streets. If you’re like me, this nice spell has certainly lifted your spirits.

Unfortunately, we know in our Canadian hearts that this weather bliss will be short-lived. With February upon us, another bone-chilling eyelash-frosting cold snap is well on its way.

So I want to take advantage of this false spring by looking forward to the summer – and the best way to look forward to the summer is to look back at last summer! In the name of sunshine and good times, this week we are going to look back to a wonderful Jamaican barbecue that we had at my cabin last summer.

Summer Memories

To me, the lake is summer. Boat rides, sunshine, camp fires, sing-alongs, and laughs with family and good friends are always punctuated by the elaborate and fantastic barbecues we all share together. Doesn’t that sound nice?

One of my favourite meals we had last year was a Jamaican themed barbecue. What is always great at the cabin is how everyone participates. We planned a somewhat ambitious Jamaican feast. My mom took care of the classic coleslaw, and I made the peas and rice (this week’s recipe!) I helped Steven with the Jamaican jerk marinade, and he took the helm barbecuing the pork and pineapple. Steve’ s buddies, Colin and Joachim, who are frequent fliers out at the cabin, took on the task of making festival dumplings(Love the name, eh?) The two of them diligently stood over the hot stove deep-frying delicious little balls of dough, not complaining for a second about being assigned the messy task that no one else really wants to do – thanks boys! It’s always a blast when everyone chips in for dinner, which turns cooking from a chore to a fun group activity.

So this week’s recipe is the side that I made, peas and rice (aka rice and peas.) My understanding is that peas and rice is a traditional Sunday lunch in Jamaica. Surprisingly, this dish contains no peas at all. I’m sure all kinds of beans or legumes could be used, but I have chosen kidney beans for my recipe. (The rice and beans combine to form a complete protein making this a great vegetarian option too– Yeah!)

I simply love this recipe – the nice flavours of all spice, coconut milk and the scotch bonnet pepper are oh so delicious. Yes, we did make it for our Jamaican themed barbecue, but I like to make this as a side for any barbecue or occasion for that matter, as an alternative to your regular boring rice!

TIPS:

– If you can’t find a scotch bonnet pepper, I would suggest a jalapeno or habanero.

– Try substituting brown rice for white

Spice/herb of the week:

ALL SPICE
What do pumpkin pie and Jamaican jerk marinade have in common? Answer – All spice! You never know when a recipe will call for this strange but delicious spice.

So with the weather all nice, maybe take the opportunity to fire up your grill and serve some peas and rice on the side. Here’s to looking back at the last summer and looking forward to the next! Come on guys, we can get through the winter!

Bon appetit,

Julie

Click here to view printable Word version of recipe:
Peas and Rice

_____________________________________________________

Peas and Rice

INGREDIENTS:
1 can kidney beans, drained and rinsed
1 can (14 oz) coconut milk
Water (approx.. 2 and 1/4 cups)
Total liquid, coconut milk + water should equal 4 cups
2 cloves garlic, chopped
1 small onion or 2-3 green onions, chopped
1 tsp dried thyme
2 cups long grain white rice (alternatively use brown, see bottom)
½ tsp ground all spice
1 scotch bonnet pepper – left whole
Salt and pepper to taste
INGREDIENTS:
1. Heat large pot. Add garlic and chopped onion and saute for a few minutes.
2. Add liquid, rice and all other ingredients, and bring to a boil.
3. Turn heat to medium-low, and cook covered until all water is absorbed (about 15 to 20 min).
5. Fluff with fork before serving.

*If you choose brown rice instead of white rice, add an extra 1 cup water and cook 35-40 minutes

Fatoush: A Delightful Lebanese Salad

Fatoush

Hello everyone,

So what is a fatoush you might be wondering?

Fatoush is a wonderful Lebanese salad. Full of many different types of veggies, enhanced by the flavours of green onions, parsley and mint, and the wonderful crunch of baked pita. The flavourful dressing offers the taste of lemon and garlic, and other wonderful herbs and spices (we will get to this later!)

I was first introduced to fatoush by my mom, who is always trying interesting and sometimes adventurous new salads. I remember making it together, and falling in love with the crunch of the pita and unique herb flavours this salad has to offer. Admittedly, this salad is a little labour intensive (but so worth it) and to this day I love to make it when I have company.

When dining out on Lebanese food, this is a salad I love to order, and will usually demolish an entire order to myself.

So after the holiday binge eating fest, I thought it would be nice to share such a wonderful healthy and refreshing salad with you.

Now for the dressing:

The key ingredient for the traditional dressing for fatoush is sumac. As I only learned of sumac’s existence months ago, I don’t even have any in my spice rack yet, so I have decided to present some alternatives on how to make this dressing (all included in the attached recipe.) Apart from the base ingredients of lemon juice, olive oil, garlic, salt and pepper, here are 4 dressing alternatives you can try:

Option 1: 2 tsp sumac
As mentioned above, this is the traditional way to make the dressing. I must confess that I have yet to make it this way myself, but based on the assumption that sumac is used in the restaurant fatoush salads I have eaten, I’m sure it would be delicious!

Option 2: 2 tbsp Za’atar
As many of you may know, I have a passionate love for za’atar. And it just so happens that the key ingredients in za’atar is sumac. So I thought I would try my luck using za’atar in my fatoush dressing, and the result was wonderful!

Option 3: ¼ tsp cinnamon and ¼ tsp all spice
This is how I made the dressing before I had za’atar. A very unique and delicious combination of spices to try.

Option 4: Leave out the herbs and spices
If you aren’t into the all spice and cinnamon, and don’t have access to sumac or za’atar, just leave out the herbs and spices – the garlic and lemon flavours will carry the dressing nicely!

TIPS:

  • Crumble the toasted pita into the salad right before serving, so the pita doesn’t get soggy
  • I love this salad for lunch the next day, so remove some before dressing to eat the next day if you like!

So next time you want to impress your guests with a salad that Is new and exciting, give fatoush a shot.

Thanks to Lori for the lovely picture!

Bon appetit,

Julie

Click here to view the printable Word version:
Fatoush

___________________________________________________

Fatoush Salad

Serves 4-6

Ingredients:

1 / 2 english cucumber diced

1 red pepper thinly sliced

1 cup green onion thinly sliced

1 / 2 cup sliced radishes

1 and 1 / 2 cup chopped parsley

1 / 4 cup fresh mint chopped

2-3 tomatoes diced

2 cups romaine lettuce (chopped or torn)

Pitas:

2 pitas oven toasted
-separate, brush with olive oil and put in oven at 350 degrees for 10 minutes
Crumble into salad before serving

Dressing ingredients:
2 cloves garlic
1 / 2 tsp salt
1 / 4 cup fresh lemon juice (1 full lemon juiced)
1 / 2 cup olive oil
pepper to taste

2 tsp sumac
or
1tbsp za’atar
or
1 / 4 tsp cinnamon and 1 / 4 tsp all spice
or
Leave out herbs and spices
*Note: if you can’t eat the whole thing dress only what you want. And don’t put all the pitas in until you serve it.

Best of 2014

Hello everyone,

As many of you know, I started Julie’s Kitchen Adventures back in February of 2014 as a much more informal recipe of the week email. But thanks to encouragement from friends and family, in September 2014 I decided to make it official and start this blog.

To me, this blog is kind of like a diary, recording all of my tasty memories with friends and family that I experience over the year.  And oh there were so many!

So I thought to wrap up 2014, I would share with everyone what my personal favourites (not necessarily most popular) posts were over the year. Now picking favourite posts is a challenging thing to do, as each edition and recipe holds a special place in my heart. Ideally, I would like to give you a top 40 list to browse, however to spare you from such tedium, I painstakingly selected my top 6 (arbitrary number)  from the year. I tried to choose a variety of posts in the top 6 that incorporate all the things that made my year special – good times with friends and family, wonderful travel and of course some tasty memories. So here they are, in no particular order:

  1. Fall Harvest: Buttercup Squash Soup and Buttercup Squash Pie

The buttercup squash edition is a homage to the vined plant that took over a large part of our yard last summer, littering the yard with tasty buttercup squashes. This was my first time every eating buttercup squash, and I immediately fell in love with the tasty soup and pie I made from the squash. John, always a lover of pumpkin pie, claims to this day that the homemade buttercup squash pie is his favourite dessert of all time.

It just so happens that this edition also was my most popular post of 2014!

  1. Deep South Part 4: Natchez, Mississippi and Fried Chicken with Biscuits

The fourth and final installment of the deep south road trip that John and I took this October had to boast the most fantastic meal of the 4 deep south blog posts. The small town feel, great Mississippi River, antebellum homes, gospel music and tasty southern cooking we experienced in Natchez Mississippi pretty much sums up what our trip was all about. The fried chicken and biscuits we made when we got home were so glorious and delicious that I know I will remember that day for a very long time.

  1. Garden with the Grandma’s and Quick Tomato Recipes

Having both of my grandmothers over to see my garden one afternoon was something special indeed. To have both these women who have meant so much in my life come and share their passion of gardening with me was something I will always remember.

The three tomato recipes to accompany this afternoon were great too! My personal favourite are the classic fried green tomatoes, a must try during gardening season when the green tomatoes are for the pickin’.

  1. John’ Smoked BBQ Ribs

Like my own recipes, it was hard to pick one of John’s many succulent BBQ delicacies as the best.

In John’s quest to master the art of BBQ and smoking, this year’s highlight had to come when he dazzled his family with a massive and memorable feast featuring smoked sausage, brisket and of course John’s ribs. It was indeed a memorable family barbecue where John amazed his guests with his barbecue prowess. It was a joy for John and I to host and share this experience with his family.

With all this wonderful BBQ available in my own home, I have to admit I’m a bit spoiled!

  1. Wood Fire Pizza: Mediterranean Pizza

The ability to make wood-fire pizza at home has changed our lives forever, as we never will look at pizza the same. The pizza night described in this post was a night to remember as it was our first crack at wood fire pizza. 5 different pizzas made with our good friends and frequent food collaborators Cody and Jackie started something special that night. We have been making wood-fire pizza ever since, but this is where the love-affair started!

6. Mother’s Day Special: Eggs Benedict with Hollondaise Sauce

This was a very special day for me, as my brother and I had the chance to make my mom a meal together for Mother’s day. I’m proud of my little brother who is really throwing himself into the culinary arts, and I am always impressed with his creativity and adventurous attitude when it comes to trying and creating new dishes. It was a treat to be able to cook for my mom on mother’s day, and the three of us had a wonderful time and many laughs making this timeless classic together at the cabin!

So there you have it, my top 6 for 2014! Special thanks to everyone who has been following my blog over the year, and I look forward to sharing more tasty experiences with you in 2015!

Bon appetit,

Julie

Carne Asada with Salsa Verde (Grilled Beef Tacos with fresh Green Salsa)

Grilled Beef Taco

Carne Asada

Hello everyone,

So for those of you who have been following this blog for a while, you will know that John and I share a special passion for Mexican food. Between our Mexican gourmet club dinner, Casa Bonita and our dedicated pursuit for Mexican grocery stores in Edmonton, we are fully committed to Mexican food at home. We have also travelled to Mexico numerous times together, where we don’t take our eating lightly. We make a point of trying as many different Mexican restaurants as possible during our travels, whether it’s a lovely sea-side Mexican restaurant at the shores of Mazatlan, Tex Mex in Austin, or the wonderful selection of Mexican and “Fresh Mex” restaurants that are to be found in the desert states throughout the United States. We are always on the lookout.

John and I have found in searching for the best Mexican food, it’s important not to judge a book by it’s cover. The best we have had to date was in a little hole in the wall in Carlsbad CA, a restaurant with authentic Mexican flair and the best selection of Tequila we had ever seen. We still revel in the memory of the delightful Yukatan pork we were served that night. On the other hand, this not judging a book by it’s cover tactic can back-fire, as the dilapidated open-24-hours Ruberto’s in Montana employing one very tired looking cook with over 60 menu options served us the worst we have ever had.

Carne Asada

One thing John and I really enjoy are the fresh grilled beef tacos, known as Carne Asada (translation: grilled meat.) We decided to try our hand at this Mexican delicacy.

SpreadFirst we had to find some key ingredients. As you may know, our preferred brand of Mexican hot sauce is Valentina’s. So it will be important to have a bottle at hand for your Carne Asada tacos. (If you can’t find Valentina’s, Chalula’s is a viable alternative.) Second, you want to make sure you have corn tortillas. You can usually find your soft corn tortillas at most grocery stores, but as mentioned above, John and I quite enjoy our Mexican grocery stores. At our favourite in Edmonton, Argyle Foods, we like to purchase our corn tortillas as well as our beloved Valentina’s hot sauce.

You can probably use many different cuts of beef for your tacos, but John and I like the flank steak, a steak that is great for marinating. Make your marinade and marinade your steak for at least one hour before grilling.

Prepare all of your toppings. We like to use fresh onions, grated cheese, cilantro, Valentina’s hot sauce. and salsa verde (see below.) Heat your tortillas and serve!

TIPS for Carne Asada:

  • Grill your flank steak however you like, John and I prefer medium rare
  • Be sure to cut your flanks steak with the grain when serving
  • Have fun with your topping! The attached recipe is just suggestions but use whatever you like

Salsa Verde

Salsa Verde

Salsa Verde

Last year, John and I planted a tomatillo plant in our garden. To our amazement, our plant thrived, producing dozens of tomatillos. Now we were faced with the problem of how we were going to use up 30+ tomatillos!

A tomatillo is a rather strange fruit (or vegetable?) It has a husk like corn that has to be removed. It is about the size and shape of a tomato. The inside is fresh and crispy, with the consistency somewhat like and apple. The flavour? It is unique and tart, fresh with a hint of lime.

So for our grilled beef tacos, I decided to take a crack at making a salsa verde, the green salsa that is often used as a garnish on tacos. It just so happens that the key ingredient is tomatillos.

I removed the husk from the tomatillos, and washed the sticky surface. I put a couple in my magic bullet with garlic, jalapenos, cilantro, pepper and salt. The result was amazing, a fresh and tangy salsa that was a perfect garnish for our tacos.

TIPS for Salsa Verde:

  • Careful when using the fresh jalapenos, as a small amount of variance in the amount of pepper and seeds use can have a large impact on the heat of your salsa verde. I would suggest you start with between ¼ to 1/3 of the pepper with seeds removed, and add more to taste.
  • Add more salt or other ingredients to taste

TomatillosIngredient I can’t live without:

TOMATILLOS

These strange fruits in your salsa verde will be the star of your Mexican meal. Turns out they freeze well too!

The delicious combination of the tender marinated flank steak goes just right with the tangy and spicy salsa verde. This wonderful and fun Mexican feast will take your taco night to the next level.

Bon appetit,

Julie

Click here to view printable Word version of recipe:
Carne Asada Tacos with Fresh Salsa Verde

____________________________________________________________

Carne Asada – Grilled Beef Tacos

INGREDIENTS:

Flank steak

Corn tortillas
Grated cheese
Sweet onion, thinly sliced
Salsa verde – see recipe below
Mexican Style hot sauce (Valentina’s)
Cilantro

Marinade:

Juice of 1 orange
Juice of 2 limes
2 tbsp white vinegar
1/3 cup olive oil
1 tsp cumin
1 jalapeno, minced
3 cloves garlic, minced
Cilantro, finely chopped

DIRECTIONS:

Marinade flank steak for at least an hour.
Grill steak to medium rare. To serve, slice steak into thin strips, slicing across the grain.

Heat tortillas before serving – microwave or fry
Garnish with onion, grated cheese, salsa verde and hot sauce of choice (Try Valentina’s or Chalula’s)

Fresh Salsa Verde

Serves 3-4

3 tomatillos
1 tbsp minced jalapeno
2 cloves garlic
Cilantro
Salt

Blend all ingredients together. IF you want it hotter, add more jalapeno.

Oven-Roasted Chestnuts

Oven Roasted Chestnuts“Chestnuts roasting on an open fire

Jackfrost nipping at your nose”

Tis’ the season for Christmas delicacies! Like most of us, I have known the lyrics to “The Christmas Song” for most of my life, with that classic opening line “Chestnuts roasting on an open fire.” But despite this, I had never tried roasted chestnuts!

Last year, I was at John’s parent’s house, and one evening, they casually roasted some chestnuts. Little did I know of treat was in store for me. They brought them out of the oven, and put them on a tray for everyone in the house to enjoy and a feeding frenzy ensued, with all participants munching on these delightful little chestnuts like a pack of rabid squirrels.

Ok so, I exaggerated a little, everyone was a lot more classy then a pack of rabid squirrels in their chestnut eating. With chestnuts so new and exciting to me, I was guilty of being the rabid squirrel of the bunch, throwing caution to the wind and devouring more then my share of the warm oven-roasted Christmas treat in a less then classy manner.

Turns out that roasting chestnuts has been a tradition in both sides of John’s family for years. So this week, I have decided to share this wonderful tradition with you, so you too can enjoy this Christmas treat! Eating them is always fun too, as everyone gathers around and it becomes quite the engaging social event.

Now you could do as the Christmas Song suggests, and roast your chestnuts over an open fire. However, most of us don’t have the resources, especially with all the gas fire places out there. I’m sure John and I will eventually try our hand at roasting chestnuts on the open fire, but for today, we will keep it simple with oven-roasted chestnuts.

There are four steps to roasting chestnuts: Selection, preparation, roasting and of course eating.

Step 1: Selection

This is a very important step, as the quality of chestnuts could vary greatly depending on the batch you have at hand. Select bad chestnuts, and they will dry and moldy, not so good. Select the good fresh chestnuts, and they will be much tastier. John’s uncle Tom is the expert in selection, and gave John and I a tutorial on how to pick the good ones from the bad once we brought them home. This is what we learned:

In the case of chestnut selection, look for healthier shiny shells as opposed to wrinkly ones. Go by feel and squeeze each chestnut, assessing the firmness. Firm, heavy chestnuts are the good ones. The chestnuts with drier, papery skin aren’t so good, you can feel that the nut has shrunken in the shell, as there is space between the shell and the nut when you squeeze. Do not eat these bad ones, they could be moldy.

Cutting the Chestnuts
Step 2: Preparation

John’s mom showed me this step. You have to cut the chestnuts at the midway point, about ¾ of the way down before roasting. This will allow you to easily crack them in half when eating them. Use a sharp knife and cut them right down the middle, so the two sides are still together. (See photo left)

Step 3: Roasting

Roast in the oven at 400 F for 20-30 minutes until chestnuts are soft.

Step 4: Eating

In the best step of all, simply break your chestnuts in half down the pre-cut line, and peel of the skin to reveal the tender and delicious gem inside. Eat chestnut and repeat step 4, over and over again.

I’m sure there is a store, perhaps a European market,  wherever you live where you can find these babies, so next time you cross paths with some chestnuts, buy a bundle and try your hand at roasting. You won’t be disappointed!

Special thanks to John’s family for sharing this special Christmas experience with me!

Season’s Greetings!

Julie

Click here to view printable version of recipe:
Oven Roasted Chestnuts

___________________________________________________________

Oven-Roasted Chestnuts

INGREDIENTS:

Chestnuts

DIRECTIONS:

  1. Select Chestnuts

Look for healthier shiny shells as opposed to wrinkly ones. Select Chestnuts with hard firm shells. Discard chestnuts with thinner, papery shell, where space exists between the shell and the nut inside.

  1. Prepare by cutting

At midway point in nuts, cut about ¾ of the way down, ensuring that two halves are still together.

  1. Roasting

Roast at 400 degrees F for 20-30 minutes.

Sweet Potatoes vs. Yams: Chorizo Sausage and Sweet Potato Soup

Soup in Bowl IIHello everyone,

Sweet Potatoes vs. Yams

So I have been very confused all these years. I was always under the impression that those nice big tasty orange-fleshed potato-like thingies at the grocery stores were yams, while the smaller long white-fleshed sweet tasting potato-like thingies were sweet potatoes. I always looked forward to enjoying some candied yams at Thanksgiving, but why oh why are the orange coloured French fries at restaurants always listed on the menu as sweet potato fries? So confusing!

So I finally decided to get to the bottom of this conundrum. I opened up my computer and googled “What is the difference between sweet potatoes and yams?” After about 3 minutes of very non-intense research, I discovered that yams and sweet potatoes are not much alike. Yams are big and starchy, and there is a good chance you have never eaten one in your life, and sweet potatoes come in many different colours of flesh, from white to yellow to orange – these are likely what you see in your grocery store.

This research seemed sufficient to me, and I got bored and decided to go eat some chocolate. If you are looking for a better description of the differences between yams and sweet potatoes, then this is not the post for you.

Now that I have nearly bored you to death, it’s time for an exciting sweet potato recipe! I got this recipe from my brother a while back, and added a few twists of my own. Today we will be making a chorizo sausage and sweet potato soup.

My favourite part of this soup is the simple yet flavourful seasoning – all the soup calls for is 1 tbsp of curry powder. Between the spicy sausage, the sweet potatoes and hearty chickpeas, this soup will fill your stomach and warm your soul. Great on its own as a full meal.

Soup in PotTIPS

  • Use orange-fleshed sweet potatoes (formerly yams) as opposed to the white-fleshed ones
  • Once you have added the vegetable mixture to the broth in your pot, be sure to blend at least half, depending on how smooth or chunky you would like your soup. I like to blend about half myself.
  • If you have a hand blender, use this device to blend your vegetables directly in the pot. If not, use a food processor or blender.
  • Try cutting out the sausages and going vegetarian, add a little more of the red pepper/chili flakes to make up for the absence of the spicy sausage
  • This soup freezes wonderfully

Ingredient I can’t live without:

SWEET POTATOES (not YAMS)
Now that I have finally figured out that I have been eating sweet potatoes rather than yams all these years, I can safely say I wouldn’t be able to live without them. We all know the classic candied sweet potatoes or sweet potato fries, but I find myself using these tasty tubers to bolster many  curries – Indian or Thai – with a dose of heartiness (and fiber!)

This soup is pretty simple, but I think you will be surprised how delicious and satisfying it is. Give it a try – you won’t have any regrets!

Special thanks to Steven for sharing the original recipe with me! I added my own twists and turns to make it just a little better.

Bon appetit,

Julie

Click here to view printable Word version of recipe:
Chorizo Sausage and Sweet Potato Soup

___________________________________________________________

Chorizo and Sweet Potato Soup

Ingredients:

2 chorizo sausages, halved lengthwise and sliced
1 onion, finely chopped
2 cloves garlic, minced
2 ribs celery, finely chopped
2 carrots, chopped
2 medium orange-fleshed sweet potatoes
1 heaping tbsp curry powder
1 can chickpeas, drained
1L chicken broth + more if needed
Salt and pepper to taste
½ tsp chili or red pepper flakes (optional)

DIRECTIONS:

  1. Slowly heat about 2 cups of broth in your soup pot.
  2. In a large frying pan, sauté onion and garlic. Add celery and carrots and sauté for a few more minutes.
  3. Add sweet potatoes to pan and sauté until they start to soften a little. Add curry powder and mix throughout vegetables while heating.
  4. Add vegetable mixture to soup pot.
  5. In frying pan, add chorizo sausage, and cook for a few minutes.
  6. While chorizo is cooking, add at least ½ of vegetable mixture with liquid into a food processor or blender, and blend until smooth. Alternatively, you can use a hand blender right in the soup pot. You can choose to blend some or all of the vegetables, depending on how chunky you want your soup.
  7. Return blended vegetables to pot, and add chorizo sausage. Add chickpeas.
  8. Add remained of chicken broth, and more if needed, until desired consistency is reached. I used an additional 2 cups on top of the 1L.
  9. Add red pepper flakes and salt and pepper to taste.
  10. Simmer for about 20 minutes.