Charcuterie: John’s Applewood Smoked Cheddar

Applewood Smoked Cheddar 2

Hello everyone!

John and I had the most wonderful wine and cheese night, I thought I would share with you some of the delicious cheeses, meats and breads we enjoyed.

John really was the head chef and master mind of the whole thing. He prepared the bread, and artistically arranged the platters in a manner I am simply not capable of.

WINE AND OLIVES

Wine and olives are a must for a charcuterie night. We chose red wine for the occasion, accompanied with sun-dried tomato olives.

BREADS

John cut French bread into slices and basted them with olive oil and either herbs du province or za’atar. The bread was served with our four pepper jelly we purchased in Louisiana, or dipped In fig balsamaic vinegar and olive oil.

MEATS

John did such a wonderful job arranging the meats. We had Canadian prosciutto, cappricollo and mortadella. Mortadella is like fancy bologna, and I adore my fancy bologna. We also wrapped cheese with the prosciutto and baked it in the oven. It was good, but we found that we preferred the uncooked version.

CHEESE

The cheese had to be the highlight of our evening. We tried a couple of interesting varieties. We started with the aged Prima Donna, a strong and salty cheese. We spoiled ourselves with the cave-aged swiss gruyere. Yes, it was actually aged in a cave. John has been caving before, so I was wondering if he thought it tasted like cave. I was disappointed when he said it didn’t. He said don’t be disappointed, you wouldn’t want it to taste like cave anyways.

The best (and today’s recipe) was John’s apple wood smoked cheddar. We purchased a block of the best old cheddar we could find at Costco, and John cold-smoked it for an hour with apple wood. He cut it into pieces, dusted it with paprika and vacuum packed the pieces. After ageing for about 2 weeks, it boasts a subtle smokiness that accents the cheese just right.

TIPS:

  • If you don’t have a cold smoker, this can be done with the A-MAZE-N tube smoker
  • We like a subtle smoke flavour, and John smokes the cheese for an hour. If you want a smokier flavour, you can smoke it for longer. But be careful, if you smoke too long, you will experience a bitter tarry flavour that is no good at all
  • Make sure you cold smoke your cheddar on a cooler day so the cheese doesn’t melt in the heat of the sun. Alternatively, you can put a block of ice in your smoker.
  • The quality of the cheddar will affect your final product. Opt for the best white cheddar you can find in your budget
  • Once vacuumed pack, the smoked cheese will keep in your fridge for months. Alternatively, wrap inn saran wrap

There is nothing like home-smoked cheddar to make your charcuterie night extra special!

Bon appetit,

Julie

Click here to view printable word version of recipe:
John’s Applewood Smoked Cheddar

___________________________________________________________________

John’s Applewood Smoked Cheddar

YOU WILL NEED:

Block of extra-old white cheddar, the best quality you can buy
A cold smoking device, such as a Bradley smoker or an A-MAZE-N tube smoker
Applewood (or Applewood pellets for the A-MAZE-N tube smoker)
Paprika
Vacuum packer or saran wrap

DIRECTIONS:

Be sure to smoke your cheese on a cool day so the heat of the sun doesn’t melt it. If not, put a block of ice in your smoker.

Light smoker as per directions
Smoke block of cheese for one hour. If you are using the amazing tube smoker, smoke in a barbecue. Have the barbecue off and place the tube smoker on the opposite side of your cheese.

Cut cheese into blocks. Dust with paprika.
Vacuum pack or saran wrap blocks.
Let age for two weeks in refrigerator.

Don’t over-smoke, or your cheese will have a bitter, tarry flavour.

Wood-Fire Pizza: Asparagus and Prosciutto Pizza

Pizza Served

Hello everyone,

I have this problem with pizza night. I always tell myself that I will eat a MAXIMUM of three slices. But when the pizza is served, I say “oh, well those three slices were kind of small, I guess I can have another.” And after the fourth I say “well, I already had four, at this point a fifth is a drop in the bucket.” And finally, “hmmm there are only two slices left, one for me and one for John, no point in just having one slice left over,” followed by a swift om nom nom.

This seriously happens every time.

What doesn’t help my problem is that we have been buying fresh dough for our crust, experimenting with some exciting ingredients and cooking the pizzas on John’s charcoal grill. All of these components add up to around 6 slices of pizza to be consumed by yours truly. .

The wood fire taste from cooking the pizza on John’s grill is something special indeed. But if you don’t have a grill that can accommodate a pizza, this pizza will of course turn out just great in the oven!

This week, John and I had fun with our asparagus prosciutto pizza. The salty prosciutto and the flavourful asparagus are accented by red pepper and sliced garlic. Once you have cooked your pizza, top with Parmesan cheese!

TIPS:

  • Decide how many pizzas you think you need for dinner and add one more. You will regret if you don’t!

Have fun and enjoy!

Bon appetit,

Julie

Click here to view printable Word version of recipe:
Asparagus Prosciutto Pizza

__________________________________________________

Wood Fire Pizza – Asparagus Prosciutto Pizza

INGREDIENTS:

Pizza Crust – fresh dough or pre-made
Olive oil with herbs of choice
Pizza sauce
Mozzarella or Havarti cheese, grated
Prosciutto
Asparagus
Thinly sliced red pepper
Thinly sliced onion
Thinly sliced garlic
Parmesan cheese
Chili flakes if desired

PREPARATION:

Cut asparagus in pieces (I did 3 per spear)
Steam or parboil asparagus until nearly cooked.
Roll out dough using flour so it doesn’t stick (for fresh) You can also use your hands to stretch and shape your crust.
Mix together olive oil and herbs. Baste crust with mixture.
Apply pizza sauce.
Top with cheese.
Top with prosciutto.
Top with asparagus, onion, red pepper and garlic

BAKING:

Baking will depend on your oven and what kind of pan you are using, but try baking for 10-12 minutes at 350 degrees C.

SERVING:

Sprinkle with Parmesan cheese before serving.

On-the-Go with Pumpkin Breakfast Cookies

Pumpkin cookies

Hi everyone,

For those who have to get up at an ungodly hour in the morning, the idea of getting up even a few minutes earlier to make and eat breakfast can be an excruciating suggestion.

I have always been an advocate of breakfast, and personally believe that a meal in the morning can do wonders for your health, energy and metabolism. So I have always made a point of eating breakfast, even when I have to get up in the wee hours of the morning. I have scolded many people who have told me they often skip breakfast, and sometimes I will give suggestions for quick, easy and healthy breakfast alternatives. It’s just this annoying thing I do I suppose.

You have your classic quick breakfasts – cereal, quick oats, yogurt and granola, toast and peanut butter – all items that can be prepared in minutes. But sometimes, 0 minutes of prep time might be just the thing that gets you eating on the way to work or school as opposed to skipping breakfast all together.

John’s job has him getting up so early some days, that it would still be dark out in the summer north of the Arctic circle (ok that was kind of lame.) So I always like to have easy breakfast options he can grab on-the-go and eat on the way to work. One of his favourites to date are this week’s recipe, pumpkin breakfast cookies!

Pumpkin puree, rolled oats, whole wheat flour, flaxseed, nuts and eggs come together in these healthy and delicious breakfast cookies that will give you enough of a boost to get you through the morning. Yes, sugar makes the list of ingredients, but these cookies are nowhere near overwhelmingly sweet.

TIPS:

  • The recipe suggests filler ingredients such as nuts, coconut, chocolate chips and raisins, but feel free to substitute for any nuts, seeds or dried fruit you like. Just be sure to include chocolate chips or some type of dried fruit to add a little more sweetness.
  • These cookies freeze wonderfully!

So treat yourself to cookies for breakfast, and a few extra minutes of precious, precious sleep!

Bon appetit,

Julie

Related posts:
Peanut Butter Banana Breakfast Cookies

Click here to view printable Word version:
Pumpkin Breakfast Cookies

___________________________________________________________________________________

Pumpkin Breakfast Cookies


INGREDIENTS:

  • 1/2 cup melted coconut or grapeseed oil
  • 2 eggs
  • 1 tsp vanilla extract
  • ½ of a 14 oz can of pumpkin puree, or 3/4 cup pumpkin puree
  • 1/3 cup brown sugar + 1-2 tbsp
  • 1 cup whole wheat flour
  • 1 ½ cup rolled oats
  • 1/4 cup ground flaxseeds – optional
  • 1/2 tsp baking soda
  • 1/2 tsp cinnamon
  • 1/4 tsp ground cloves
  • 1/4 tsp nutmeg
  • ¼ tsp ground ginger
  • ¼ tsp salt
  • 1/3 cup shredded coconut
  • 1/3 cup walnuts or almonds
  • 1/3 cup chocolate chips or raisins

DIRECTIONS:

  1. Preheat oven to 350°.
  2. Melt coconut oil in microwave. Be sure that any ingredients added to the coconut oil are not too cold otherwise the coconut oil may harden. Ignore this step if using grapeseed oil.
  3. In large mixing bowl, beat eggs by hand. Add oil, pumpkin, vanilla and sugar. Mix until well blended.
  4. Add dry ingredients – oats, flour, flax, baking soda, spices and salt – and mix well.
  5. Fold in coconut, nuts and chocolate chips/raisins. Mix to incorporate.
  6. On a baking sheet lined with parchment paper (optional), drop tablespoon sized balls of the dough, an inch apart or so. These cookies expand only a little.
  7. Bake at 350°.for 13-15 minutes.

Cookies freeze wonderfully!

Vegetarian Chili (for Vegetarians and Meat Lovers Alike!)

Chili Pot

Hello everyone,

I’m sure that most of us love chili. The saucy, spicy hearty dish is great when you need to feed a big group of people, or just your family (leftovers anyone?) Chili can be very healthy too (depending on your recipe of course). Whole ingredients including veggies, beans, tomato sauce and ground meat combine in a filling and tasty dish.

However, I know when I eat chili, especially chili made with ground beef, I get kind of a heavy, full feeling in my stomach that takes a while to go away. The chili is delicious, but the quantity I can consume is self-limiting by that full feeling.

But there is a solution: take the meat right out of your chili, and go vegetarian! Making your chili vegetarian can more than satisfy your appetite while leaving you feeling real good after eating. So good, in fact, that you may find yourself going back for seconds or even a third helping!

The best part about today’s vegetarian chili recipe is that you won’t even miss the meat in there. There are so many other great ingredients – three types of beans, two types of peppers, mushrooms, mini-corn – that more than compensate for the absence of meat.

However, there is a secret ingredient here, one that your vegetarian chili can’t go without. I first tried it at my friend Jackie’s house when she made vegetarian chili for me, and I have to give her credit for this one. The secret is squash! I have used both butternut and buttercup squashes in my chili, and the succulent and satisfying orange pieces really add a substantial boost to the dish.

This is truly a vegetarian chili for the meat lover – you won’t even notice that the meat is gone!

TIPS:

  • If you want a smaller batch, you can reduce the vegetable and bean quantity.
  • Try playing around with the spices and flavourful ingredients to give your chili the taste that best suits you! Keep it simple with chili powder and cumin, or add the kitchen sink trying ingredients including balsamic vinegar, barbecue sauce, dried mustard and honey!
  • This recipe is one of my favourites to freeze. I like to make a big batch and portion it into individual containers for lunches.

Spice of the week

MAYAN CHILI POWDER
Mayan chili powder is comprised of four different peppers, cocoa powder and cinnamon. The cinnamon and cocoa powder offer a deep, rich flavour that is truly unique. If you can find it, I HIGHLY RECOMMEND that you give Mayan chili powder a shot in this recipe. It is something special indeed!

I discovered this wonderful variety of chili powder at my favourite spice shop here in Edmonton, Silk Road Spices (visit their stores in Edmonton and Calgary or click here to order online.)

I have included in the recipe a version with and a version without Mayan chili powder.

Special thanks to Jackie for changing my chili life forever though the secret ingredient that is squash!

Bon appetit,

Julie

Click here to view printable Word version of recipe:
Vegetarian Chili
Vegetarian Chili – Mayan Chili Powder

___________________________________________________________________________

Vegetarian Chili
(Serves 8)

INGREDIENTS:

  • 1 small butternut squash or 1 medium buttercup squash, cut into bite-sized cubes
  • 1 onion, chopped
  • About 10 mushrooms, sliced
  • 5 cloves garlic, minced or crushed
  • 2 large carrots, peeled and sliced
  • 1 red pepper, diced
  • 1 green pepper, diced
  • 1 can cut mini-corn, 1 cup frozen corn kernels
  • 1 can chickpeas
  • 1 can red kidney beans
  • 1 can black beans
  • 1-28 oz can diced tomatoes
  • 1-14 oz can tomato sauce or pasta sauce

Spices and flavour: 

  • 1.5 tbsp chili powder
  • 1 heaping tsp cumin
  • 1-2 tsp oregano

(Optional)

  • ½ tsp cayenne pepper
  • 2 tbsp balsamic vinegar
  • ¼ cup barbecue sauce
  • 1-2 tbsp honey (if you prefer the sweeter taste)
  • 1 tsp mustard powder

Feel free to use any combination of the above spices and flavours, or adding whatever you like of your own. Tweak them by adding more, less or none of each to your taste. I would however, recommend you keep the chili powder and cumin at the very least!

Spices (With Mayan Chili powder):

If you are lucky enough to have Mayan Chili powder

  • 1.5 tbsp Mayan Chili powder
  • 1 tsp cumin
  • 1 tsp hot chili powder, or ½ tsp cayenne pepper

(I like to keep the spices simple to really feature the rich flavours of the Mayan Chili powder

 Garnishes (any combination of):

  • Grated cheese
  • Cilantro
  • Sour cream
  • Greek yogurt
  • Lime
  • Hot sauce (I like Mexican style – try Chalula’s or Valentina’s)

DIRECTIONS:

  1. Use the largest pot you own. Heat pot. In some cooking oil fry onions and cook until they are starting to get tender..
  2. Add mushrooms and garlic. Cook for another minute or two.
  3. Add squash. Cook for a few minutes. Add red and green pepper, cook for a minute more.
  4. Add spices, mix well.
  5. Add beans, chick peas, mini corn, tomato sauce and stewed tomatoes.Stir.
  6. If using, add BBQ sauce, honey, mustard powder along with any other ingredients you would like. .
  7. Bring to a boil. Lower temperature, cover and simmer for 30 minutes. After 30 minutes, check to see if you like the consistency of the chili. If it is too liquidy, continue to simmer uncovered until desired consistency is reached.
  8. Garnish with grated cheese, cilantro, sour cream, hot sauce, more lime, or combination you like. Try serving with your favourite garlic bread, cornbread or polenta.

Freezes wonderfully!

Thailand Part 3: Thai Cooking Class and Thai Green Curry

Red and Green Curries 2

Hello everyone,

One of our most memorable days in Chiang Mai had to be the day we attended our Thai cooking class, at the Thai Farm Cooking School. There were many Thai cooking class locations in Chiang Mai, but we chose Thai Farm thanks to a recommendation from Lonely Planet and its rural location and the beautiful outdoor setting.

We boarded the back of a pickup truck and headed out of town. On the way, we had the pleasure of stopping at a wonderful Thai food market.  You don’t see many grocery stores in Thailand, so this was a nice treat. The market was huge and had anything you could want. Vegetables, herbs and spices, fresh meat and more varieties of rice then I knew existed. The even had freshly made pre-made curry pastes! A pretty cool experience.

We continued on our way to the Thai farm. We arrived and were greeted with refreshments –lemongrass tea, made from fresh lemongrass. The setting was lovely. Set with a table for us to eat at, the inviting open patio was connected to the cooking studio. The entire building was surrounded by a wide variety of plants in the organic farm.

We started by taking a tour around the farm. Here, we had the chance to learn about many of the exotic Thai ingredients, while we got to smell and sample many of them. Kaffir limes, sweet and sour varieties of tamarind, bitter eggplant, baby pineapples, and the spicy bird’s eye Thai chili peppers were just some of the interesting ingredients we encountered.

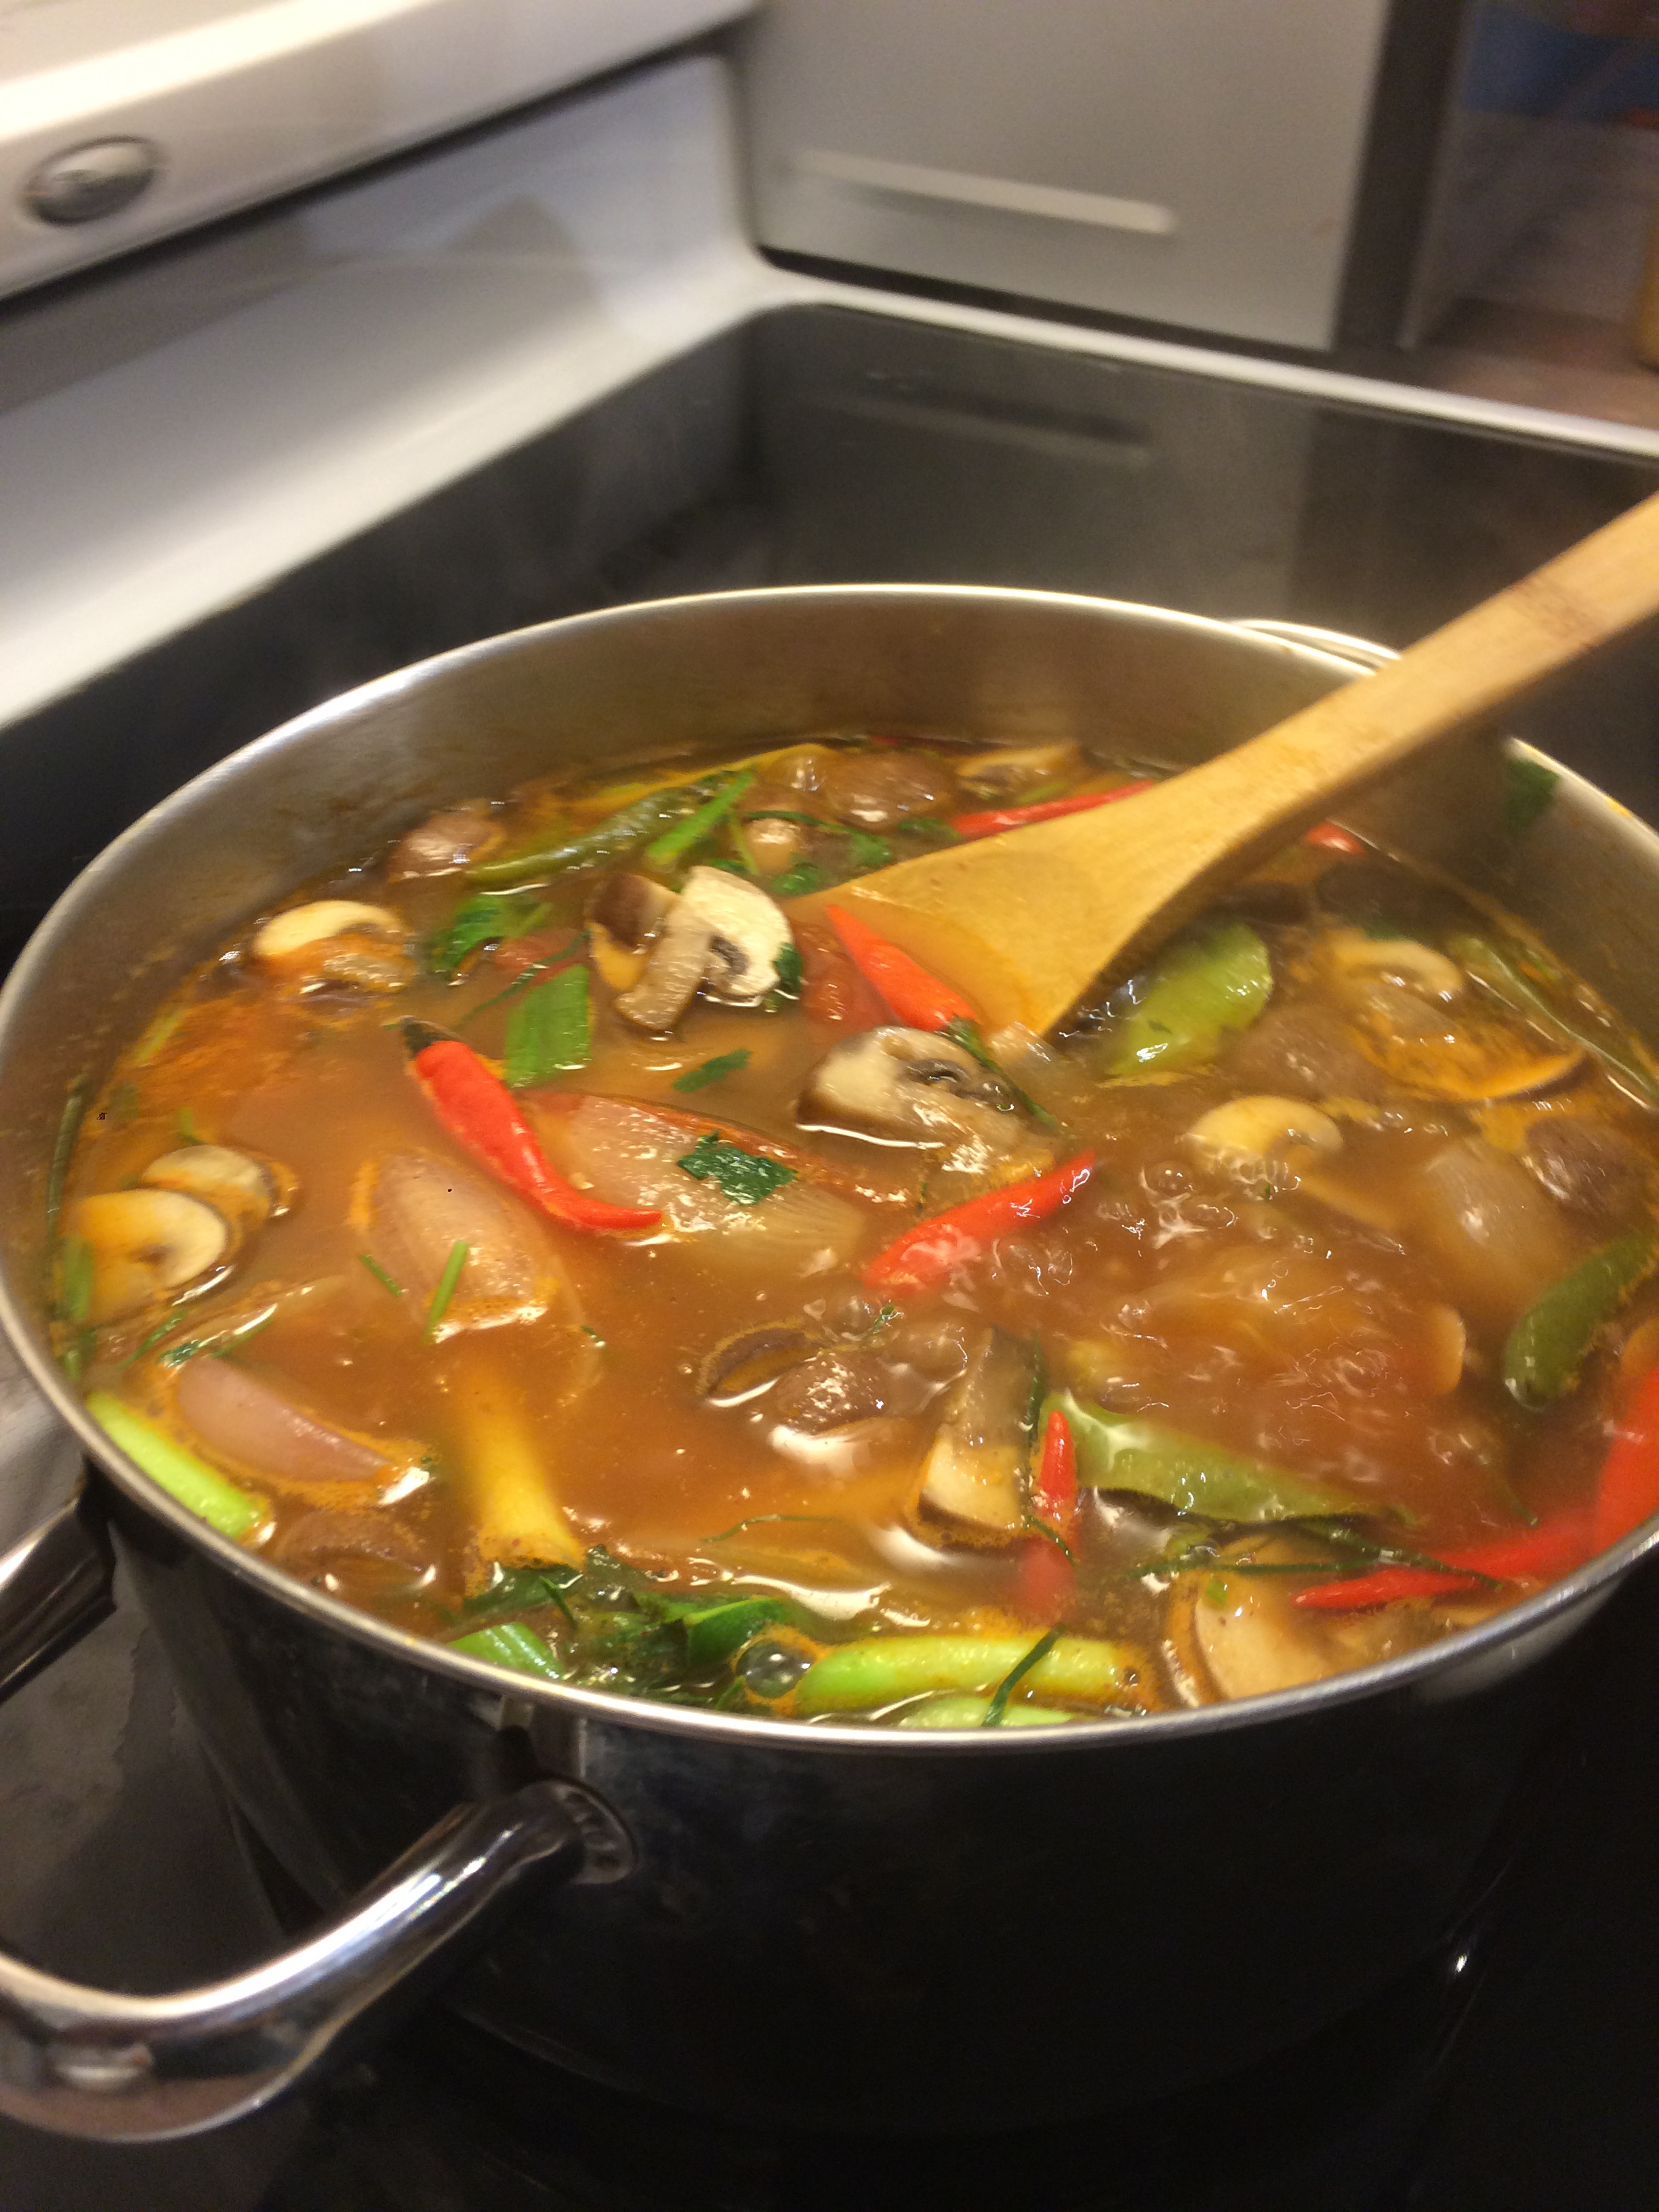
After cooking and eating a delicious tom yam soup, we made our Thai curry pastes. I chose green and John chose red so we had the chance to try both. We started by dry-roasting the cumin and coriander seeds, and then finely chopped all of the fresh ingredients. Putting everything in the mortar and pestle, we worked hard as we smashed everything into a paste.

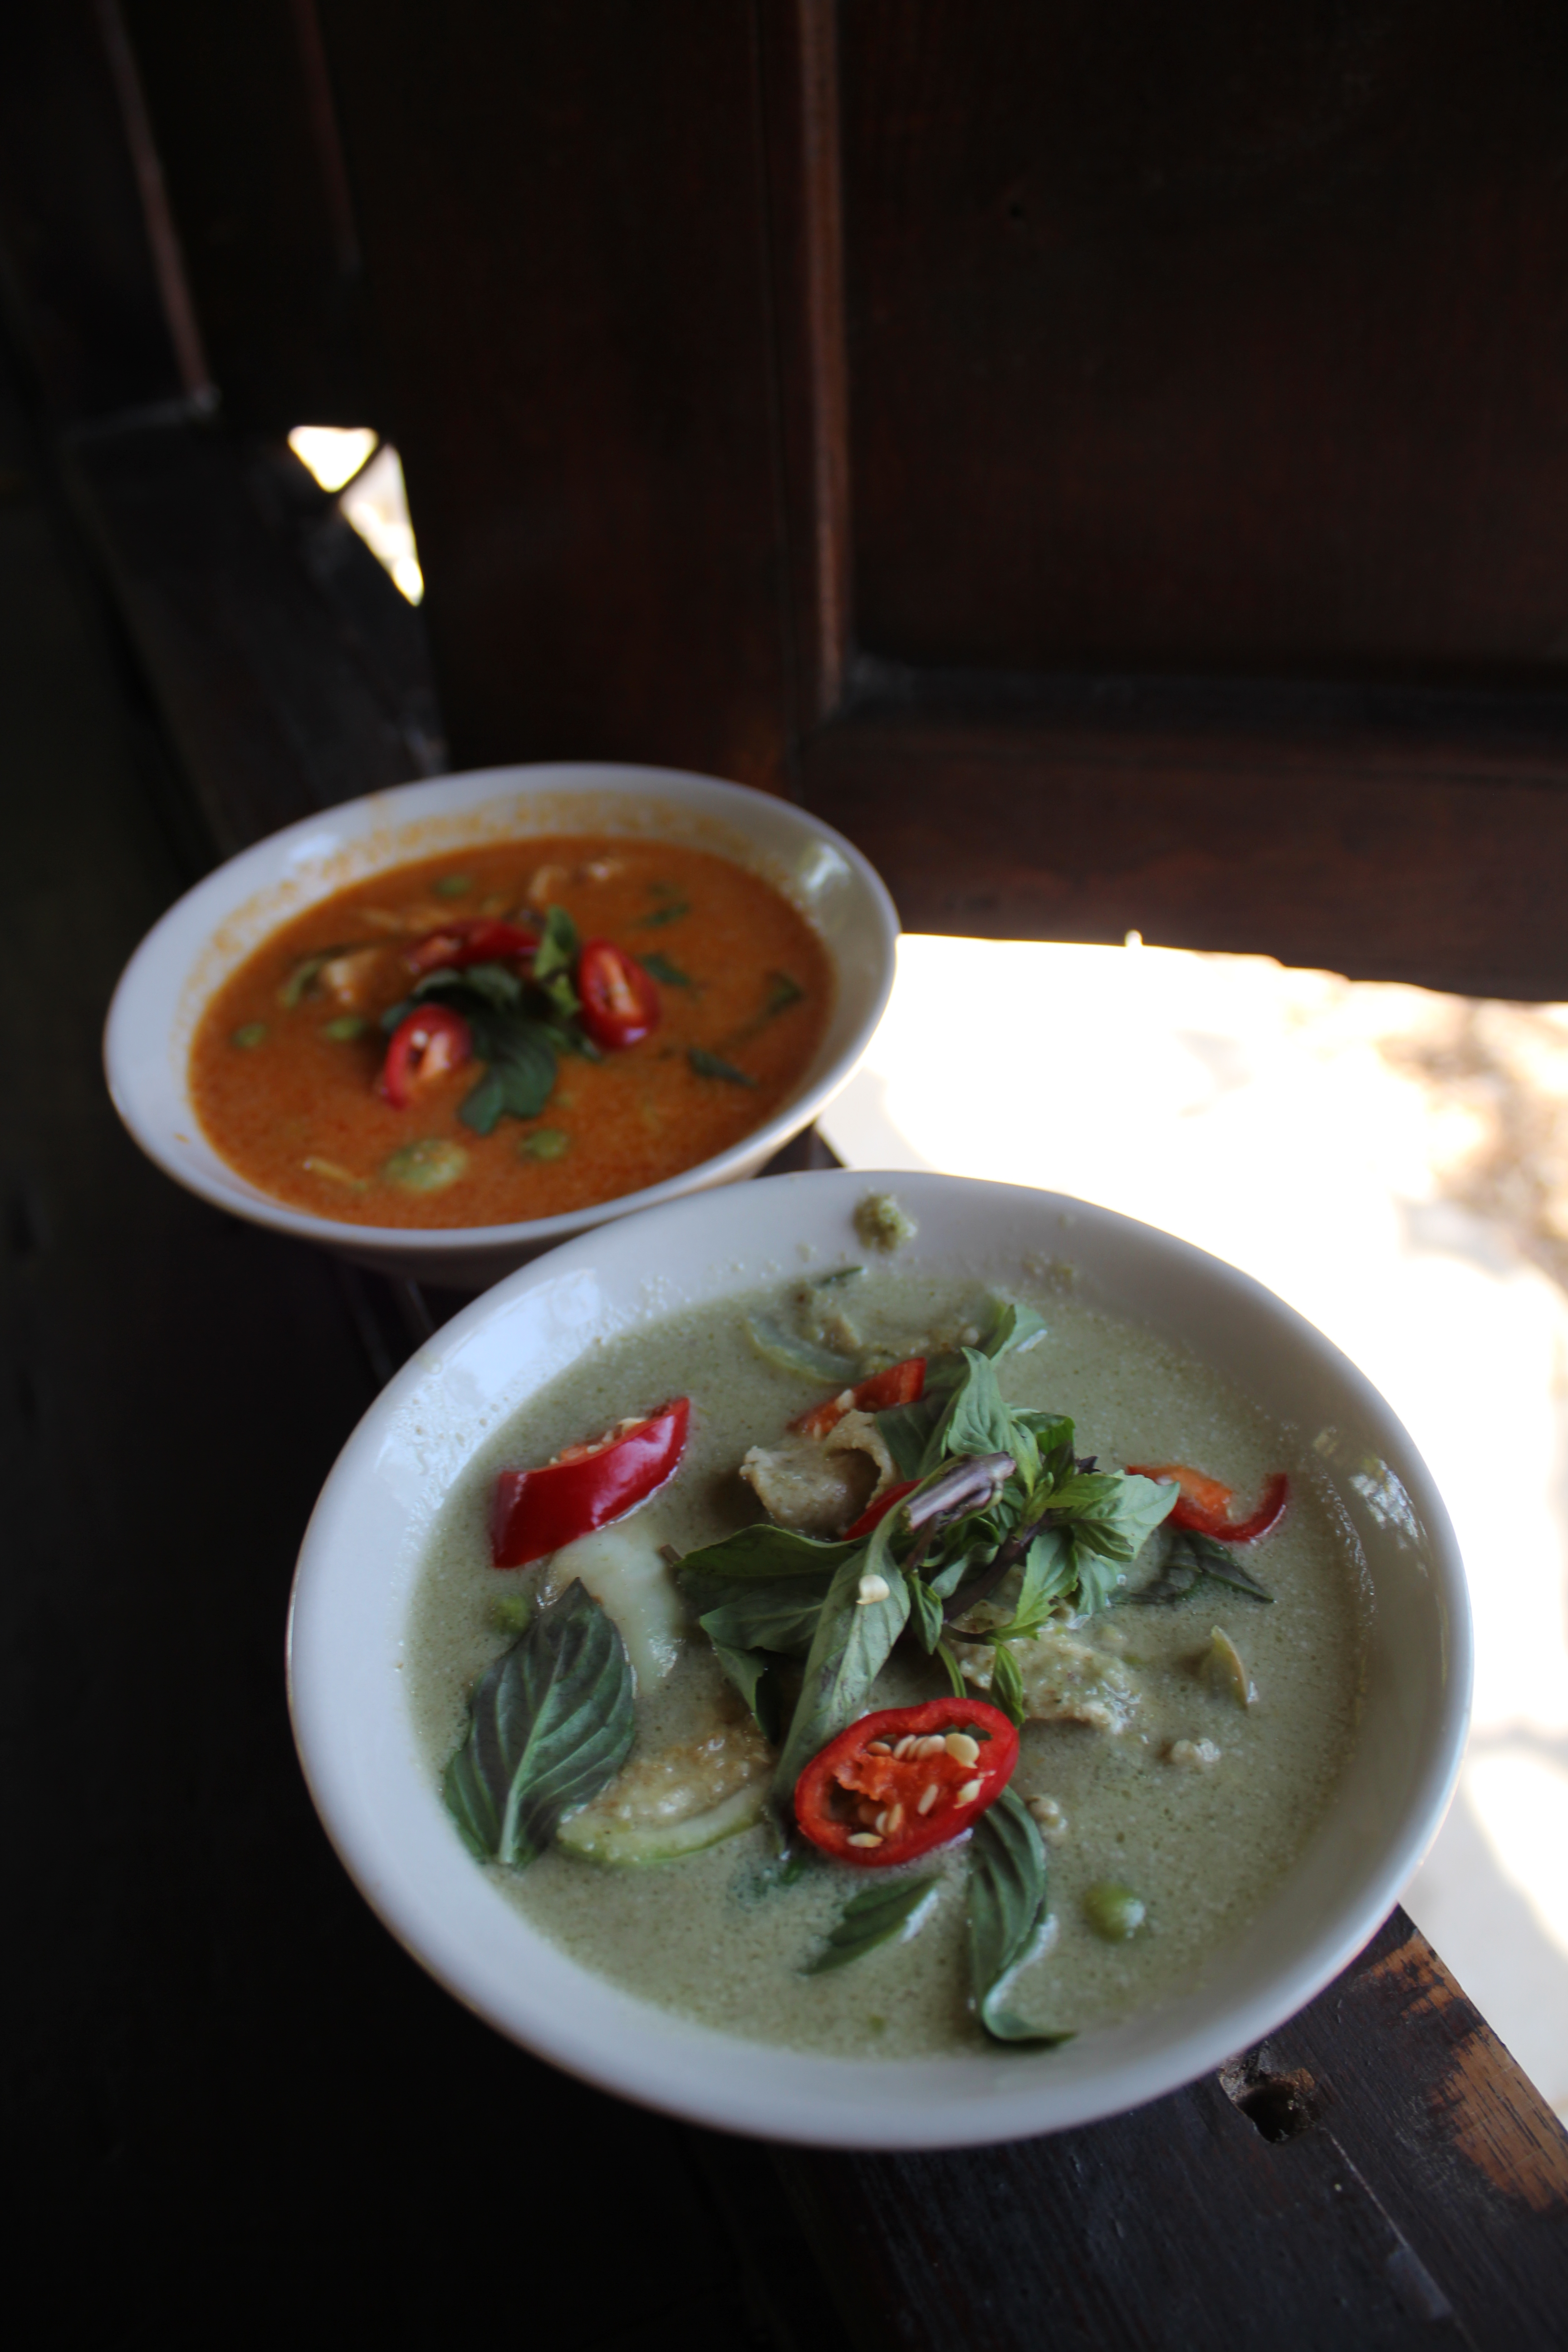
Green vs. Red Thai Curry

The difference between the two curries is the types of peppers used. For the green curry, you use fresh peppers; small green bird’s eye chili peppers for heat and a long Thai green pepper for colour. For the red curry, dried peppers are used: small dried red bird’s eye chili peppers for heat, and a dried long Thai red pepper for colour. Our instructor told us the red version is supposed to be hotter, but it my opinion, the heat will depend more on how many chili peppers are used.

It was recommended by our instructor that we use between 1 and 10 bird’s eye chili peppers, 10 being “Thai hot.” John and I opted for about 5 each (keep in mind this was for a single portion recipe. The recipe featured in this post serves 2 or 3.)

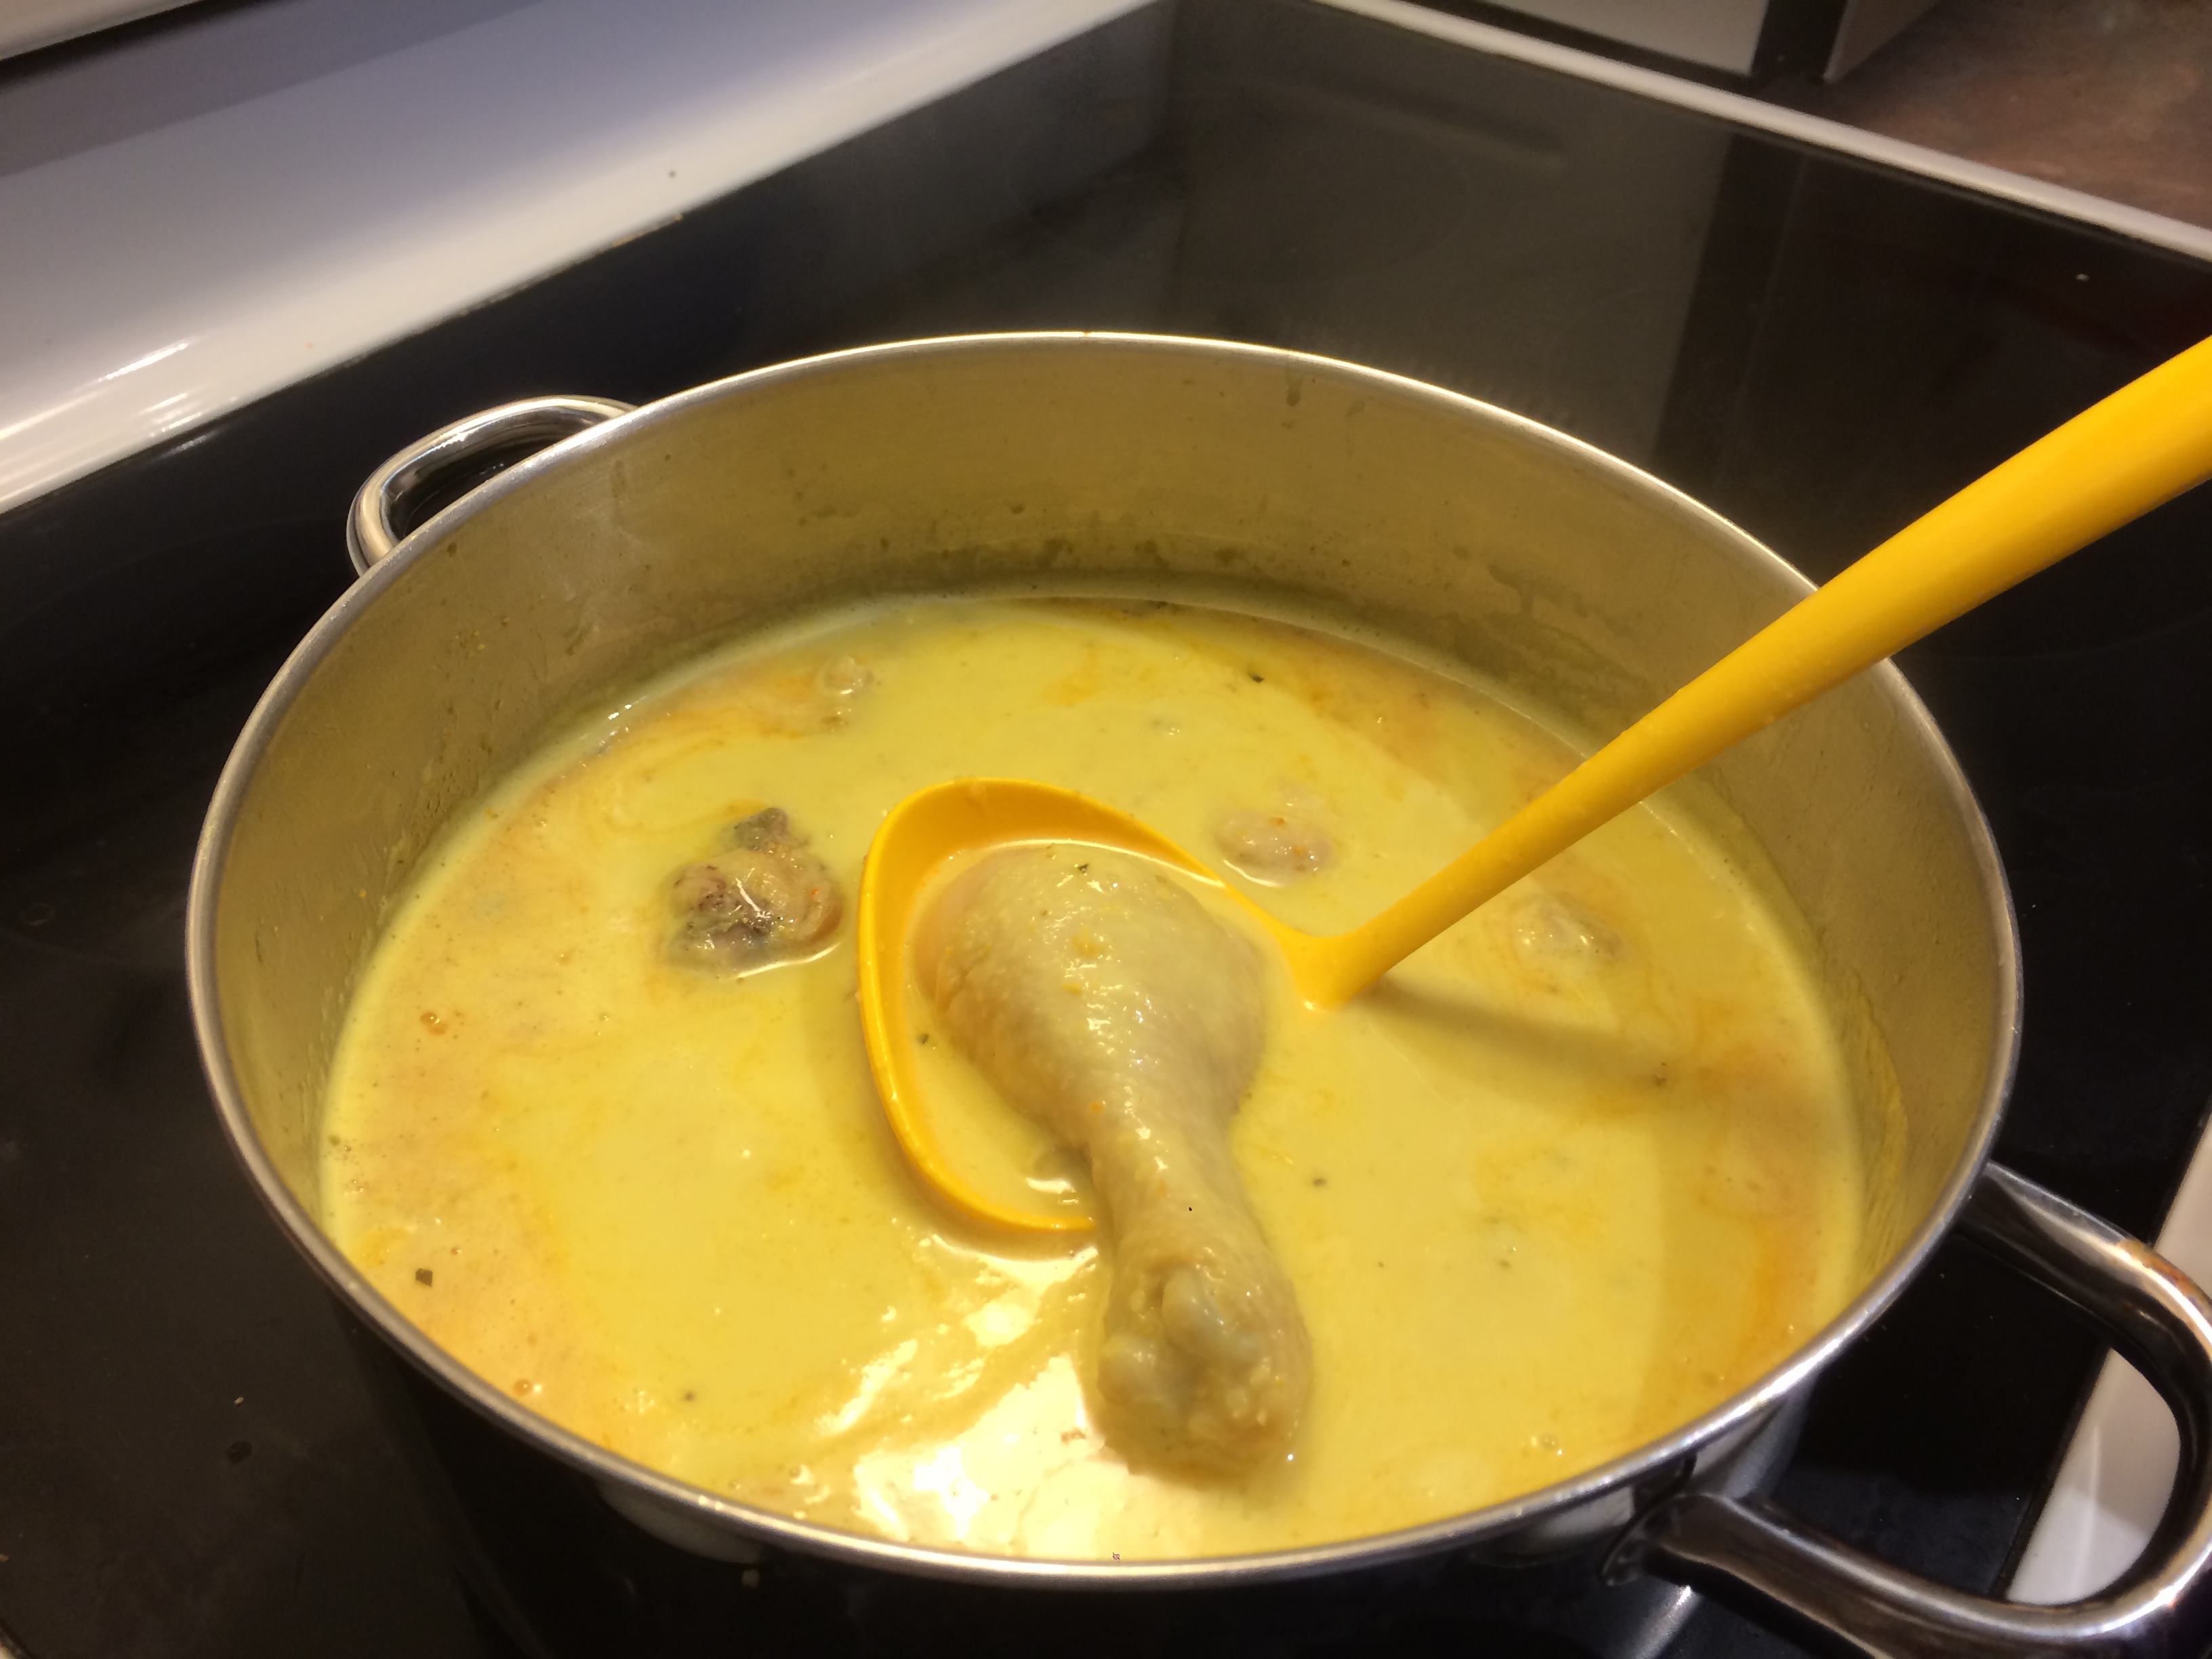
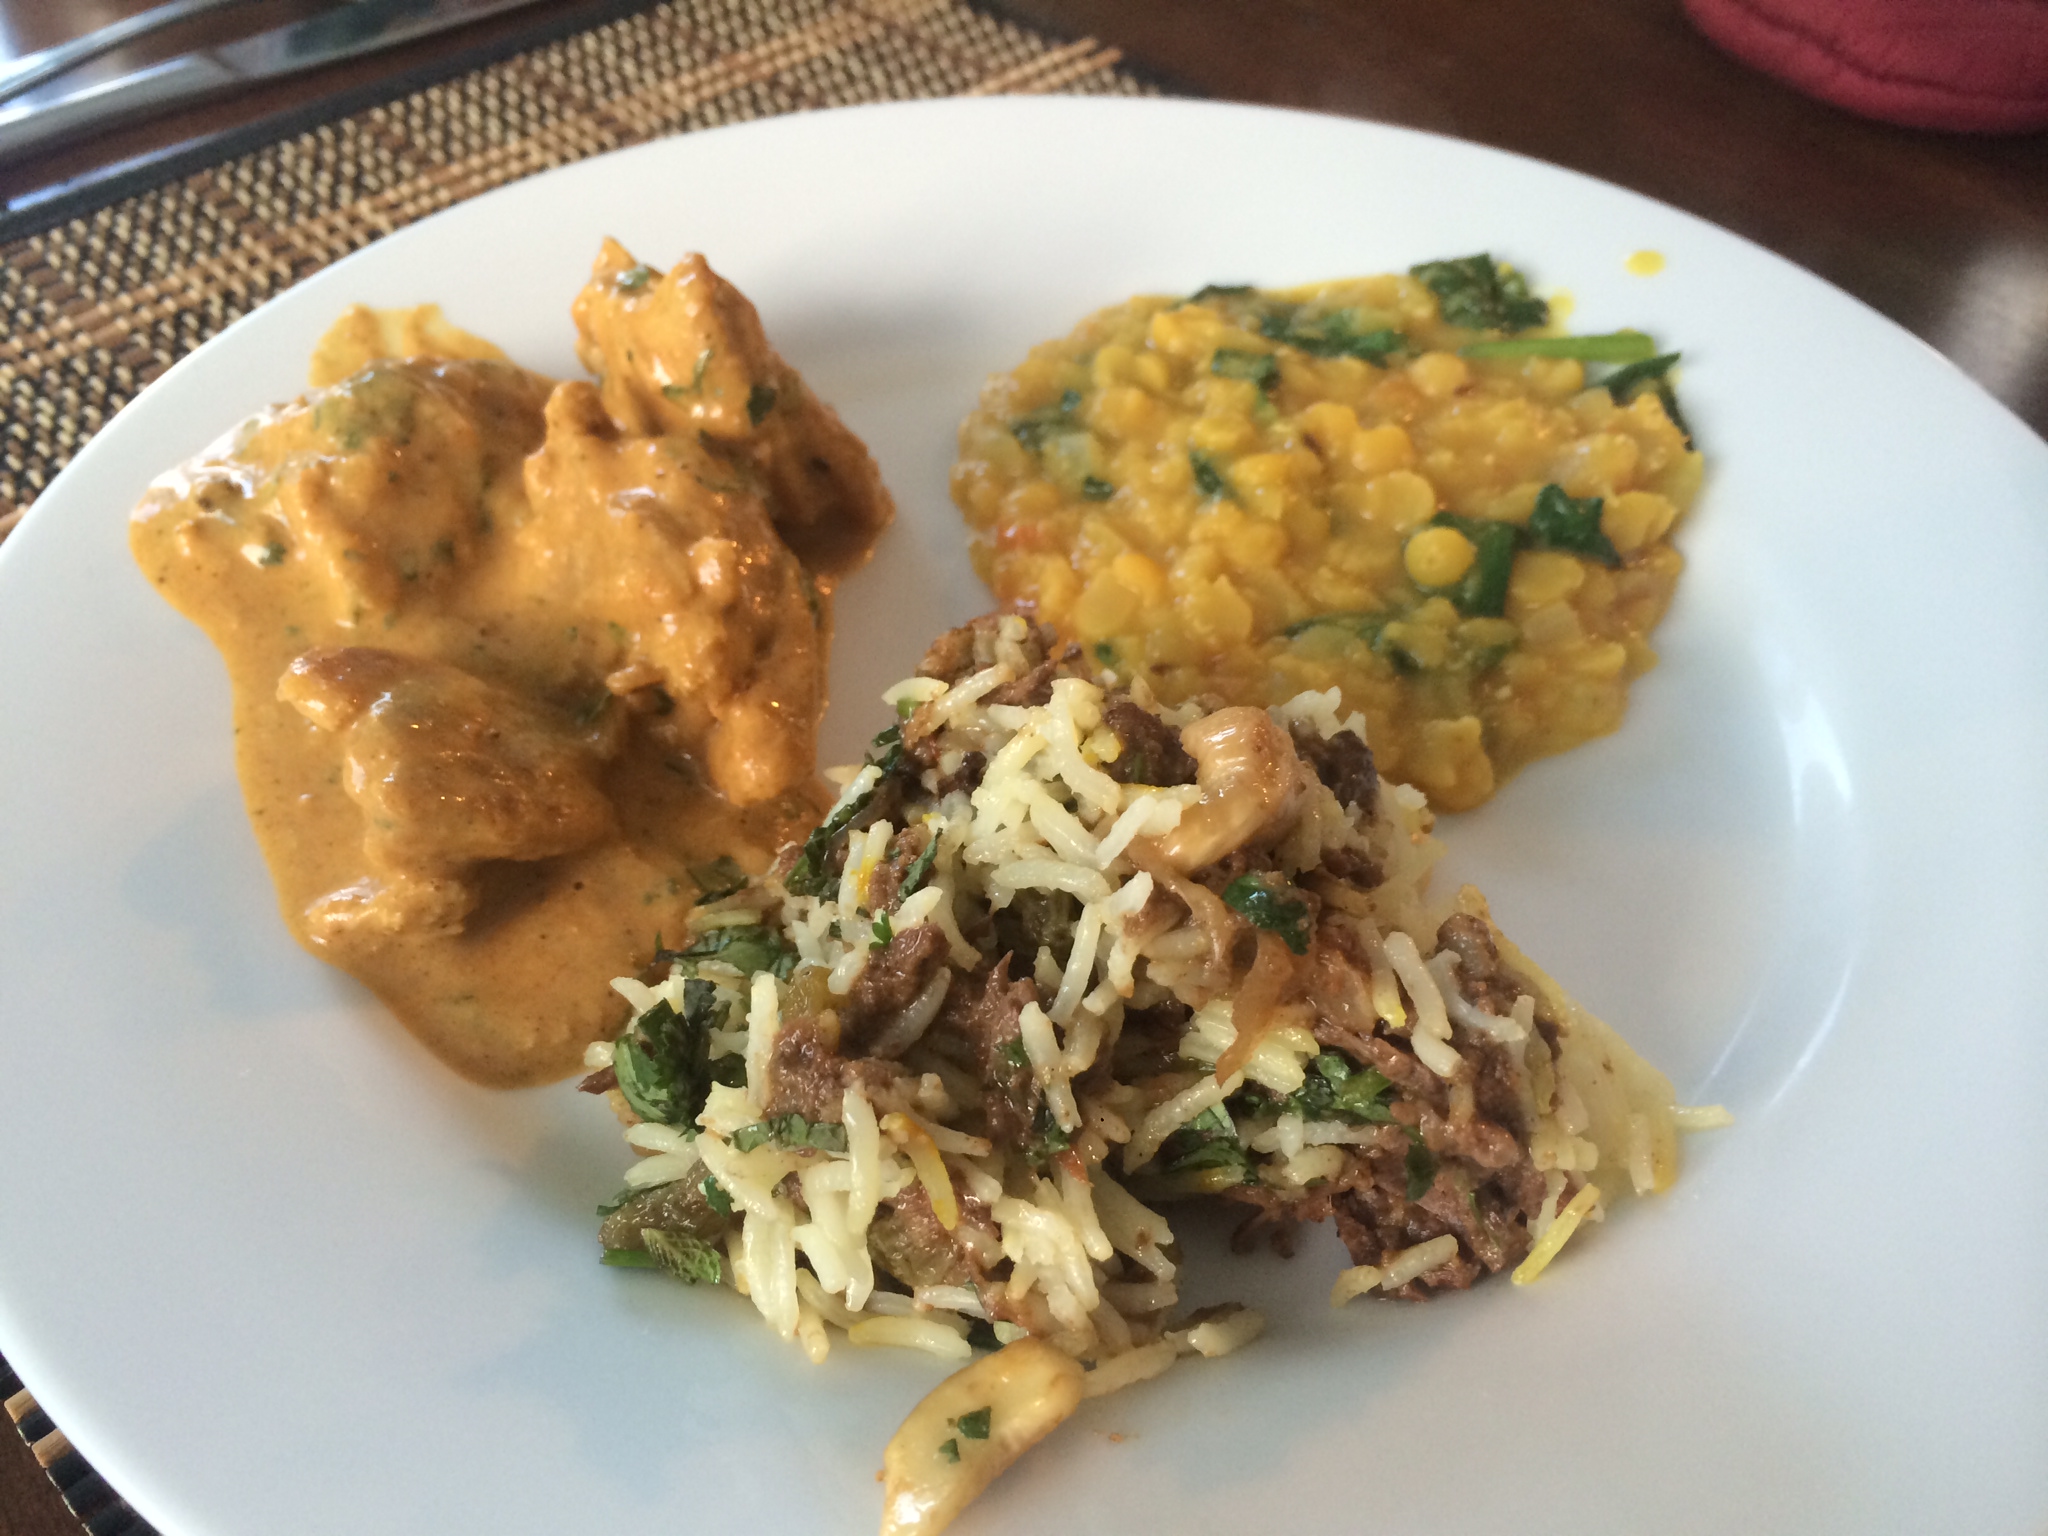
We took our pastes to our cooking stations and heated the saucepan. We started by frying the pastes until they were fragrant, then adding the coconut milk. We added the Thai eggplants, cooking for a few minutes. In went the chicken. Once the chicken was done, we added the sweet Thai basil and our curries were ready to eat.

We set our curries aside and began work on the next dish, our Thai stir fries which our instructor claimed were “Thai fast food, faster than McDonald’s.” Her description was pretty close. My cashew chicken was done in minutes, frying the chicken and then adding the sauce and vegetables. This will be a keeper recipe for quick home meals!

We took a seat and enjoyed our meals. Everything was delicious, but the dish that stood out for me was the Thai green curry. This had to have been the best green curry we had eaten in Thailand, and is this week’s recipe!

John and I have made green curry many times since we have returned home from Thailand. Ingredients such as lemongrass, galangal, and kaffir lime leaves have become staples in our fridge, and it is common for us to whip up a green curry for dinner.

John and I are not huge fans of the Thai eggplants, and find that the ones that we get in town don’t hold a candle to the fresher eggplants we sampled in Thailand. As a result, we prefer to substitute other vegetables, which you will see in the recipe below.

TIPS:

  • The pepper for colour is very important, or your curry will end up more of a yellow instead of a green. Thai long chili peppers are the best, but we sometimes substitute Anaheim peppers or Serrano chili peppers depending on what is available. If you use Serrano peppers, be careful as you will end up with a much hotter curry!
  • If you have a mortar and pestle, use this to make your paste – more work for a better product. If not, a Magic Bullet or mixer grinder blender will have to do!
  • We suggest some of our favourite vegetables in the recipe, but use whatever you like!
  • Substitute tofu for the chicken to make a vegetarian dish

Mango Sticky RiceHerb of the week

LEMONGRASS
Officially named Cymbopogon, you can’t have Thai food without lemongrass. Commonly used in curries, soups and teas, lemongrass is a staple herb across many different types of Asian cuisine.

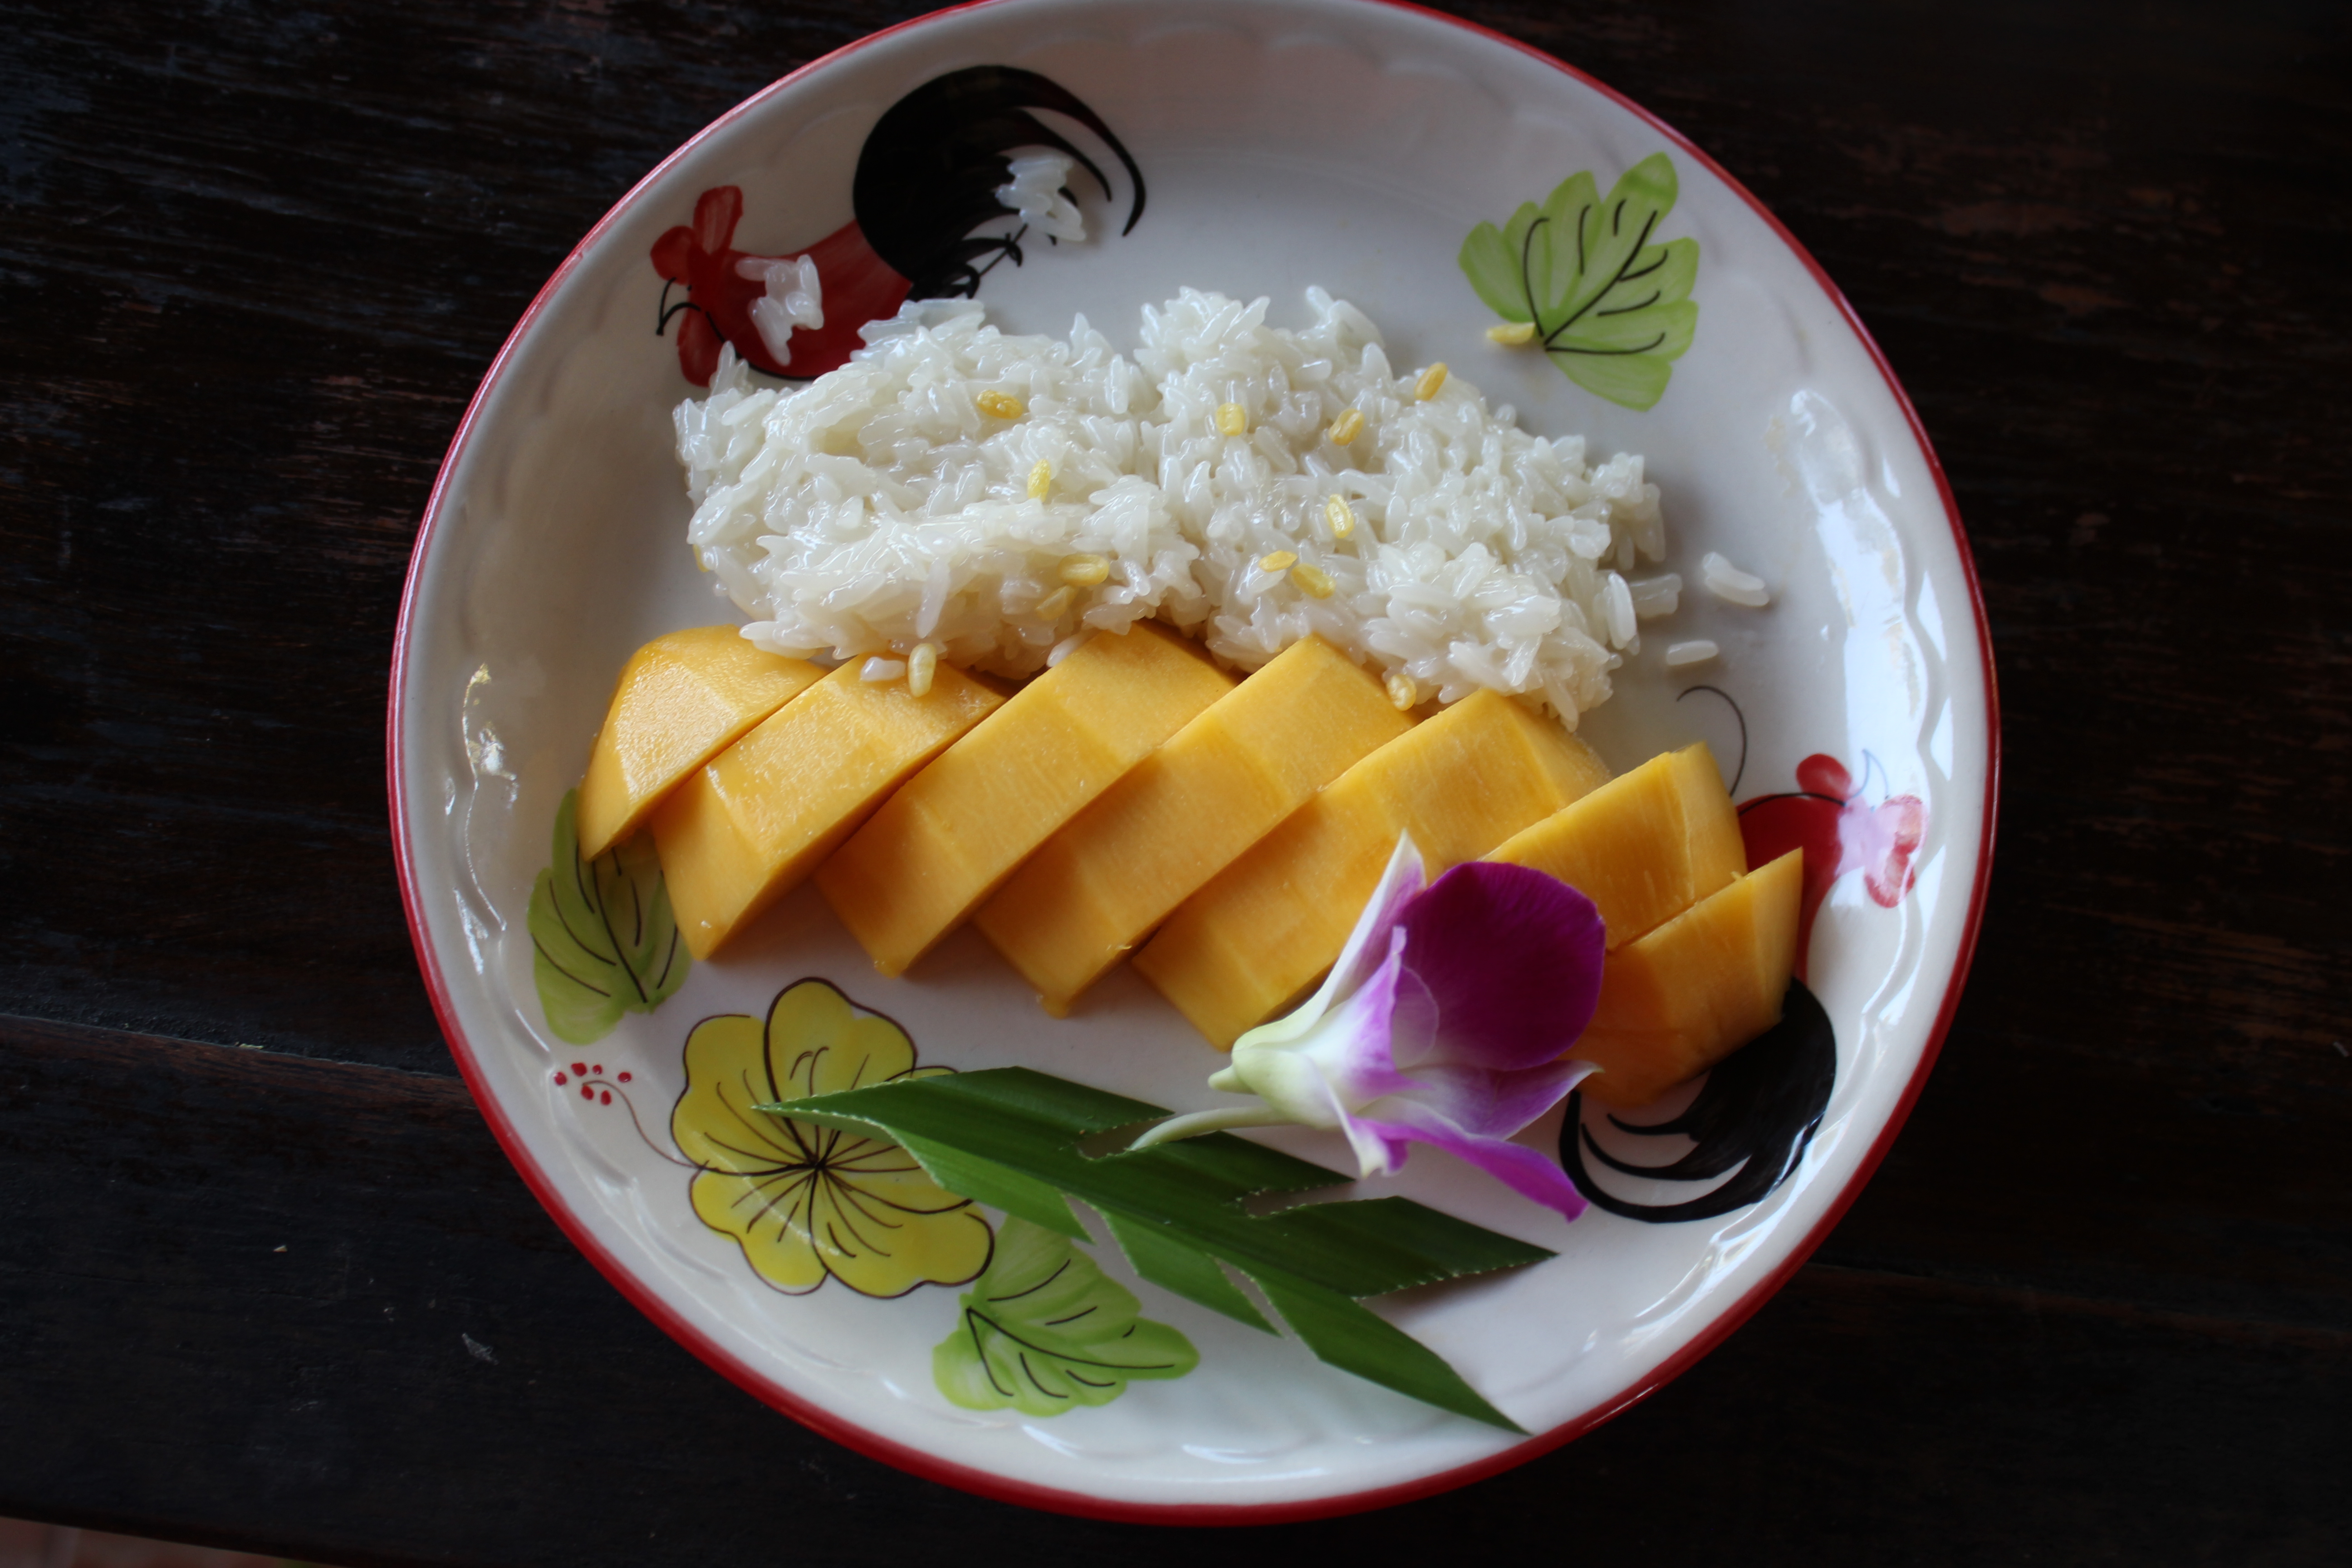
The final leg of our cooking class was a delicious mango sticky rice. After a whole day of eating, we were pretty stuffed. But the meals that we made in our cooking class ended up being some of the best food we had the privilege of eating during our trip to Thailand. So if you are a food lover and happen to be in Thailand, do yourself a favour and take a cooking class!

Bon appetit,

Julie

Click below to view other posts in the Thailand travel series:
Part 1: Railay Beach and Tom Yam Soup
Part 2: Chiang Mai and Khao Soi 

Click here to view the printable Word version of the recipe:
Thai Green Curry

_____________________________________________________________________________________

Thai Green Curry
(pictured below are the paste ingredients for a single serving. This recipe will feed 2 or 3 people)

Green Paste IngredientsPASTE INGREDIENTS:

½ tsp cumin seeds (alternatively ½ tsp ground cumin)
½ tsp coriander seeds (alternatively ½ tsp coriander seeds)
2-15 green bird’s eye chili peppers (Thai chili pepper) Select quantity depending on desired heat.
*2 long green Thai pepper, 2 serrano peppers or ½ Anaheim pepper
2 tbsp chopped shallots
2 tsp chopped galangal
6 kaffir lime leaves, de-stemmed and finely chopped
2 tsp chopped garlic
2 tbsp chopped lemongrass
½ tsp salt

*These peppers are used for colour. Thai green peppers are the best pepper to use for colour. If you can’t find them, Anaheim and serrano peppers are a good alternative. However, be aware, the serrano peppers are very hot, you might want to dial down the bird’s eye chilies if you use the serrano peppers.

INGREDIENTS:

4 boneless skinless chicken thighs, chopped, or tofu
2-3 cups vegetables – try:
– Orange fleshed sweet potatoes
– Mushroom
– Cut baby corn
– Snow peas
– Carrots
– Cauliflower
– Broccolli
Alternatively, you can omit the tofu and chicken and bolster the vegetables!
2 tsp sugar – palm sugar preferred
1 tbsp fish sauce (or soya sauce for vegetarian)
1-14 oz can coconut milk
½ of the 14 oz can water
Oil

Garnish:
4 kaffir lime leaves
Thai basil leaves (approx. 10)
Red Thai chili pepper

PASTE DIRECTIONS:

You will need a large mortar and pestle to make the paste. If you don’t own one, alternatively you can use a spice mixer or Magic Bullet.

  1. Begin by dry roasting the coriander and cumin seeds. Heat a pan on high, add the coriander seeds and roast until fragrant (less than a minutes) Do the same with the cumin. If you are using ground cumin and coriander, skip this step.
  2. Add both cumin and coriander to your mortar and pestle, grind until a powder. Set cumin and coriander aside

(if you are using a spice mixer or Magic Bullet, skip step 2)

  1. Chop all paste ingredients into small pieces. This will make it easier to blend/mortar and pestle.
  2. Add all paste ingredients (except for cumin and coriander) to mortar and pestle, smash until a fine paste is formed, about the consistency of peanut butter. Incorporate coriander and cumin. If you don’t have a mortar and pestle, place all items in spice mixer of Magic Bullet and blend)

DIRECTIONS:

  1. Heat a pot on medium high. Add oil and ½ cup coconut milk. Add paste and fry until paste is fragrant.
  2. Add chicken or tofu. Add rest of coconut milk and water. Add sugar, and fish sauce. Stir. Cook for a few minutes.
  3. Add vegetables that take longer to cook – sweet potato, mushrooms etc. Cook for a few minutes.
  4. Add all other vegetables. Cook until vegetables and chicken are done.
  5. Add lime leaves, Thai basil.

Serve with Thai jasmine rice. Add red chili peppers to garnish if desired.


Thailand Part 2: Chiang Mai and Khao Soi

Khao Soi

Hello everyone,

After spending time in southern Thailand, John and I headed north for a few days to Chiang Mai.

Steeped in culture and history, Chiang Mai is the largest city in northern Thailand. The city center, or old Chiang Mai, is surrounded by a moat and remnants of a wall once erected to defend the city. The streets of Chiang Mai are busy and bustling, with markets and vendors occupying every available space.

Chiang Mai is host to many beautiful Buddhist temples, as well as Mahachulalongkorn Rajavidyalaya Buddhist University, which houses Wat Suan Dok, a temple built in the 14th century which has recently undergone a restoration. It is not unusual to see groups of monks walking around town in their unmistakable bright orange garb.

One of the highlights of our entire trip had to be the elephants. John and I spent the day at the Elephant Retirement Park, a place where elephants are rescued from hard labour and tourism. Yes, I know what we were doing was technically elephant tourism, but the Elephant Retirement Park is unlike other elephant tourism businesses. At these other sites, bull horns are used and large devices are strapped onto elephants’ to allow tourists to ride them, devices that are not good for the elephants’ backs.  Where we were, there were no bull horns and we weren’t allowed to ride the elephants. The Elephant Retirement Park welcomes tourists to help fund the park (it is expensive to feed an animal that eats over 300 lbs. of food a day!)

I think the elephants loved us as much as we loved them, eating bananas and giving us hugs and kisses with their trunks. It was amusing when the baby elephant played his favourite game, one where he would try to head-butt you onto the ground and sit on you. Although he was a baby, he still weighed half a ton! Not cool to get sat on by him. Luckily, John and managed to avoid this fate.

The elephants got so excited for the mud bath (that inevitably turned into a mud fight) with all of the elephants and tourists in the mud together. The elephants got us as bad as we got them, filling their trunks with muddy water and spraying us. A messy and fun affair! Elephants are our new favourite animals.

The food vendors were left right and center in Chiang Mai. You couldn’t walk a block without seeing at least one, if not dozens. On some streets, there were rows of food vendors selling everything from rice sausages to fresh grilled fish. These guys are truly masters of their craft, preparing whatever dish they happen to be serving with remarkable skill and ease. With so many street food vendors in town, John and I were amazed that they all seemed to be busy with customers.

Surprisingly, Chiang Mai wasn’t flooded with northern Thai cuisine. We saw it here and there on menus. With the help of our Lonely planet guidebook, John and I managed to find a few well-reviewed restaurants that specialized in the regional cuisine.

When ordering our northern Thai dishes, we started out by selecting our chili dips, or nam phrik. We ordered the hot green chili dip, and the more mild red dip with tomatoes and ground pork. The dips were served with pork rinds. Did we mention that northern Thai cuisine is very pork heavy? Along with the pork rinds, we saw and sampled minced pork, pork sausages, pork curries and pickled pork! All common on these northern Thai menus.

Northern Thai cuisine also features some Burmese influenced curries. Among these, our favourite had to be khao soi, a yellow curry soup. We ate this soup on several occasions, and just had to try and make it when we got back from our trip. This brings us to this week’s recipe, Khao Soi!

Khao Soi is just wonderful. The mild heat of the yellow curry is tempered with creamy coconut milk. To serve, add cooked egg noodles and top with crunchy egg noodles. And as opposed to chicken chunks, khao soi is served with full chicken drumsticks!

Khao Soi PotTIPS:

  • For the crunchy noodles, the classic method is to deep fry some fresh egg noodles. However, I typically don’t like dealing with the mess of deep-frying, so I purchased a brand of noodle that can be eaten uncooked for our garnish.
  • Use fresh or dried egg noodles, both taste great!
  • Bird’s eye chilies are the small Thai chilies (as seen in Khao Soi photo at top of post)

Herb of the week

KAFFIR LIME LEAVES
A common ingredient in Thai cooking, kaffir lime leaves have a similar scent to a regular lime, but distinctly different.  When using, kaffir lime leaves can be left whole and removed before eating or mortar and pestled into a paste. Some Thai recipes will call for kaffir lime rind, but typically you can just substitute the lime leaves as the kaffir limes can be hard to find.

Chiang Mai SunsetChiang Mai had to be the most memorable leg of our trip to Thailand. The people, the culture, the animals and of course the food came together in an experience that John and I enjoyed immensely! If Chiang Mai were an ice cream sundae, Khao Soi would be the cherry on top!

Special thanks to John for really tapping into his artistic food-arrangement skills for the Khao Soi photograph!

Bon appetit,

Julie

Click here to view other posts from the Thailand Series:
Part 1: Railay Beach and Tom Yam Soup

Click here to view printable Word version of recipe:
Khao Soi

__________________________________________________________________________

Khao Soi
Yellow curry chicken noodle soup

Serves 4 – 6

INGREDIENTS:

Egg noodles (fresh or dried)
Crunchy Asian noodles – to be eaten uncooked
2 cans coconut milk
2 cups chicken broth
2 tbsp palm sugar (or regular sugar)
At least 2 tbsp Fish sauce – more to taste
6 – 8 pieces of chicken, drumsticks preferred (1-2 drums per serving)

Chopped cilantro and sliced lime wedges to garnish

Paste:

2 Thai bird’s eye chilies (red or green)
2 small shallots, or 1 large
4 cloves garlic
1 stalk lemongrass,4-6 inches. Peel outer layer.
3 kaffir lime leaves
A knob of fresh turmeric – 1 to 1.5 inches
2 slices galangal
A pinch of salt
1 tsp coriander seed (or 1 tsp ground coriander)
1 green cardamom pod (or a pinch of ground cardamom)
1 ½ tbsp shrimp paste

DIRECTIONS:

(If you are using ground coriander and cardamom, skip steps 1 and 2)

  1. Dry roast coriander seed and cardamom pods. Heat a pan and roast for 30-45 seconds, until seeds are aromatic. Remove and allow to cool
  2. In the mortar and pestle, crush coriander seed and cardamom pod until it is ground. Remove from mortar and pestle.
  3. Cut paste items into smaller pieces. Place all paste items except for shrimp paste and ground coriander/cardamom in mortar and pestle, pound to combine until fine paste is formed, about the consistency of peanut butter. Incorporate shrimp paste, ground coriander seed and ground cardamom pod into paste.
  4. Heat oil in soup pot. Add paste and stir until paste is aromatic, less than a minute.
  5. Mix in coconut milk, chicken broth, palm sugar and fish sauce. Add chicken and bring to a boil. Turn heat down to a simmer.
  6. Cook, mixing occasionally, until chicken is cooked, about least 30 minutes.
  7. While broth is simmering, cook egg noodles by soaking in boiling water until desired done-ness is achieved, a few minutes at most.
  8. When broth is done simmer, season to taste. Add more fish sauce if desired.
  9. Divide cooked noodles into bowls. Add chicken to each bowl. Fill each bowl with broth. Top with crunchy noodles. Garnish with cilantro and lime wedges. .

If you don’t own a mortar and pestle, you can make the paste in a Magic-Bullet style blender.

Thailand Part 1: Railay Beach and Tom Yam Soup

Tom Yam Bowl

Make sure to check out my new Travel page, displaying posts and recipes related to our travels!

Hello everyone!

In February, John and I were fortunate enough to take a trip to Thailand. So for the next few weeks, I’m going to share with you our wonderful travels in Thailand, with a food perspective of course.

Railay Beach was our first destination. Located in southern Thailand on the Andaman Sea, Railay Beach boasts beautiful turquoise water and impressive multi-coloured limestone cliffs. Railay also happens to be a world renowned destination for rock-climbing, the sport that has been John’s passion for the last two decades.

There are four main beaches on Railay, and the most impressive would have to be Phra Nang. Recently, this beach has been voted as one of the top 10 beaches in the world, and it is evident why. The pristine sand is surrounded by beautiful limestone cliffs, some even boasting cave-like features including stalagmites reaching towards the ground. The beach faces out toward the turquoise sea, offering a glorious view of limestone islets. John and I enjoyed spending time rock climbing on Phra Nang, bouldering on the cliffs on the beach.

Not only can you climb on the peninsula, but you can go out on the sea as well. Large spires and cliffs rising out of the water have been eroded at the bottom by the changing tide of the salty sea, thus making Railay one of the world’s few destinations for deep water soloing. Deep water soloing is where rock climbers will climb the limestone islets and fall into the ocean below the. John and I took a boat out to some of the climbing destinations, and spent a wonderful afternoon climbing the cliffs and falling into the sea below.

MonkeysOh yes, and there are monkeys on Railay too. Those of you who have visited Thailand know that they aren’t cute and friendly, but rather cheeky and ready to steal things from you. Don’t be fooled by their adorable façade – they will steal your camera and give you rabies if they have the chance.

The food…

John and I are lovers of Thai cuisine, and we were very excited for the food on our trip. Railay offers a multitude of lovely resorts right on the beach, all with restaurants that boast a beautiful atmosphere. The problem with these restaurants are that they kind of expensive by Thailand standards. After one meal at one of these sea-side resort restaurants, John and I discovered the Mangrove.

The Mangrove was inland with no view of the water, however their prices were great and their menu extensive. The restaurant itself was nothing glamorous, but the great food, the huge charcoal grill sitting outside and lower prices more than made up for it. In the end, we ate every remaining meal of our stay at the Mangrove, with no regrets. The food was so good we had no reason to go elsewhere. Red curry, green curry, Panang curry, grilled skewers, seafood, soups, pineapple fried rice – the menu went on and on!

John is a seafood lover, and was very excited to sample some of the fresh grilled seafood right out of sea. He ordered a couple of delicacies that he had never had the privilege of trying before, starting with the blue crab. John loved the blue crab. Compared to a normal crab, John delighted in the blue crab’s less fishy, less salty but sweet, savoury and light tastes and textures.  The next night was the king prawns, prawns as large as smokies. I had never seen anything like them before. John was a happy guy after these meals.

The Mangrove also boasted the best Tom yam soup we tried on our trip (and of course we had the soup multiple times.) Tom yam soup is this week’s recipe!

Tom yam is a hot and sour soup flavoured with lemongrass, kaffir lime leaves, galangal, Thai chili peppers and shallots among other things. You can serve the soup with chicken, shrimp or even vegetarian. After the prep is done, the soup itself is pretty quick to make, as it doesn’t require a long simmering time like other soups – the method we use has the soup at a boil as you add the ingredients.

TIPS:

  • If you can find Tamarind Chili jam, this is the way to go to have your Tom Yam make the jump from good to great. But the jam can be hard to find, so you can use regular tamarind paste if you can’t find the good stuff. Another option is to order it or make it yourself – check out this link to a recipe and a place to order your jam online. (Thanks to John for finding this great website!)
  • Remember, to taste and adjust your flavours as you go. You may find that you prefer more or less chili peppers, salt, fish sauce etc. You may even find that you want to increase the lemongrass or galangal. When John and I make tom yam, every soup turns out a little different then the last.
  • Select number of bird’s eye chilies according to how hot you like your soup. John and I made the “serves 4” version below, and used around 20-25 chilies for a medium heat soup.

Tom Yam PotHerb of the week:

GALANGAL
Galangal is a frequent flyer in Thai cooking. I like to think of galangal as the Thai ginger – galangal and ginger are both roots but have distinctly different flavours. On Railay Beach, John had a Chai tea where the barista mortar and pestled all of the ingredients, including galangal instead of the typical ginger – delicious!

So if you ever find yourself on Railay beach, make sure you get yourself to the Mangrove to enjoy a bowl of their Tom Yam soup! If not, give it a try yourself!

Special thanks to John for taking such wonderful photos!

Bon appetit,

Julie

Click below to view other posts in the Thailand series:
Chiang Mai and Khao Soi

Click here to view a printable Word version of the recipe:
Tom Yam Soup

_________________________________________________________

Tom Yam Soup

Single Serving

INGREDIENTS:

  • 2 cups water
  • 2-6 crushed bird’s eye chili peppers (use flat side of the knife, crush pepper. Crushed peppers should remain intact as you add it to the soup, keeping the seeds contained in the pepper)
  • ½ cup sliced mushrooms
  • 1 stalk lemongrass sliced into 1-inch long pieces – remove outer layer
  • 1 inch galangal, sliced into thin medallions
  • 1 small tomato, cut into wedges
  • 2 shallots, crushed with flat side of knife
  • 1 tbsp fish sauce or soya sauce (don’t mix). Add to taste.
  • ½ tsp sugar
  • ¼ – ½ tsp salt, or to taste
  • 1/2 tbsp tamarind chili jam or tamarind paste (if you can’t find tamarind chili jam, you can make or order your own by clicking here)
  • 5 shrimp or equivalent of chicken or tofu
  • 3 kaffir lime leaves
  • 1 chopped green onion, 1-inch pieces
  • 1 spring cilantro, finely chopped
  • 2 tsp lime juice

To Serve 4

INGREDIENTS:

  • 8 – 10 cups water
  • 15 – 40 crushed bird’s eye chili peppers (use flat side of the knife, crush pepper. Crushed peppers should remain intact as you add it to the soup, keeping the seeds contained in the pepper)
  • 2 cups sliced mushrooms
  • 5 stalks lemongrass (4-5 inches each) sliced into 1-inch long pieces – remove outer layer before slicing
  • 4 inches galangal, sliced into thin medallions
  • 4 small or 2-3 large tomatoes, cut into wedges
  • 8 shallots, crushed with flat side of knife
  • 4 – 6 tbsp fish sauce or soya sauce (don’t mix). Add to taste.
  • 2 tsp sugar
  • 1-2 tsp salt, or to taste
  • 2 – 3 tbsp tamarind chili jam or tamarind paste (if you can’t find tamarind chili jam, you can make or order your own by clicking here)
  • 20 shrimp or equivalent of chicken or tofu
  • 12 – 15 kaffir lime leaves
  • 3 chopped green onions, 1-inch pieces
  • 4 springs cilantro, finely chopped
  • 2 – 3 tbsp lime juice (try juice of ½ a lime)

DIRECTIONS:

  1. Make a broth. Put water in a pot. Add lemongrass, galangal, shallots, tomatoes and mushrooms. Heat until boiling.
  2. Once boiling, add tamarind chili paste, and bird’s eye chili peppers. Continue boiling for a few minutes.
  3. Flavour with fish sauce/soya sauce, salt and sugar.
  4. Add shrimp/chicken/tofu. Boil until meat/tofu is cooked. Shrimp will cook very fast, in less a minute. Chicken will take a minute or two, if chopped
  5. Stir and add green onion, cilantro and lime leaves. Turn off heat.
  6. Add lime juice and serve.

Please note: If you want to eat the lime leaves chop finely. To chop, de-stem, roll into a spiral and then chop into thin strips, as thin as you can. Don’t eat the lemongrass or chili peppers. Eat the galangal If you like.

Chicken Korma and Indian Cooking Class

Meal2

Hello everyone,

If you read last week’s post, you will know that John and I took a wonderful Indian cooking class with Edmonton’s own Michelle Peters-Jones. She is the author and owner of The Tiffin Box, a popular blog primarily featuring Indian cuisine.

Last week, I took you through the making of our own garam masala spice blend. This week, I am going to show you the wonderful Indian dishes we prepared with Michelle! I have linked each dish to Michelle’s blog (if it happens to appear on there.)

Beef Biriyani

As it takes a few hours in the oven, we started with beef biriyani, a slow-cooked beef dish layered with rice.

Vegetable Samosas

Next, we had some fun making vegetable samosas. The filling is surprisingly simple, primarily featuring potatoes and curry leaves. John and I had a blast mastering how to assemble these cute little triangle-shaped dumplings. After a quick deep-fry, our samosas were delectable!

Masala Dal

Our third dish was masala dal, a spiced lentil dish. While cooking the red lentils and split peas until they were mushy, we fried some onion and tomatoes with spices and then mixed them into the lentils. Easy – and a great side to accompany any entrée! The secret that Michelle showed us here was the tempering. Right before serving, you fry some chili peppers with garlic and cumin seeds. Place them on the dal and cover. When you lift the lid serve, a wonderful spicy aroma fills the air.

Korma2Chicken Korma (today’s featured recipe!)

The final main course was the chicken korma. I’ve always loved chicken korma, and have made it a few times using pre-made spice packages, so I was very excited to learn how to make it from scratch, and all about the spices involved. I was very surprised at how easy it was, and how quick! Including prep time, you can easily make this dish in less than 45 minutes. The dish included some whole spices (cardamom pods, cloves and cinnamon/cassia) as well as the fresh garam masala spice blend we had made earlier that day. Finished with some homemade almond paste and cream, the wonderful spices in this rich and satisfying dish are to die for!

KheerCardamom and Rosewater Kheer

Of course we had to have dessert as well, and this could have been the highlight of my life. I love rice pudding, and a Costco-sized package of Cozy Shack can typically be found in my refrigerator. So you can only guess how I swooned over a homemade rice pudding (also known as kheer) flavoured to perfection with cardamom, saffron and rosewater. Absolutely extraordinary – I’ve never had better!

When the meal was ready, John and I dove in and didn’t hold back. I have to apologize to the local Indian restaurants, but nothing we have eaten holds a candle to what we cooked with Michelle that magical day.

Since our cooking class, I have already made the dal and chicken korma in my own kitchen. As mentioned above, the korma is surprisingly easy providing you have the proper whole spices and blends in your kitchen. But if you don’t, they are all pretty easy to find.

TIPS:

  • If you would like to try a vegetable version of this korma, check out Michelle’s navratan korma – other than the substitution of the chicken for an assortment of non-meat ingredients, it is nearly identical.
  • Serve your korma with basmati rice – Michelle suggests cooking at a 1:1.5 rice to water ratio, and to cook for around 17-18 minutes.

Spice of the week

CASSIA BARK
I had never heard of cassia bark before our cooking class. I learned that it is very similar to cinnamon, but milder in flavour. It is often used over cinnamon thanks to its superior affordability.

From what I learned from my internet research, there are two main types of cinnamon – Ceylon cinnamon and cassia cinnamon. Ceylon cinnamon, native to Sri Lanka, is also known as “true cinnamon.” Cassia cinnamon is what we typically buy and use in North America. Unless you can verify the source of your ground cinnamon, there is a good chance you are using cassia.

So special thanks to Michelle for a fun and memorable day of cooking! John and I learned a lot and left with our appetites more than satisfied. The chicken korma recipe has already become a staple in our home, and I know the others are sure to follow!

Bon appetit,

Julie

Interested in viewing the first part of the Indian Cooking Class series? Click below:
Garam Masala Spice Blend and Indian Cooking Class

Click here to view the printable Word version of the recipe:
Chicken Korma

________________________________________________________________________

Chicken Korma

By Michelle Peters-Jones


Almond paste: 

¼ cup almonds

½ cup boiling water

Korma: 

1 kilo skinless, boneless chicken thighs (about 8 – 12)

1 tablespoon neutral oil

4 – 5 whole cloves

1 inch piece cassia bark or cinnamon

4 – 5 whole green cardamom pods

1 medium onion, finely diced

2 garlic cloves, crushed

1 inch piece of ginger, grated

1 teaspoon garam masala

½ teaspoon ground cumin

½ teaspoon mild chili powder

1 tablespoon tomato paste

¼ cup hot chicken stock or water

Salt and pepper to taste

¼ cup whipping cream

Small handful fresh cilantro, to garnish

Method: 

1. Make the almond paste. Soak the almonds in the boiling water for about 15 – 20 minutes. Place almonds with water in a powerful blender and blend to a fine paste and keep aside.

2.  Meanwhile, cut the chicken thighs into bite-sized pieces and keep aside.

3.  Heat the oil in a heavy based pan, and add the cloves, cassia or cinnamon and cardamom. Fry for a  minute, until the spices are fragrant, then add the diced onion. Fry the onion on a medium high heat, until beginning to go golden around the edges.

4. Add the garlic and ginger. Fry together for an additional 30 seconds. Add the spices to the onion mixture. Fry for another 30 seconds, then add the tomato paste. Fry everything together until it cooks into a thick, sticky mass. Season with a little salt.

5. Add the stock to the pan, and the chicken thighs. Cover the pan and cook for about 15 minutes until the chicken is cooked through.

6. Add 3 – 4 tablespoons of the almond paste (keep the remaining paste for other uses) and the cream to the sauce, and cook on a gentle heat until the sauce is thick and creamy. Season to taste with the salt and pepper and garnish with fresh cilantro leaves before serving.

Serve with basmati rice.

Garam Masala Spice Blend and Indian Cooking Class

Plate

Hello everyone,

Instead of exchanging gifts for our last anniversary, John and I decided to try something different and treat ourselves to an experience together. As we are lovers of Indian cuisine (both dining out and cooking it ourselves) we decided to partake in an Indian cooking class. This was John’s idea, and was originally intended to be a surprise for me, but he decided to tell me to make the planning easier (I was SO EXCITED!) John found something much more interesting than a typical college style cooking school. Through a little research, he discovered Michelle Peters-Jones a very successful local food blogger who is active in the Edmonton food scene. Michelle also happens to offer private Indian cooking classes. After viewing her very impressive blog The Tiffin Box, John and I were convinced that Michelle knows her stuff and that this would be a great experience.

We arrived to a warm welcome at Michelle’s home. After coffee and some time getting to know each-other, we got started. Through browsing the recipes on Michelle’s blog and some of her own suggestions, we had already determined our menu for the day:

  • A garam masala spice blend
  • Beef Biriyani – a slow cooked beef and rice dish
  • Chicken Korma – a rich and creamy dish
  • Masala Dal – a red lentil dish
  • Veggie samosas – vegetarian dumplings
  • Spiced rice pudding – oh how I love rice pudding

We started by making our garam masala spice blend, a very commonly used Indian spice blend. This ended up being an eye-opening and life changing experience for John and I. To date, we have always bought our spice blends pre-made. But thanks to the incredibly fragrant and fresh blend we made with Michelle, this will change from now on.

To make our garam masala blend, we started by dry-roasting the whole spices one-by-one, including spices such as star anise, green cardamom pods, cassia bark and black peppercorns. We then put them into Michelle’s Panasonic Super-Mixer-Grinder and pulverized the whole spices into a powder.

What Is a Panasonic Super-Mixer-Grinder you ask? Well, John and I were very intrigued by this powerful little device. Turns out these mixer-grinders are a normal part of an Indian kitchen. Depending on what attachments you have, these high-powered devices will cost you much less than a VitaMix. Among other things, they can grind your spices, make chutneys, mix dough and even juice fruits and vegetables.

John and I are currently in the process of shopping for a mixer-grinder. We have it down to the Panasonic Super-Mixer-Grinder and the Preethi Mixer-Grinder. Although the Panasonic seems to be the gold standard, the 220 volt device would require some adaptations in our kitchen. We are leaning towards the 110 volt but well reviewed Preethi. We look forward to making our own spice blends at home – garam masala, madras curry powder, tandoori and even the biriyani blend!

Garam MasalaThe final product was incredible. This garam masala blend was far superior to anything we had purchased at even the best spice stores. As an added bonus, Michelle assured us that the cost of the whole spices is very affordable, less then purchasing a pre-made mix.
TIPS:

  • Starting with the heaviest spices, you must dry-roast the spices before grinding! This is essential as it will bring out the fragrances.
  • If you don’t have a mixer-grinder, you can use a Magic Bullet with the proper grinding blade, or a coffee grinder.
  • Store your spice blend in a dark area.

Of course, we aren’t finished here – next week it’s the meat and potatoes of the cooking course (or perhaps the lentils and rice?) as I take you through the other delicious dishes we made with Michelle.

Bon appetit!

Julie

I have posted Michelle’s garam masala blend below, but you can click here to view her post and recipe directly on her website. In fact, if you have the urge to try your hand at some Indian cuisine, I would suggest checking out her website www.thetiffinbox.ca.

To view the next post with all of the wonderful dishes we cooked in our Indian cooking class, clike here:
Chicken Korma and Indian Cooking Class 

Click here for the printable word version of the recipe:
Garam Masala

_________________________________________________________

Garam Masala
By Michelle Peters-Jones

2 star anise

1 tablespoon cassia bark

1 teaspoon green cardamoms

½ tablespoon whole black peppercorns

2 pods black cardamom, seeds only

½ tablespoon whole cloves

1 teaspoon mace

1 ½ tablespoons whole coriander seeds

1 tablespoon cumin seeds

1 teaspoon freshly grated nutmeg

3 – 4 dried bay leaves

Method:

Heat a heavy based pan until it is very hot.

Dry roast the whole spices (except for the nutmeg), in the order listed (essentially, the heavier spices first, then moving on to the more delicate ones) and remove to a bowl.

Let the spices cool completely, then blend to a fine powder in a spice grinder or an old coffee grinder. If the spices don’t blend down completely, sieve them, and then blend the coarse leftovers again.

Store in an airtight tin, away from direct sunlight.

In the Beginning: Mushroom Barley Risotto

Braley Rizotto Plated

Hello everyone,

Happy 50th post!

I did it! I made a milestone! Two actually – I started this blog just over a year ago on February 16, 2014. Unfortunately, I just got back from Thailand and was gone at the time of my one year anniversary, so we will be celebrating the 50th post milestone as opposed to the 1 year anniversary.  I thought it would be fun to look back at how “Julie’s Kitchen Adventures” started, and the very first recipe behind it all – mushroom barley risotto.

My mom discovered mushroom barley risotto a few years back in an ATCO Blue Flame Kitchen cookbook, and my whole family fell in love with it. This dish is cheesy, rich, flavourful comfort food at its best, and has been a family favourite since my mom made it that fateful night. I remember her telling me about this recipe and saying that she was planning on trying it. When she finally did, I got a very excited phone call from her, just delighting in how absolutely delicious this mushroom barley risotto was. Of course, I had to try it myself and after doing so, I agreed with my mom’s opinion whole heartedly.

We made it at the lake one day, and my friend Alie came over to try the mushroom barley risotto. Like all people who sample this dish, she adored it.  Naturally, she asked me to email her the recipe, which I of course did. I can’t remember what I wrote in the email, but in my mind I imagine the body of the message to have be full of helpful tips and insightful anecdotes.

Last February, my lake friends and I got together for a few drinks on Whyte Avenue. If I recall correctly, Alie brought up the mushroom barley risotto recipe, and how good it was. I think she asked me to send her more recipes, and then the idea struck me. “Why don’t I start a recipe of the week email?” Of course, I made everyone there sign up, and my new recipe of the week email was born.

Shortly thereafter, I sent out my very first email featuring Roasted Vegetables with Quinoa. It was much more bare bones then my current posts typically are, simply featuring the recipe and a few tips. As I sent out each new email, I slowly added more friends and family to my mailing list. Over time, the email evolved into something more the just a recipe with tips, but to a means that allowed me to share my cooking experiences and food-related stories with everyone.

In September, a few people pushed me to set up a blog. I diligently uploaded my thirty-some previous emails onto the blog, doing my best to edit and format each one. I also had to pick a name. Since “Recipe of the Week” was already taken, I had to find a new name. “Julie’s Kitchen Adventures” popped into my head, and the rest is history!

Barley Rizotto in PotMushroom Barley Risotto

Rich, delightful, soul-warming. Just of few of the many adjectives I could use to describe this dish.

This recipe takes a little time and patience, but isn’t difficult at all. Like any risotto, you have to continuously add liquid a bit at a time, while stirring somewhat consistently.

It makes a lovely side to nearly anything – chicken, fish, roasted pork tenderloin . But there are times where I have eaten this dish as the entrée all on its own. It’s good enough to carry itself as a full meal!

TIPS:

  • Use any melting cheese you want. I often use cheddar because it is easily available.
  • I like to make my own chicken broth (OXO, Better then Bouillon etc.) for this one as opposed to using the pre-packaged tetra-packs – I find the flavour of this to be to overpowering or too salty. I prefer to make a weaker broth.
  • You don’t have to stir non-stop by any means, but keep an eye on it, stirring occasionally and making sure to keep adding the liquid.
  • Get your barley right – be sure you use pearl barley and NOT pot barley!

To this day, mushroom barley risotto is still one of my favourite sides. It’s the perfect touch to make any meal extra special. So good, in fact, that it led to the creation of this enterprise.

Thank you mushroom barley risotto. And to all the people whose love for mushroom barley risotto led to “Julie’s Kitchen Adventures.”

Bon appetit,

Julie

Click here to view printable Word version of recipe:
Mushroom Barley Risotto

_____________________________________________________________

Mushroom Barley Risotto
From ATCO Blue Flame Kitchen

Serves 68.

INGREDIENTS:

6 cups chicken broth

3 tbsp butter

2 cups thinly sliced assorted mushrooms, or regular mushrooms

2 tbsp olive oil

1 /4 cup finely chopped onion or shallot

1 cup pearl barley

1 / 2 cup dry white wine

1/2 cup shredded fontina cheese – or any melting cheese you like

1/2 cup light cream (10%) or whipping cream

1/2 tsp salt

1/2 tsp freshly ground pepper

Chopped fresh parsley

DIRECTIONS:

In a pot, heat broth to simmering; keep warm. Meanwhile, melt butter in a Dutch oven over medium heat. Add mushrooms and sauté until mushrooms are light and liquid is evaporated, about 5 minutes. Remove from heat; set aside.

Heat oil in the Dutch oven over medium heat. Add onion and sauté about 2 — 3 minutes. Add barley and sauté for 3 minutes. Add wine and stir, until wine is almost absorbed.

Add 2 cups (500 mL) hot broth to barley mixture; cook, stirring frequently until almost all of liquid is absorbed. Add remaining 4 cups (1 L) hot broth, adding about ½ a cup at a time, cooking and stirring constantly until barley is tender and most of liquid is absorbed, about 35 — 40 minutes. Remove from heat.

Add mushrooms and cheese, stirring until cheese is melted. Stir in cream salt and pepper. Sprinkle with parsley. Serve immediately.