Casa Bonita: Sweet and Spicy Mexican Black Beans

Sweet and Spicy Mexican Black BeansHello everyone,

So there are a few key weekends each summer that everyone at my lake looks forward to – May long weekend, September long weekend, Barnburner, West Cove days – but one of my favourites has to be July long weekend.

I think my cousin Sophie says it best when she refers to the crew out at Lac Ste. Anne as our lake family. Some of us are related by blood, others are not, but it doesn’t matter either way. We have all grown up together since we were  kids and are all as good as family out there. We laugh together, cry together, party together, chill together and have EPIC camp fire sing-alongs- you know the drill

So several years back (6 or 7, maybe even more…no one really knows for sure) we came up with the idea to have a Mexican fiesta on Canada day (yes, we know, the cuisine is not appropriate for the occasion, but the spirit sure is!) My understanding of how this all started is that I think my Uncle Don and Aunty Ann wanted to try something fun because their family from Sweden was out at the cabin, and a Mexican fiesta sounded like a fun idea. I remember there was a threat of rain that day, so my Uncle Don managed to set up a bunch of tarps, and we had a great time!

There is a Southpark episode where Cartman’s sole goal in life was to go to this tacky Mexican restaurant called Casa Bonita. At the time, some of us were pretty into Southpark, so we started calling our Mexican fiesta Casa Bonita, and the name has stuck. (I think we have to credit my brother with this gem.) Now everyone attending, parents and all, refer to the fiesta as Casa Bonita.

It’s funny how in Spanish Casa Bonita means ‘beautiful house,’ and the name couldn’t be more appropriate. With good friends and family coming together under the same house (or our cabin’s front yard in our case) what could be more beautiful?


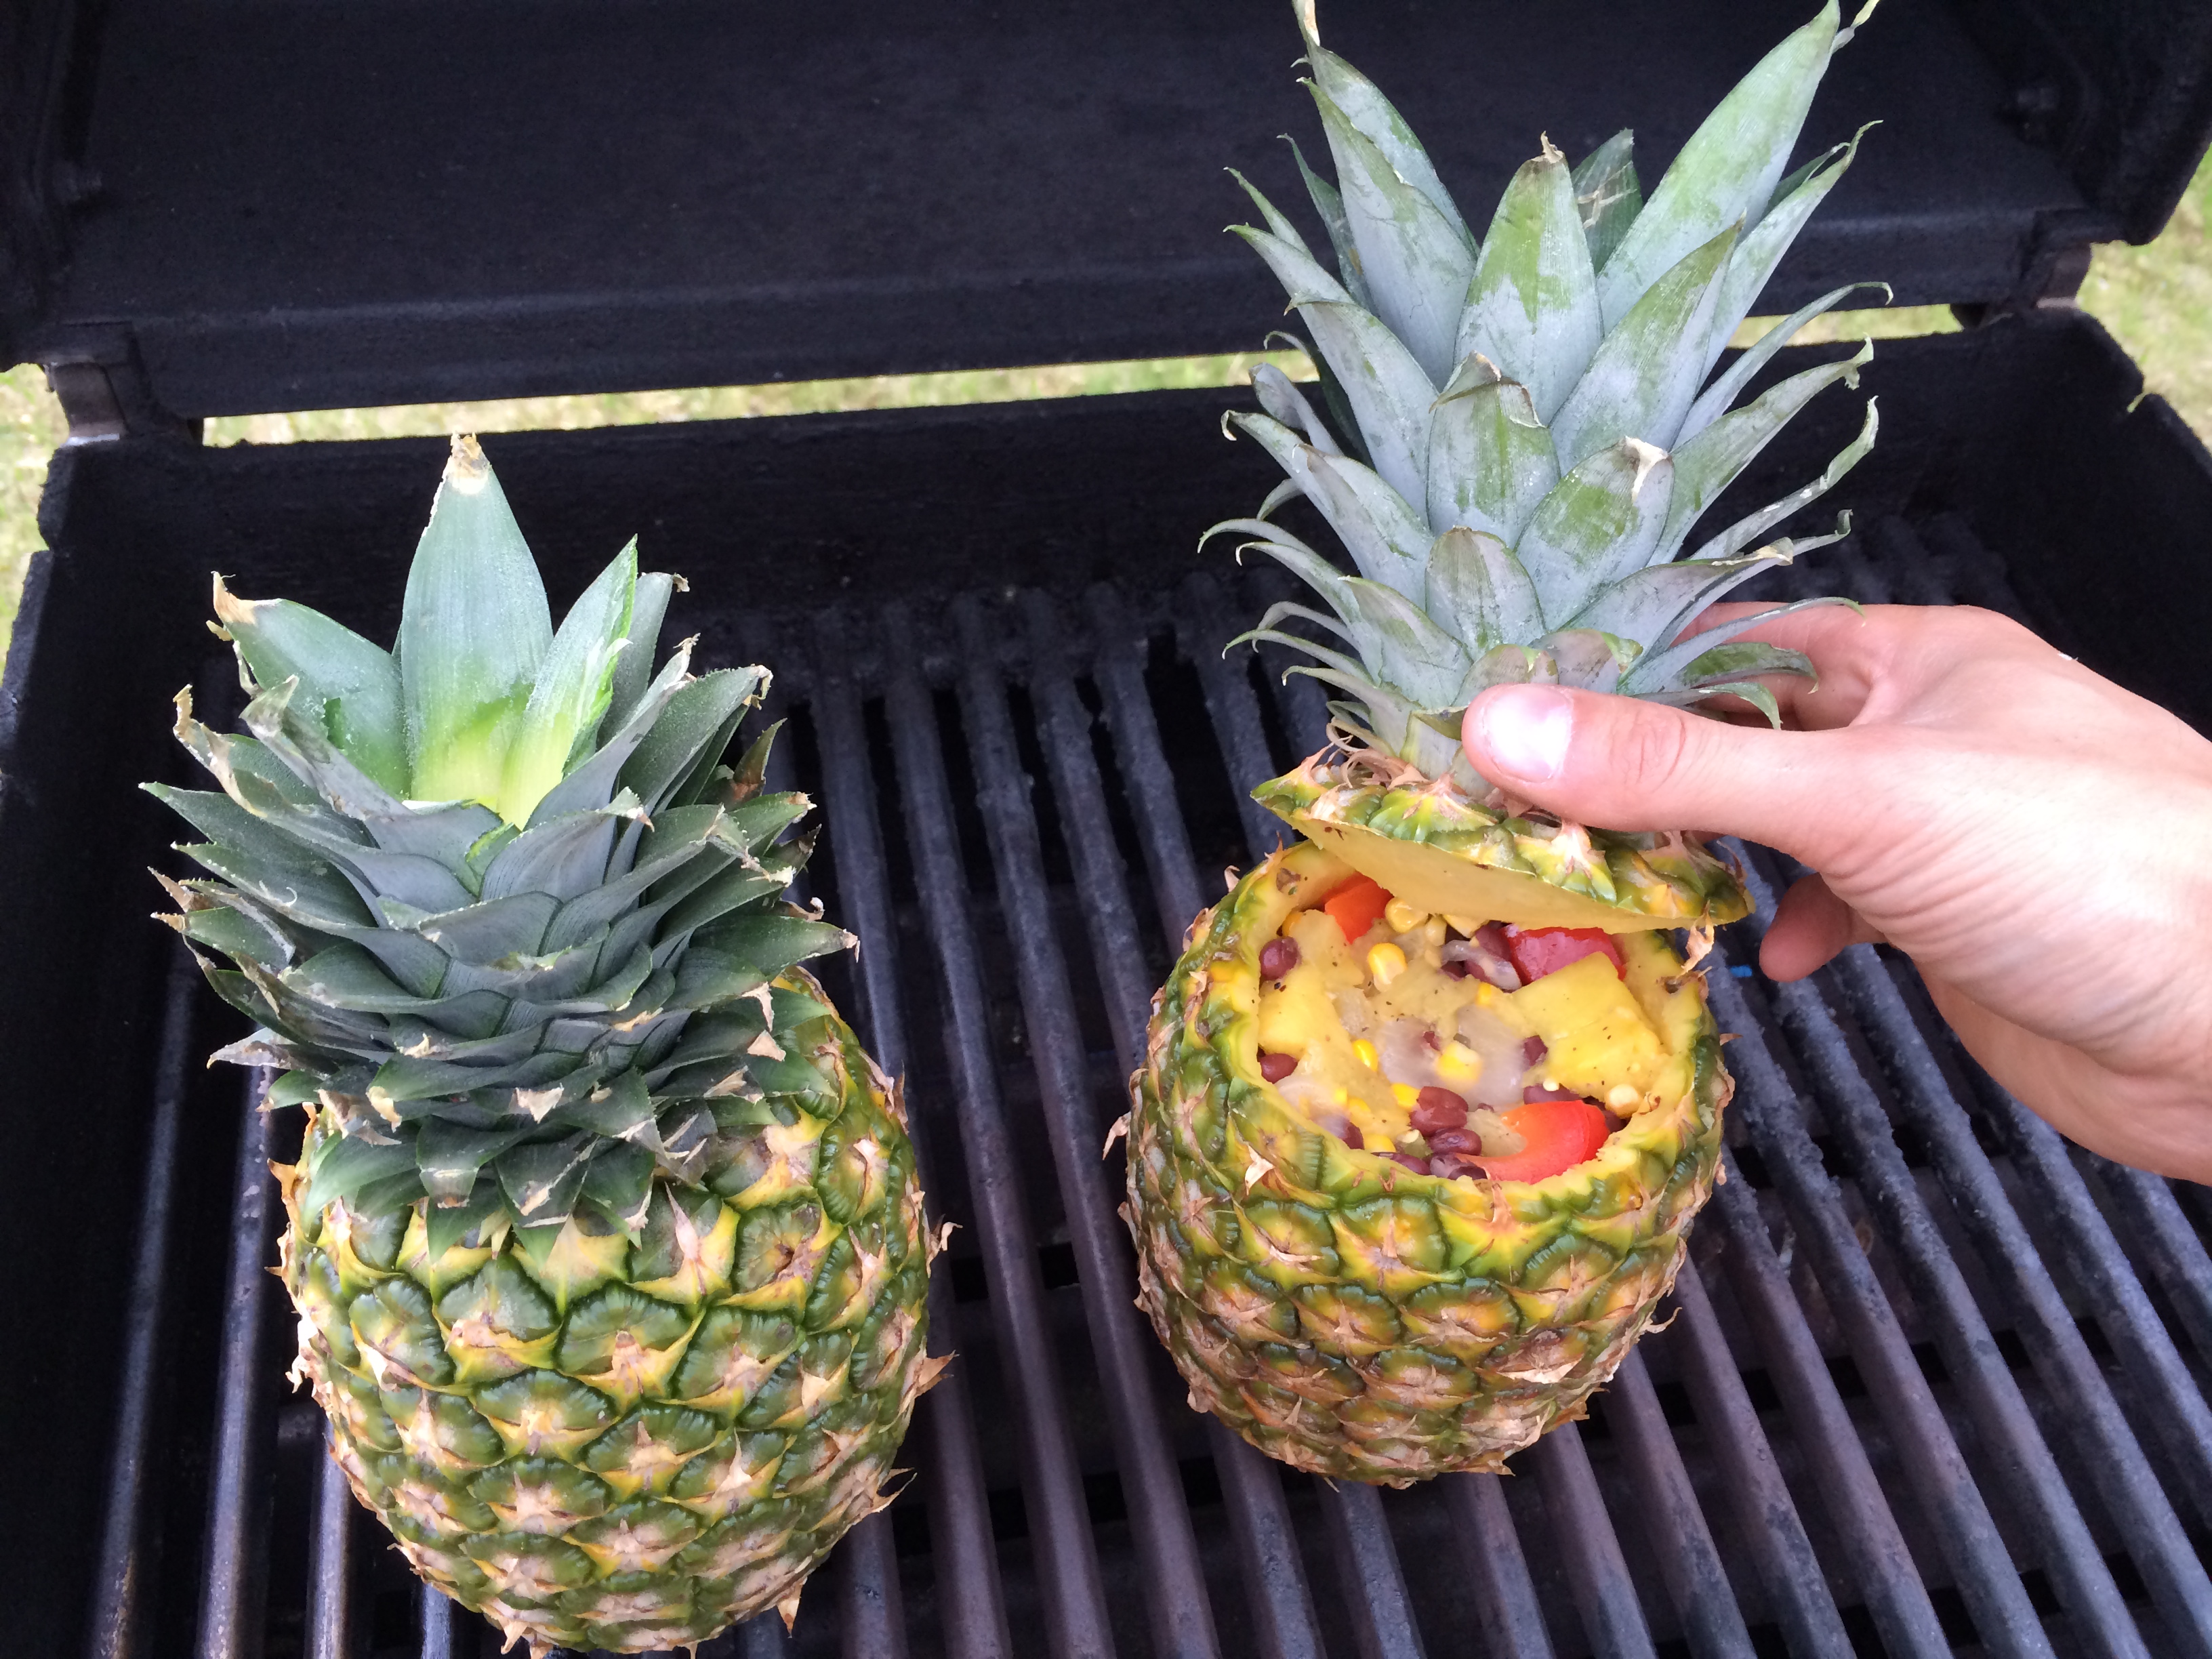
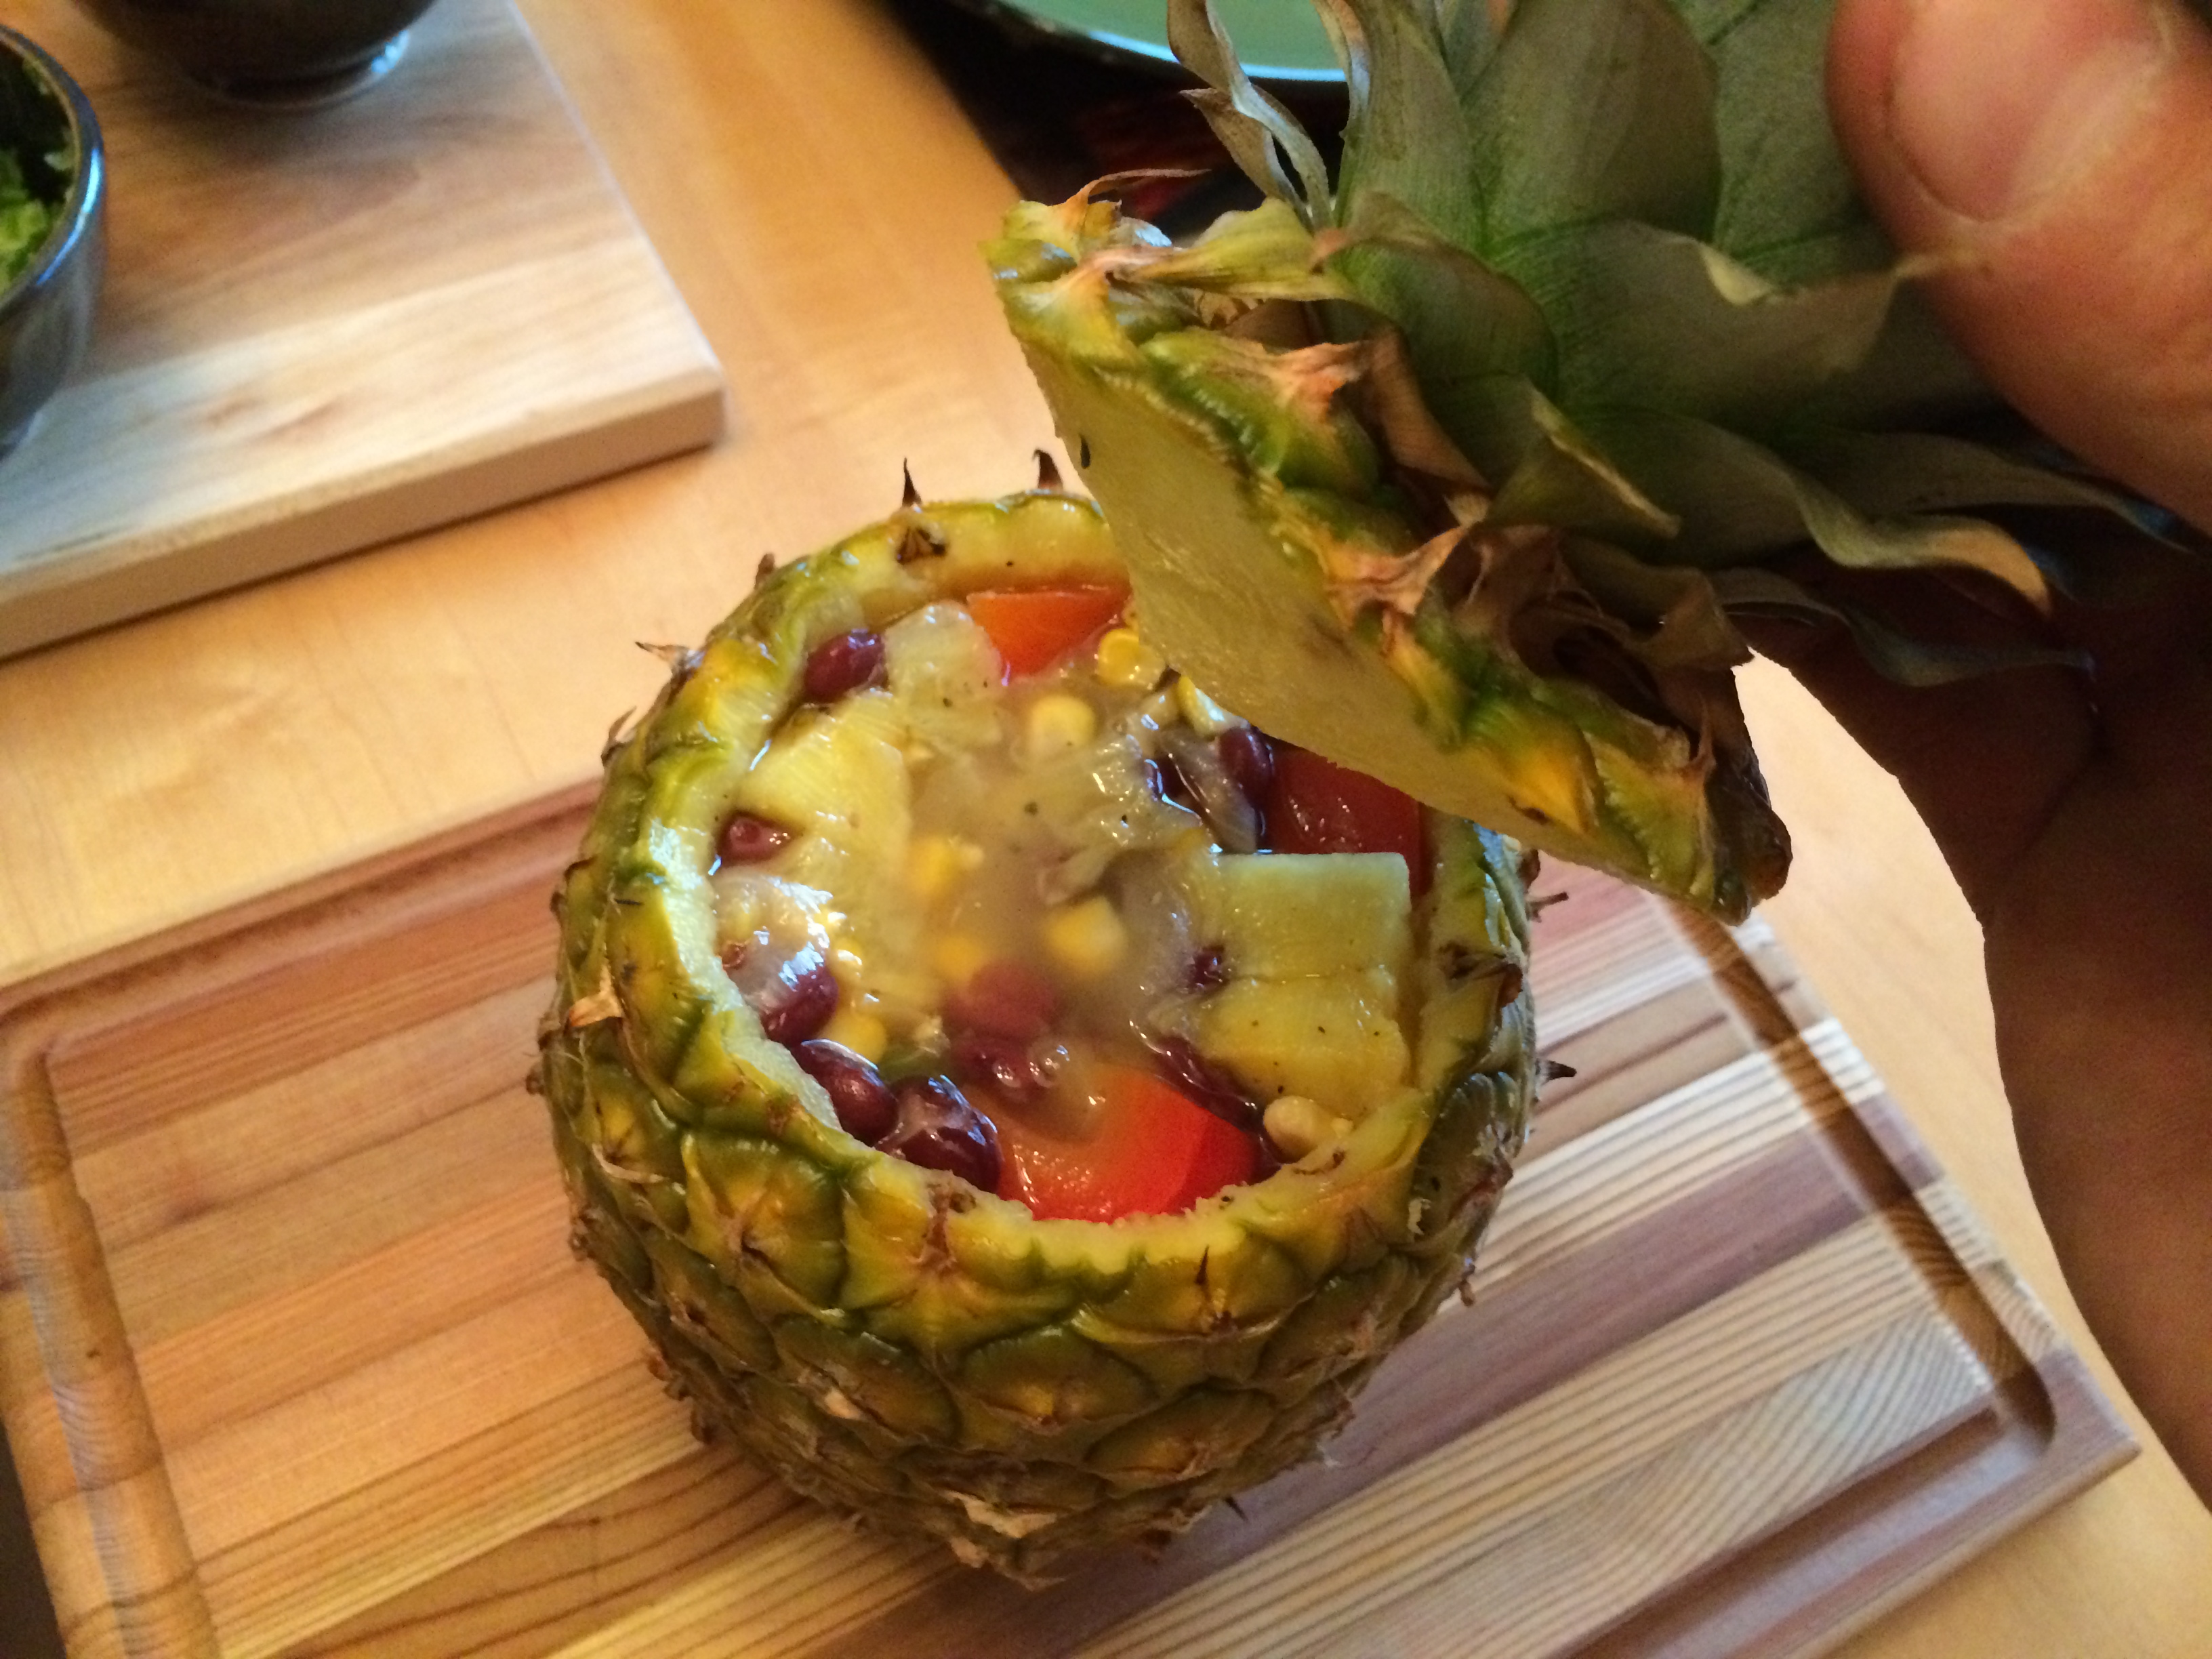
So every year, we always have a different mix of people at Casa Bonita, some years we have probably had more then 30, other years significantly less. But over the years, everyone has kind of fallen into a signature dish. My cousin Lori always starts off the festivities with her patented mango salsa. This year, she also made a pico de gallo. . My mom always makes sangria that just has a habit of magically disappearing as everyone digs in, and usually contributes a Mexican pulled pork and rice. For years, I have been making my favourite sweet and spicy Mexican black beans (which is our recipe of the week!) My friend Alie usually changes it up every year. Last year, Alie and her sister Jossie showed up with four splendid jugs of blended summery drinks. This year, Alie brought a cream cheese crab dip and Tex-Mex style Tater Tots. The tasty bite-sized taters really do lock in all the flavour.

And we can’t forgot my Uncle Don! Every year he lights it up with his enchiladas. When you ask him what he put in them he has no idea. He is the kind of chef that makes if up as he goes with no use of a recipe, and his food always turns out great!

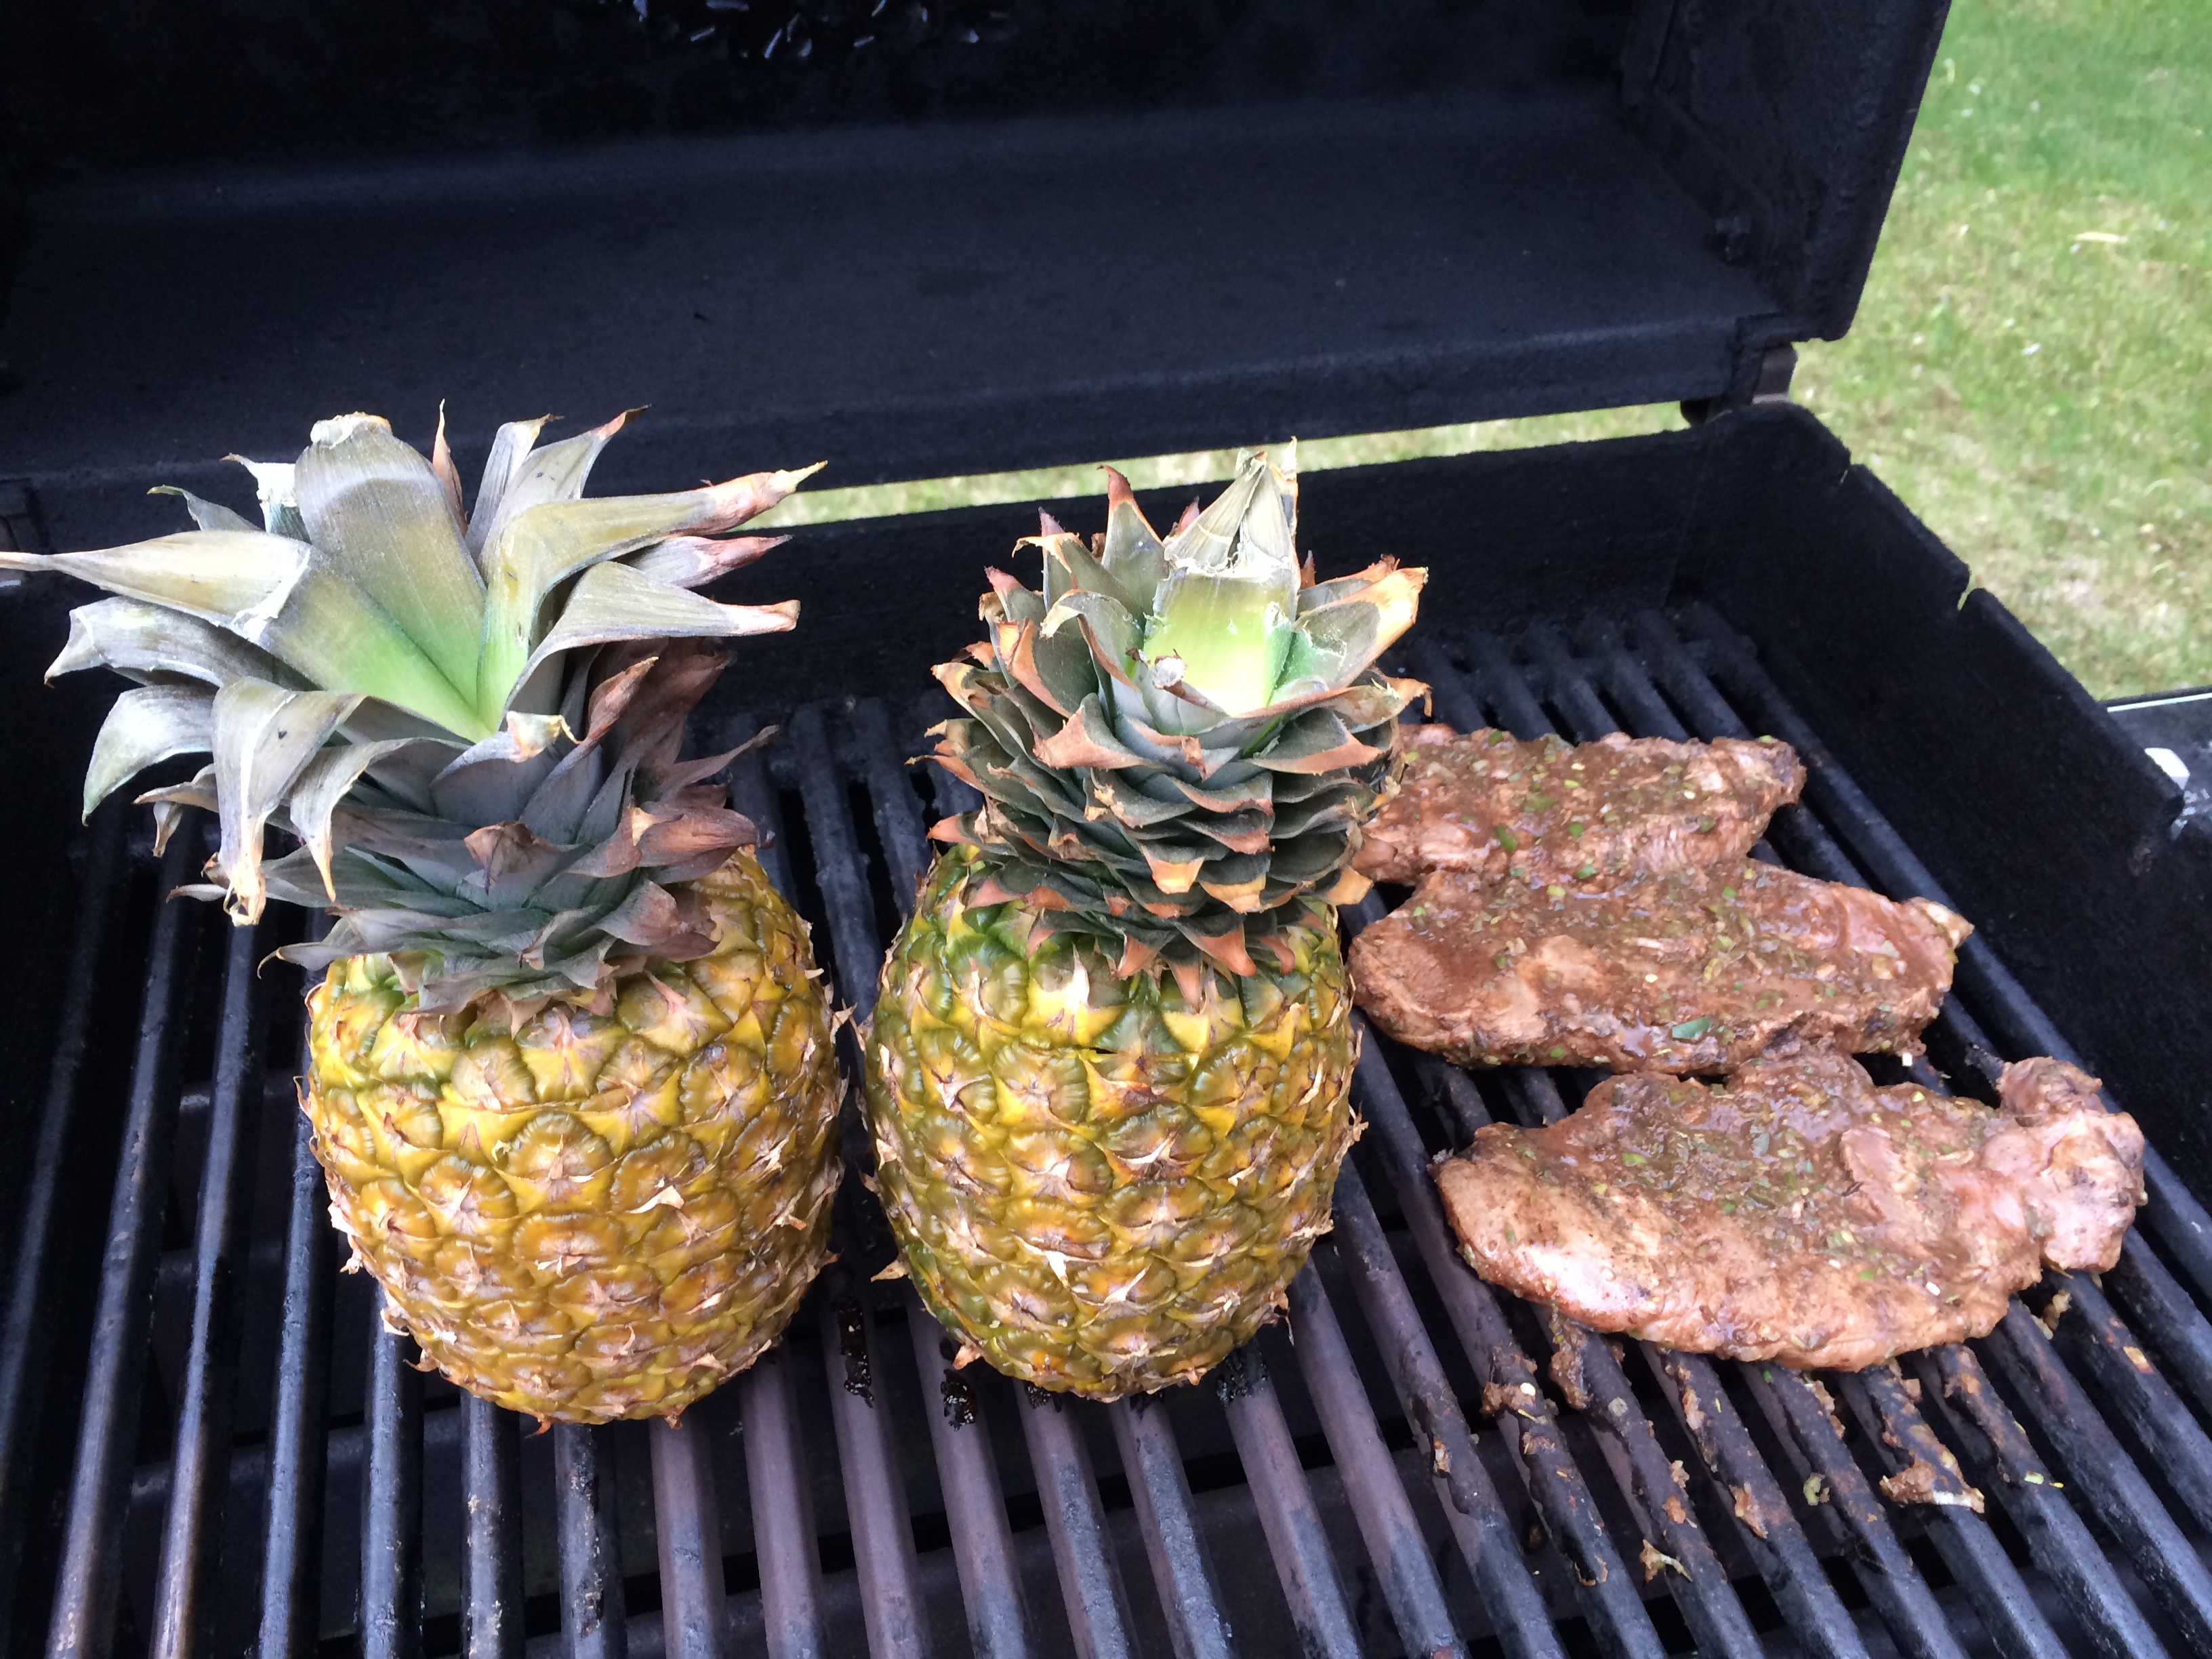
So I intended on getting a fantastic picture of our spread, but the food was attacked with such vigor by all (including myself) that this is the best I could do, a bit of an afterthought. Below are Uncle Don’s fajitas, my mom’s pulled pork and rice, and my spicy beans.

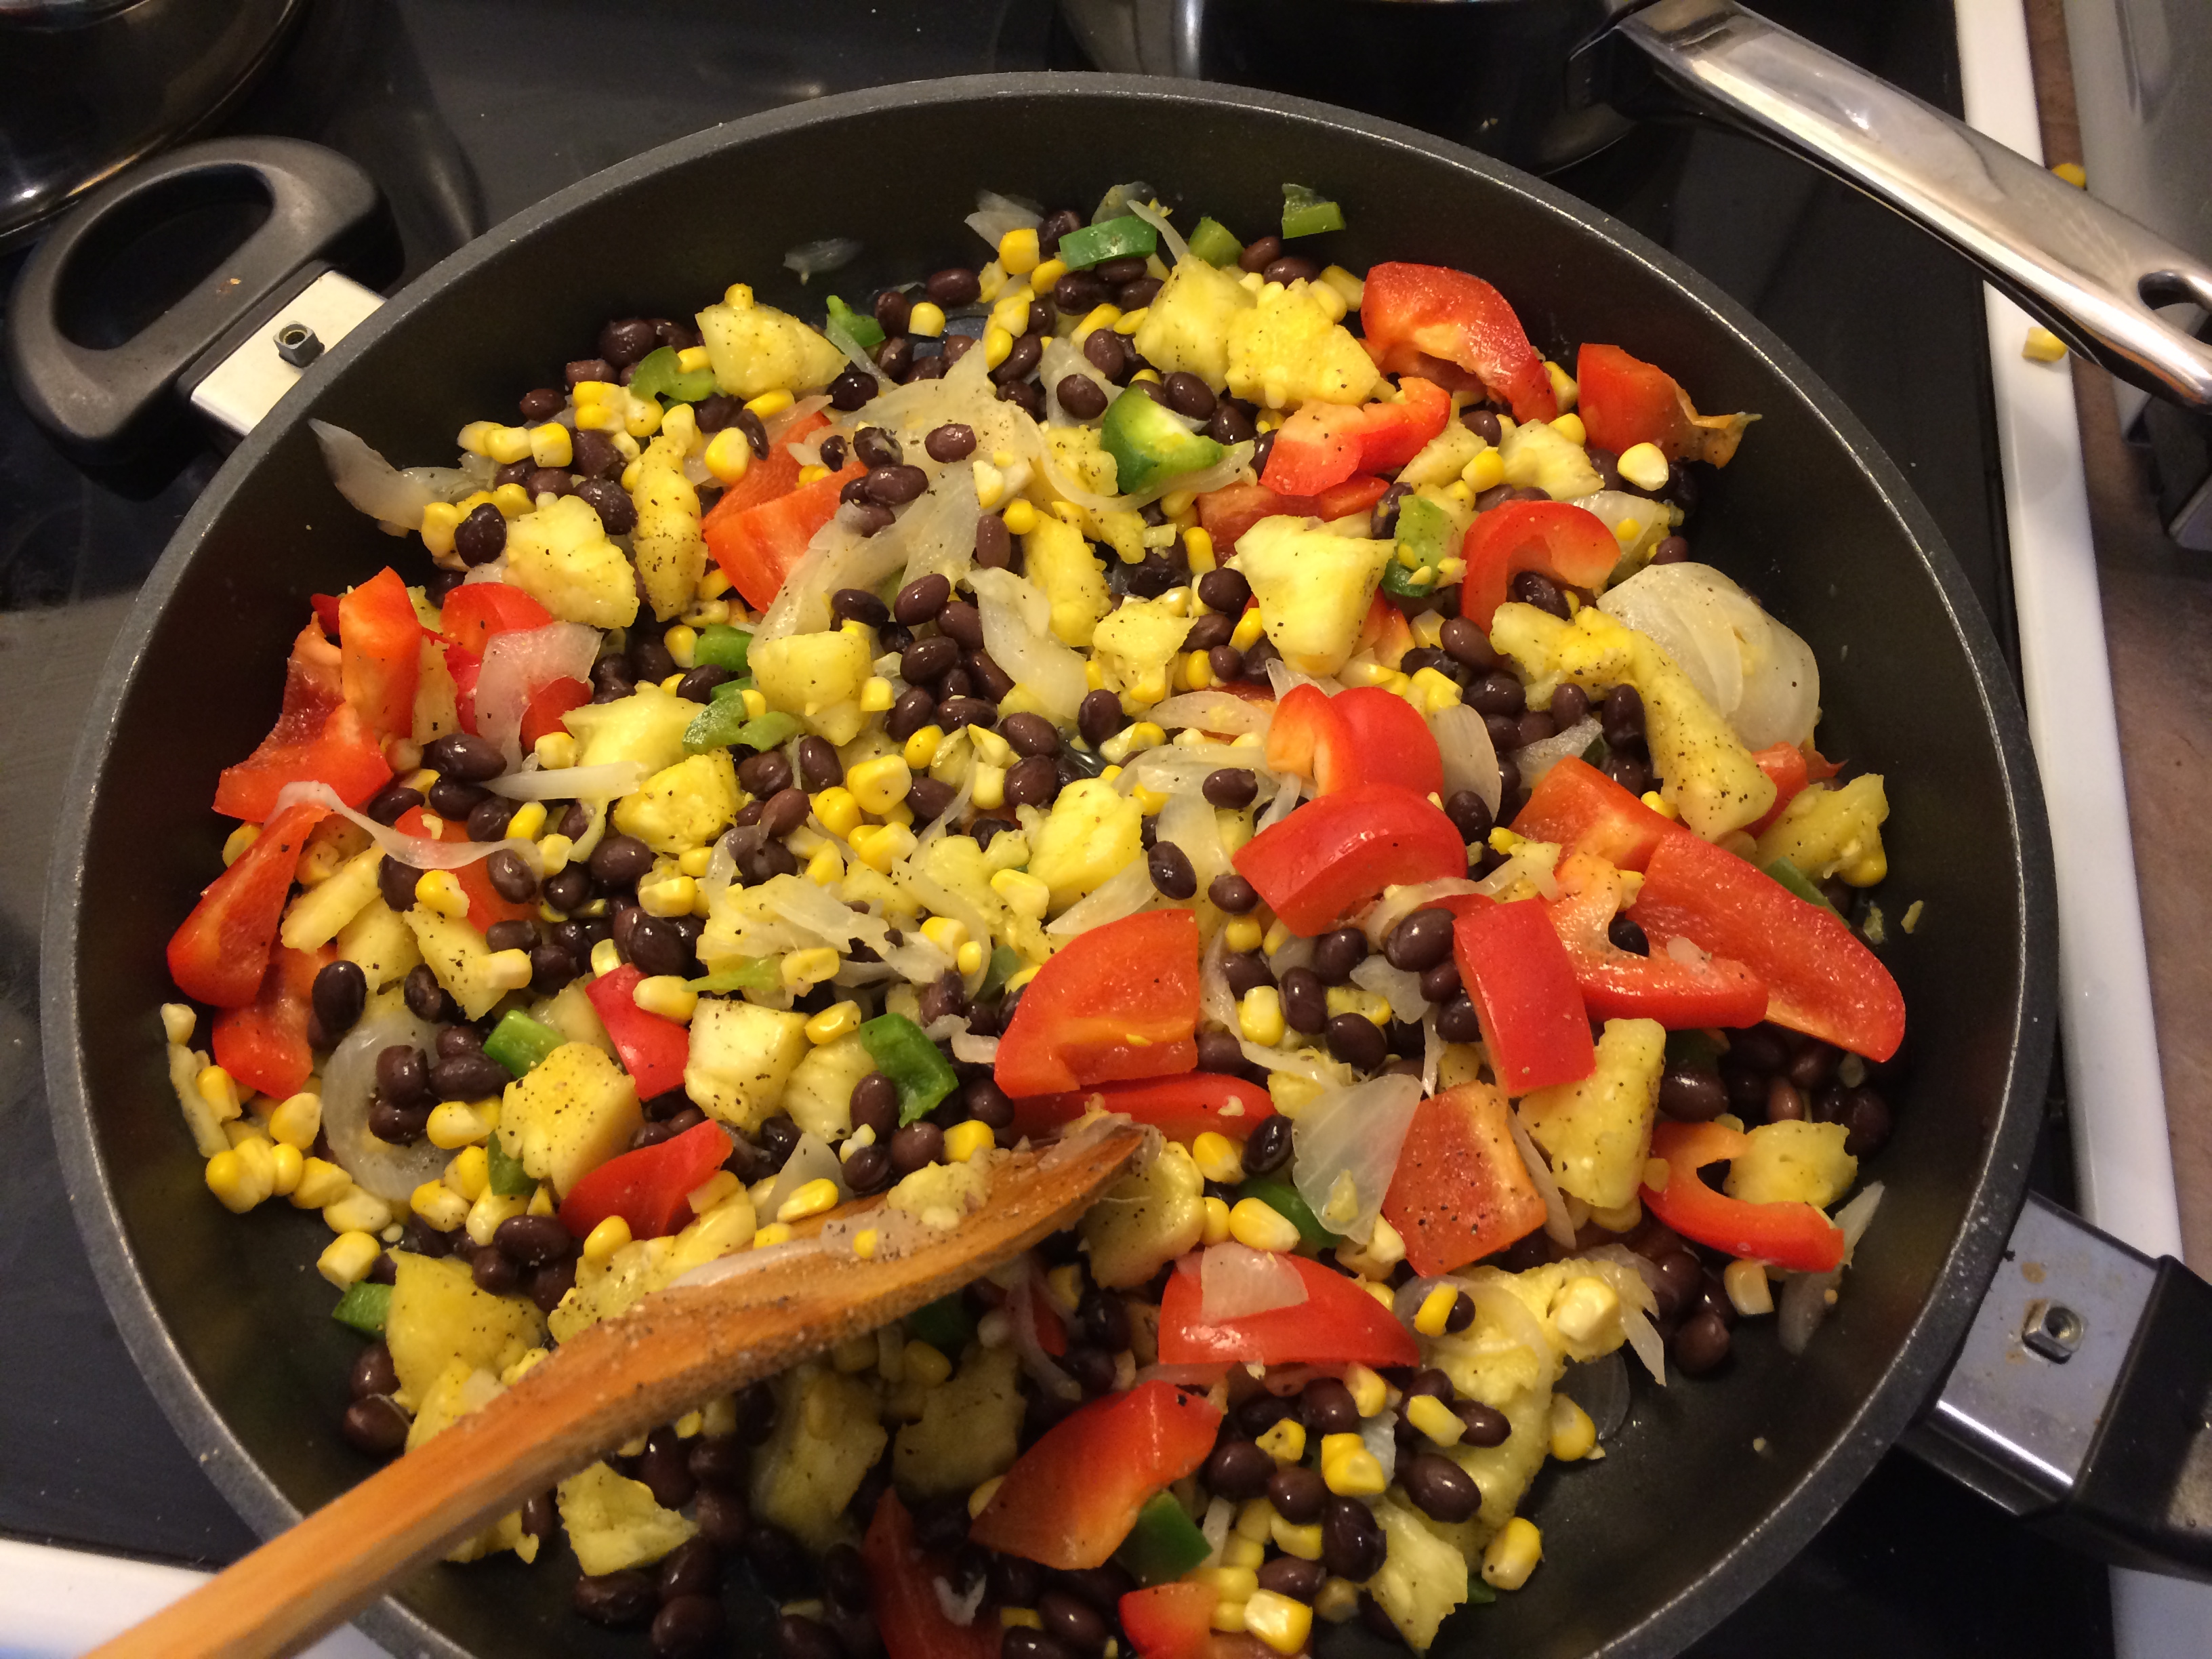
So this week’s recipe is Mexican sweet and spicy beans. I have loved this recipe since the day I first made it, and not only is it a staple at Casa Bonita, but it frequently finds its way to our spread when John and I do Mexican.

TIPS:

–          Saute the onions until they are caramelized. This takes a while, but is worth it in the end.

–          Every time I make these beans, the level of heat is varied. If you want them just a little hot, remove the seeds from both your jalepenos. Usually, I leave the seeds in one of the two jalapenos – this gives the beans quite the spicy kick

–          You can simmer the beans on the stove, but I find it putting them in the oven produces the best results

Ingredient I can’t live without:

BLACK BEANS
I love these little babies so much. Baked beans, black bean hummus, chili and salad – you can’t go wrong!

So special thanks to my lake family for make Case Bonita so much fun year after year! We love to get over-stuffed with Mexican food together. I am already looking forward to next year!

Bon appetit,

Julie

Click here to view printable Word version of recipe:
Sweet & Spicy Mexican Black Beans

_________________________________________________

Sweet and Spicy Mexican Black Beans

Serves 10+

Olive Oil
2 medium onions, finely chopped
2 cloves garlic, crushed
2 jalapeno peppers, seeded and finely chopped
3 or 4 14 oz cans black beans, drained
1 28 oz can crushed tomatoes
1/3 cup honey
1/3 cup brown sugar
1 tsp ground ginger
1 tsp salt

DIRECTIONS:

Heat the oil in a frying pan over medium heat. Add onions and saute until the onions are a nice golden colour, about 15-20 minutes. Add garlic and jalapenos, saute for 5 more minutes.

Preheat oven to 350 degrees. In a large dutch oven or oven-safe dish, all ingredients, including the onion mix. Bake beans in oven for 1 to 1.5 hours. Alternatively, you can simmer beans if you don’t want to use the oven.

Grilled Jalapeno Raspberry Turkey Burgers

Full Dinner

Hello everyone,

So a little known fact (at least to men) is that girls can barbecue too! Yes, yes, I realized that I am blessed to be surrounded by men in my life who are all-start grillers – John, Steve, Joce – however, it’s great when the girls fire up the grill.

So with the weather being so friendly, and John being so far away, my cousin Lori and I have taken the opportunity to get outside, enjoy the nice weather and prepare some mightily delicious (and healthy) meals. Some of the highlights of our meals over the last couple of weeks have included such gems as grilled portabella mushroom bruschetta, organic Moroccan chicken sausages, brown rice with mushrooms and leeks, and a cilantro lime goat cheese salad. Now, there is a pretty good chance that some of these recipes will grace your inbox in the future, but for now I would like to focus on one of our own creations, raspberry jalapeno turkey burgers.

When I was in the fabulous sauce shop in Austen TX, I picked up a bottle of raspberry jalapeno compote for Lori. She was trying to figure out something creative to do with it, and ended up adding some of the compote to turkey burgers. She reported back to me, informing me of how delicious this creation was. Last week, I thought it would be nice to get a chance to try these burgers myself. So I picked up some ground turkey and asked Lori to bring the compote over for our dinner. When Lori forgot the compote at home (and she lives on the other side of the city) she decided to improvise, showing up with a basket of fresh raspberries and a jalapeno.

Meal With FixingsI mashed the raspberries, and Lori chopped the jalapeno, and we added the ingredients to our burger mix. While sitting outside enjoying the sunshine, Lori grilled these patties to perfection. We served the burgers in iceberg lettuce wraps, stuffed with tomato, avocado, mayo and mushrooms grilled in butter and garlic, and finally a sprinkle of feta. With our lettuce-wrapped burgers, we enjoyed delicious side of quinoa with kale and cranberries.
So this week’s recipe is raspberry jalapeno turkey burgers (with a bonus salad below!) This was a improvised creation that turned out great. What I really loved in these burgers is how the sweet raspberry and spicy jalapeno flavours really stood out, and complimented each other so nicely.

TIPS:

–          We also added fresh basil and feta cheese, not listed in the attached recipe.

–          Handle the burgers carefully as turkey burgers can fall apart.

Ingredient I can’t live without:

GROUND TURKEY
A nice healthy alternative to ground beef. Goes especially well in chili, you wouldn’t know it wasn’t beef! It doesn’t clump up like ground chicken.
So watch your grills boys, the girls are here to stay!

Fruit PartyA Special Note:

I would like to end this edition with a special note. When we were growing up as kids, my grandmother always encouraged healthy eating. One thing she would always do for her grandkids was create what she called a ‘fruit party.’ I have fond memories of my grandma cutting up a variety of fruit and placing it on a plate in a beautiful and festive arrangement before serving it to us. As this is something we always loved, Lori and I decided to create our very own fruit party this dinner:

Bon appetit,

Julie

Click here to view printable Word version of recipe:
Lettuce Wrapped Raspberry Jalapeno Turkey Burgers

______________________________________________________

Lettuce Wrapped Raspberry Jalapeno Turkey Burgers

Burgers

1 package ground turkey
1/3 cup bread crumbs
1 egg
1/2 cup or more, fresh raspberries, mashed in a bowl
1 jalapeno pepper, seeded and minced
1 tsp dried mustard
1 tsp salt
pepper

Optional:
Fresh basil
Feta
Minced onion

Mix all ingredients and form into long shaped patties.
Grill.

Garnish (suggestions)

1 head iceburg lettuce, use leafs as wraps
Sliced tomato
Sliced avocado
Mushrooms,  sauted in butter and garlic
Mayo
Feta, or other grated cheese

John’s Grilled Stuffed Pineapples with Sweet and Sour Sauce


Pineapple on BBQ

Hello everyone,

John is a creative chef. He rarely uses recipes (only sometimes as guidelines) and usually prefers to make it up as he goes. And of course, the outcome is usually fantastic. This week’s recipe is no exception.

We were at Save-On the other day trying to figure out what we wanted for dinner. John paused in mid-step (in a very dramatic fashion at that) and stared intensely ahead. After a few seconds I asked him what he was up to. He responded that we should have stuffed grilled pineapples for dinner, and then proceeded to select two ripe pineapples from the shelf in front of him.

Well, I have had a few things stuffed before – turkey, peppers, potatoes – but stuffed pineapples? That sounded crazy…but intriguing!

So we went through the grocery store, selecting items we thought would go great in a stuffed pineapple. Corn, red peppers, jalapenos, black beans all ended up in our cart. After grocery shopping, we went home to get this crazy experiment underway. John started to core and scoop the fruit out of the pineapples while I got all of the stuffing ingredients into the frying pan. We tasted what was in the pan and decided it needed something more. After a quick discussion,  I ran to the basement and grabbed a jar of our homemade sweet and sour sauce (a bi-product of our barbecue sauce.) The sweet and sour sauce was the perfect touch. After stuffing the pineapples and grilling them for about half an hour (with tops on and all) we were very excited about the delicious dinner these silly looking things yielded!

Core Pineapples – and preserve fruit!

Empty pineapple

Fry ingredients in pan. Add pineapple fruit and sweet and sour sauce (optional)

Filling in Pan

Stuff pineapples with filling

Stuffed Pineapple

Put stuffed pineapples on BBQ. Grill pineapples for about 30 minutes

Dinner on BBQ

Eat stuffing  – and throw some Jamaican Jerk pork chops in there for good measure

Full Meal

IPS:

–      –  We used a homemade sweet and sour sauce in one pineapple, and left the other sauce free just to see how it would turn out. If you don’t feel like making the sauce, it will turn out just great without!

–      – Serve on a bed of rice, garnished with cilantro and green onion

Ingredient I can’t live without:

SWEET AND SOUR SAUCE
When John and I canned our own BBQ sauce, this was a by-product that we love. We frequently use it in stir fires and as a marinade for grilled vegetables.

So here’s to a successful wacky experiment! Kudos to John on the great idea. I am excited to see what other tasty treasures will be created this summer!

Bon appetit,

Julie

Click here to view printable Word version of recipe:
Stuffed Pineapples with Sweet and Sour Sauce

______________________________________________________

Stuffed Pineapples with Sweet and Sour Sauce

Serves 4 – 6

2 pineapples
1 cob corn
1 can black beans
1 red pepper, chopped
1 jalapeno pepper, diced (leave ½ seed for spicy if desired)
1 onion, diced
Sweet and sour sauce (see recipe below)

Cilantro and green onions to garnish

Directions:

  1. Cut tops of pineapple. With long knife, cut out core and pineapple fruit, leaving the pineapple as empty as you can.
  2. Remove pieces of core from your pineapple and preserve fruit.
  3. Parboil corn cob.
  4. Heat oil in large pan. Add onions and jalapeno pepper. Cook. Add red pepper. Cook. Cut corn off cob and add corn. Add black beans. Cook. Add ½ of pineapple.
  5. Add sweet and sour sauce. Start by adding a few tablespoons, and continue to add to your liking.
  6. Spoon as much of the ingredients as you can into pineapples. Cover pineapples with their tops.
  7. Grill pineapples upright on barbecue at around medium-low, for about 30 minutes.
  8. Serve on a bed of rice, and garnish with cilantro and green onions.

Sweet and sour sauce

½ cup apple cider vinegar
½ cup brown sugar
1/3 cup pineapple juice
½ tsp ginger
1 clove garlic, crushed
1 tbsp cornstarch, dissolved in water
¼ cup oil

Directions for dressing:

  1. Place all ingredients in pot (except cornstarch, water and oil) and simmer on medium to reduce acidity, about 10 minutes.
  2. While simmering, dissolve cornstarch in water.
  3. Add cornstarch in simmer pot until dressing thickens. Remove from heat and mix in oil.

Wood Fire Pizza – Mediterranean Pizza

Mediterranean

Mediterranean

Greetings all!

So John has purchased a new barbecue. We now own four different meat cooking devices in our yard (plus one borrowed) – the Bradley smoker, the Weber propane BBQ, the bullet smoker (we call it R2D2 thanks to the cylinder shape), and the newest member of our family, John’s Kamado – a ceramic charcoal grill and smoker.  Plus we are testing out a wood pellet smoker on loan from John’s uncle Tom.  Our deck looks like an outdoor cooking show set.

As there is a lot to be said about this new Komado BBQ, but for today’s purposes, I am just going to focus on the pizza cooking abilities of this thing… we will save a more detailed look at the new BBQ for another day!
John says:

“With it’s 3000 year old ceramic dome design and lava stone it is a perfect pizza oven with that true wood fire taste.”

You might think that you are familiar with wood fire pizza. Like I was, you are possibly under the impression that this is how they cook their pizzas at Famoso.  John enlightened me that this is wrong! Famoso uses gas fire as do many other restaurants. So as John and I couldn’t remember ever having a real wood-fire pizza, we were pretty excited to try this out.

John typically does not frequent the Italian Center but I managed to drag him there anyways. We first had to source our pizza ingredients – dough and pizza sauce of the highest quality. We were intent on making our own dough from scratch. But while running low on time, we realized that we could purchase fresh made pizza dough from the west end Italian Center!  At around $1.50 per crust, we couldn’t say no. We bought 6 cute little bags of dough for our pizzas.
Pizza SauceNext, we had to select our pizza sauce. After talking to some of the staff, they guided us to the house favourite, ‘Mutti’ pizza sauce. Unprompted, even the cashier commented on how much she liked the product while we were checking out. (Pictured left)

So equipped with dough, pizza sauce and a pile of other pizza ingredients, we headed home to start dinner.

Our goal for our pizza night was to come up with different and unique pizzas to cater to all taste buds. As two people can’t eat 6 pizzas (not even if John is one of them,) we had to have Cody and Jackie over for dinner. Cody had actually purchased the same BBQ as John a few weeks earlier, so this was definitely a group experiment.

So the boys went outside to fire up the grill, while Jackie and I tried to figure out what to do with the dough.

I rolled out the first ball of dough into a nice flat and round pizza crust. What didn’t to me occur until that moment was how fragile the dough would be. It would have been nearly impossible to lift that uncooked thin crust, heavy with toppings, off the table and onto the Komado, especially since we didn’t have one of those pizza board/shovel thingies big enough for the pizza. So the boys came up with a solution to staggered a couple of cutting boards on top of each other and smothered them with cornmeal. Jackie and I would make the pizza right on top, and the boys would carry the pizza out and plop it on the BBQ.

So after about 5 minutes in 700+ degree temperature, our first pizza was ready to taste!

PIZZA I: Buffalo Chicken

For our buffalo chicken pizza, John pre-cooked the chicken in Louisiana buffalo sauce. Topped with the buffalo chicken and pickled banana peppers, this pizza definitely packed a spicy punch. Before serving, we drizzled the pizza with honey and crystals Louisiana hot sauce (I just learned that this is a thing.)

So once we were done devouring the first pizza, it was on to number two. Jackie and I got working on rolling out the dough and topping the pizza while the boys got the BBQ to temp. This is how we did the whole meal: creating and cooking each individual pizza before all sitting down to eat it. (It took us hours to finish dinner!)

PIZZA II: Mediterranean

This pizza was my baby. I brushed the crust with olive oil and my new favourite spice (as you all know) za’atar. I added a very light dabbing of pizza sauce and just a sprinkling of mozzarella. Toppings included chicken, sun-dried tomatoes, garlic chunks, basil, black olives and feta. Simply delectable! (This pizza will be this week’s recipe)

PIZZA III: Cappricollo and Peppers

Spicy cappricollo with red and green peppers were featured in this Italian inspired pie. With crust brushed in olive oil, thyme and oregano, and topped with mushrooms, onions and fresh basil. Unfortunately, John got the grill a little hot on this one (over 800 degrees!) so this one was a little on the crispy side, but still delicious!

PIZZA IV: Vegetarian

Our vegetarian pizza was topped with artichoke hearts, red and green peppers, and onions. Jackie provided some arugula, which made this pizza just that much better

PIZZA V: Soppressata and Pineapple

Our last pizza of the day packed quite the kick with spicy soppressata and banana peppers, with sweet pineapple to even out the taste. Yes, I know, the crust is a pretty weird on this one, but you can’t win them all – well actually, I didn’t feel like redoing it. It all tastes good.

And yes, I am aware of my inability to make a round pizza crust. Oh well, doesn’t change the taste!

So this week’s recipe: Mediterranean Pizza

TIPS:
– Go to the Italian Center and buy your crust and sauce … a real time saver that creates a delicious pizza!
– The za’atar was a nice touch, but if you don’t have it on had try just basting the crust with olive oil and garlic.
– The use of cornmeal will keep your pizza crush from sticking to the table or the pan. If you are baking your pizza in the oven, I would suggesting building the pizza right on the pan if you are using fresh dough.
-These Pizzas can be cooked on the BBQ at temps of 500-600F on a pizza stone.

Special thanks to John for providing the pictures and technical BBQ descriptions and tips, and to Cody and Jackie for helping out in what was a pizza party to remember! Our next pizza quest will be to make our own dough and sauce. So stay tuned for the second installment in our pizza saga! (Date: TBD)

Bon appetit,

Julie

Click here to view printable version of recipe:
Mediterranean Pizza

______________________________________________________________

Mediterranean Pizza

Thin crust pizza crust
Olive oil and za’atar or oregano and garlic – use to brush crust
A very light layer of pizza sauce
A light sprinkling of mozzarella cheese
Chicken – pre-cooked, fried in a Mediterranean seasoning (or herb of your choice) and thinly sliced
Sun dried tomatoes
Fresh basil
Chopped garlic
Sliced black olives
Feta cheese

Black Bean Coconut Salad with Cumin

Black Bean Coconut Salad

Hello everyone,

So as many of you may know, John has been on vacation in Lake Tahoe for the last week, leaving me to fend for myself!

So there are a few aspects of my day-to-day life that change when John is not home. First, anything that breaks will stay broken. The second is that there are generally no tools lying around (I suspect this somehow explains the first change.) But the most notable change when John is on vacation would have to be my eating habits.

And no, this is not what you might be thinking; me, sitting at home, my lazy bum parked on the couch, stuffing my face with bags of cheezies and pounds of chocolate in secrecy, like John will never know. When John is away, my meals are essentially replaced by bird food, meals whose lack of substance and excess amount of vegetables would make any grown man’s stomach groan in agony.

So as I have been consistently been preparing myself salads for dinner and lunch over the past week, I thought I would share one of my recipes with you! This week’s recipe is a Black Bean Coconut Salad. Quick and easy, this hearty salad is a great fresh side to any Indian cuisine you may be making, however the high fiber black beans make this a perfect dinner or lunch salad.

This recipe is by Bal Arneson, the Spice Goddess!

TIPS:
– Start by adding 2 tbsp of cumin, and then continue to add more to taste. You will find that you can add a startling amount of cumin to this salad.
– Be sure to use unsweetened, dry coconut

Ingredient I can’t live without:

DRIED COCONUT:
– A great ingredient to add subtle sweetness. Try adding to your porridge, baking, or any coconut curries

Spice/herb of the week:

CUMIN
– An essential ingredient in Mexican or Indian cooking. Try adding to your homemade hummus along with coriander.

My menu this week: black bean salad today, orzo feta salad tomorrow, and homemade Italian dressing the day after!

Bon Appetit!

Julie

Click here to view printable Word version of the recipe:
Black Bean Coconut Salad

____________________________________________________________

Black Bean Coconut Salad
By Bal Arneson 

INGREDIENTS:

1 can black beans
1 / 4 cup dried coconut, unsweetened
1 / 4 cup finely chopped green onion
1 / 4 cup finely chopped parsley
2 tbsp – 1 / 4 cup ground cumin
1 / 4 cup apple cider vinegar
1 tbsp lime juice
2 tbsp olive oil
salt and pepper

DIRECTIONS

Toss, refrigerate and serve

Za’atar Roasted Chickpeas with Couscous

Couscous with Za'atar Roasted Chickpeas
Hello everyone,

As many of you may know, I love spices! I am proud of my spice collection at home. I have all the standard herbs (basil, thyme, sage, dill, tarragon, oregano and more), and some not so standard ones –herbs du province and lavender. I have a ton of spices such as cumin, coriander, chili powder, curry powder, cayenne pepper, cloves, cinnamon (all the ones that start with C.) I also have others that don’t start with C – paprika, smoked paprika, ginger. nutmeg, turmeric. I have a good seed selection – cumin seeds, mustard seed, coriander seed, celery seed. I also have some more interesting spices like garem masala, fenu greek, cardamom, and amchoor (a mango powder.) John and I now have 5 different types of salt (sea salt, coarse salt, lemon salt, Himalayan rock salt, fleur de sel) and as you can probably imagine, an unlimited selection of rubs from different places around the continent.

John and I have a wonderful spice rack he found at Bed Bath and Beyond that can hold up to  36 spices, as well as a bucket on the top shelf full of bags of spice, as well as a shelf for the rubs – and we are rapidly running out of room!

​My mom’s good friend Nellie was fortunate enough to be able to visit Turkey recently. In her emails about her trip, she mentioned to me that she went to a bazaar where she purchased fresh and exotic spices. When Nellie got back from her trip, she told me that she had something for me! I was delighted to learn that this gift was a selection of fresh spices right from Turkey! My goodie bag included mint, cumin seeds, and the most fragrant cumin I have ever had the privilege of smelling. She also included a wonderful spice blend that she said the merchant had created just for her, combining 15-20 different spices. Finally, I also received some za’atar. I was particularly excited for this one.  My mom and I sampled some Happy Camel pita bread at a farmer’s market a while back. It was delicious, and the vendor informed us the spiced used was a Middle Eastern spice called za’atar. It is a spice I am sure you have tasted before, as I recognized its distinct flavour, but I had never known what it was called until then. I had been searching for za’atar but it has proven to be very difficult to find. So getting some of this spice, especially of the highest Turkish quality, was very exciting.
“So what is za’atar?” You might be asking. Za’atar is a Middle Eastern spice blend, often used on or in bread. It consists of the following spices:

  • 1/4 cup sumac
  • 2 tablespoons thyme
  • 1 tablespoon roasted sesame seeds
  • 2 tablespoons marjoram
  • 2 tablespoons oregano
  • 1 teaspoon coarse salt

“So what is sumac?” you might be asking. Frankly, I had no idea so I decided to consult Wikipedia.  After reading the first few lines of the Wikipedia page, I got bored and stopped reading. I still have no idea really.

http://en.wikipedia.org/wiki/Sumac

So I wanted to find a dish for me and John to enjoy featuring my precious za’atar. I only had one shot at this, as even if I manage to find more za’atar here in Edmonton, it probably won’t be close to the quality of the Turkish blend.

This week’s recipe is Israeli Couscous and Roasted Chickpeas with Za’atar.  I found the recipe on this website randomly online and thought it looked worthy. Chickpeas and carrots tossed in a lemon za’atar tahini marinade, roasted in the oven and combined with Israeli couscous, garnished with green onions. Healthy and delicious! I couldn’t stop eating the za’atar marinade before I added it to the chickpeas.

TIPS:

– If you have trouble finding Israeli couscous, just substitute regular couscous. This is what I did for my dish, however I would love to try it with the Israeli couscous.
– Ok, so I am aware I made a whole edition of this email around a spice that is impossible to find. In the likely event you don’t have za’atar, I would suggest substituting other strong spices such as cumin, coriander or curry powder. Now that I have discovered this tahini based marinade, I think I will experiment with other spices.
– On a note unrelated to the recipe itself, Israeli couscous is a great soup ingredient – larger than regular couscous, these little balls don’t get soggy in your soup like pasta would, especially when you let your soup sit over-night.

Ingredient I can’t live without:

TAHINI
A key ingredient for hummus, I always have a jar of this in my fridge. This week’s recipe also introduced me to the idea of using tahini in marinades or dressings as well. As mentioned above, I think I will be experimenting with this idea in the near future.

Spice/herb of the week:

ZA’ATAR
You really have to try find some za’atar for your spice rack. Once I can get my hands on some more, I have plans to add it to hummus, pizza crusts, breads, roasted vegetables etc. The problem is that za’atar is terribly hard to find in Edmonton. My mom managed to find a store in little India that sells sumac so we could make our own blend, and sourced a spice store in Calgary called Silk Road Spices that sells za’atar – we may be relying on Steven to bring us some! Fortunately, Silk Road Spices is opening a store on Whyte Ave. in Edmonton. They are hoping to open by the end of the summer, and I am very excited and will be checking them out! Once I visit this store, you will like be getting a second spice edition in your inbox.

UPDATE: Silk Road Spiced has opened in Edmonton! Here you can find precious Za’atar. Check out their website: Silk Road Spices. They have a Calgary location as well. If you live in a different city, you’re on your own! 

So for this week, I would love some feedback from you! Apart from what I mentioned above, please tell me your favourite or most interesting spice in your spice rack!

Special thanks to Nellie for the fantastic Turkish spices!
Bon appetit,

Julie

Click here to view printable Word version of recipe:
Za’atar Roasted Chickpeas with Israeli Couscous

____________________________________________________________

Za’atar Roasted Chickpeas and Carrots with Israeli Couscous
(Serves 4)

INGREDIENTS:

1cup dry israeli couscous, or regular couscous
2 tsp olive oil
1 can chickpeas, drained
5 carrots, peeled and thinly sliced

Garnishes:
2 green onions, light green parts sliced thin
Extra za’atar

Za’atar Dressing:
1/3 cup olive oil
1/2 lemon, juiced
2 tsp tahini
1Tbsp za’atar – add more to taste if desired
Salt and pepper to taste

DIRECTIONS:

Prepare vegetables and chickpeas:

  1. Preheat oven to 375 degrees C
  2. Combine chickpeas and sliced carrots in a bowl
  3. Make dressing. Combine olive oil, lemon juice, za’atar, salt and pepper
  4. Pour half the dressing on the vegetables and toss
  5. Line a baking sheet with parchment paper and spread vegetables. Bake for 15-20 minutes, mixing once or twice until chickpeas reach your desired consistency.

Prepare Couscous

  1. While vegetables are baking, prepare Israeli couscous or regular couscous. Follow cooking instructions on package.
  2. Remove couscous from heat, fluff with fork and let stand for about 10 minutes.

To Serve

  1. Once vegetables are done, combine vegetables, couscous and the rest of the dressing and toss.
  2. Garnish with green onion and sprinkle with extra Za’atar to serve.

Peanut Butter Banana Breakfast Cookies

Breakfast Cookies

Hello everyone,

There was a time in my life as a child where I avoided breakfast in favour of sleeping in. Lucky, for me my mom created delicious and healthy yogurt shakes which I could down in an instant on the way out the door, tricking me into consuming some nutrients in the morning.

However these days, I have come to love breakfast. Even waking up in the morning at 5:30 AM for work, I always take the time to enjoy a healthy breakfast and a cup of coffee before leaving the house. I know I will feel terrible in an hour or 2 if I neglect this morning ritual.

It can be difficult finding fast and delicious breakfasts for those work mornings. I have my staples: Eggs and rye toast, Greek yogurt and granola and my homeade porridge mix, Some mornings I will feel creative and make some sort of vegetables with poached eggs dish, or a healthy pancake, but I find it necessary to change up the menu once and a while to not get too bored with the same old thing everyday.

Bring in the breakfast cookies. A great discovery for me, not only are these delicious, but they are FAST! These days, I typically have a bag of them in the freezer, and will pull out a few in the morning, pop them in the microwave on a low power for a minute, and presto, cookies and coffee for breakfast. Cookies for breakfast? Pinch me, I’m dreaming.

And the good news is these are pretty healthy. Thanks to the bananas, there is only 1/4 cups of added sugar in a batch of 18. That works out just under 4g (or 1 tsp) of added sugar per cookie. Not too bad, especially since you know what you are eating. If you want, you could try reducing the sugar further. I once tried eliminating the brown sugar altogether, but found that this recipe benefits from at least a little. I would suggest cutting it in half to 2 tbsp, but try the full amount in your first batch and reduce from there.

Anyways, enough about sugar, lets talk about some of the other ingredients. Bananas, peanut butter and quick oats make up the base of this recipe, and then you get to try adding a little bit of whatever you like. Nuts, seeds, chocolate chips and dried fruit are possible candidates. See recipe for more suggestions. .

TIPS:
– Try experimenting with the extra ingredients, using whatever you happing to have lying around. My favourite combination is 1/2 cup dried coconut, 1/2 cup raisins, and 1/2 cup chopped walnuts.
– If you have a couple of bananas in your fruit bowl that are way too ripe, this recipe is a great way to use them up
– As mentioned, try reducing the sugar if desired
– These freeze great, so if you make a big batch they should last a while (providing you hoard them to yourself)

Ingredient I can’t live without:

BANANAS
I always have a couple of bananas in my fruit bowl. Evidently, I use them for baking but I also like to cut up 1/2 a banana into small pieces and cook it into my porridge. The banana melts down and sweetens your porridge nicely, a great alternative to adding sugar.

Spice of the week:

CINNAMON
For breakfast, I had to pick cinnamon. I probably add this to every sweet breakfast dish I make. Also a frequent ingredient in Indian recipes.

Well, hopefully this week’s recipe will help change things up in the morning for you once in a while. Special thanks to my nana who provided me with this recipe a while back.

Bon appetit!

Julie

Click here to view prinatable Word version of recipe:
Peanut Butter Banana Breakfast Cookies

_____________________________________________________

Breakfast Cookies

3 eggs
1 / 2 cup brown sugar
1 tsp salt
2 tsp cinnamon
4 large bananas
1 and 1 / 3 cup peanut butter
4 tsp vanilla

Cream all items together

In separate bowl add:
4 cups quick oats
2 tsp baking soda
Add to above mixture and let sit for 30-60 minutes

2.5 cup of any of the following
Chocolate chips
Dried fruit
Nuts

Add to above mixture

Grease cookie sheet
Drop in tbsp on a sheet
Cooke 350 for 10-12 minutes

Spinach Beet Salad with Orange

Spinach Beet Salad

Hello everyone,

Beets beets beets! Such a wonderful treat!

Did I mention, I love beets!

I was always a little scared of beets when I was young, with the disturbing dark red juices  appearing in undesirable places and all. But these days, I’m over that … I simply love beets! (Did I mention that yet?) This year, I have even planted jumbo beets in my garden!

The problem with beets is that they are messy. When I am preparing them, I always fear even dripping the smallest amount on my white cupboards as I believe that the bright red stain will never go away. To date, I have been miraculously lucky with no permanent beet stains yet! (knock on wood)

As you all know, beets are also a pain in the butt to prepare. Peeling them is not easy, and you inevitably get that red juice all over your hands. After trying to peel them, chop them and roast them, I got fed up and have found a better way.

To roast beets:

1. Pre-heat oven to 400 degrees F.
2. Wash beets and chop off top and bottom.
3. Cover beets in olive oil.
4. Place beets on large piece of tin foil, and wrap them in the foil.
5. Place on pan and roast in oven for 1 hour to 1 hour and 30 mins, depending on how soft you like them, and how large they are. I usually roast them on the longer side.
6. Remove from oven and let cool. Once they have cooled, you can rub the peel off very easily with your hands. I like to do this over the sink.
7. You can store your beets in your fridge, ready to go. Add them to salads, reheat them as a side for dinner, or just snack on them.

So now that your fridge is full of delicious beets, it is time for a beet recipe!

This week’s recipe of the week is a spinach beet salad. I adapted this recipe from a chef Michael Smith recipe, that Canadian guy who lives by the ocean in the Maritimes and spends the whole day cooking for his family and doing yoga. What a life.  The spinach beet salad combines roasted beets, spinach, orange, fennel with a sprinkling of sunflower seeds. The dressing is a raspberry wine vinaigrette with orange zest.

TIPS:
– Although fennel is nice, you can do without. I didn’t use it in the picture above.

Ingredient I can’t live without:

BEETS
Beets beets, a wonderful treat. Did I mention, I love beets?

So get out and enjoy yourself some of those tasty sweet tidbits also known as beets! Anyways, I’m off to make another salad for lunch tomorrow – broccoli salad! I wonder how that would taste with beets…

Bon appetit,

Julie

Click here to view printable Word version of recipe:
Spinach Beet Salad

_________________________________________________________

Spinach Beet Salad

INGREDIENTS:
Spinach
Roasted Beet
1 Orangs, cut into chunks
Fennel, finely chopped (optional)
Sunflower seeds

Dressing:
1/4 cup olive oil
2 tbsp raspberry wine vinegar (or red wine vinegar)
Zest of 1 orangs
1 tsp grainy mustard or dijon mustard
1 tsp honey – or more to taste

To roast beets:

1. Pre-heat oven to 400 degrees F.
2. Wash beets and chop off top and bottom.
3. Cover beets in olive oil.
4. Place beets on large piece of tin foil, and wrap them in the foil.
5. Place on pan and roast in oven for 1 hour to 1 hour and 30 mins, depending on how soft you like them, and how large they are. I usually roast them on the longer side.
6. Remove from oven and let cool. Once they have cooled, you can rub the peel off very easily with your hands. I like to do this over the sink.
7. You can store your beets in your fridge, ready to go. Add them to salads, reheat them as a side for dinner, or just snack on them.

John’s Beer Can Chicken

Beer Can ChickenHello everyone,

So anyone living in Edmonton will have experienced our higher than normal temperatures last week. I’m not sure how high they actually got, but when planting my garden out in our south-facing back yard, it felt pretty hot to me! And when the weather gets hot, it’s time for a beer! Nothing will make your day and ruin the next like beer!

Beer, beer, wonderful beer! Drink it on a nice hot day, or while watching the Oilers loose (Or the Oil King win whoop whoop! Memorial cup champs 2014!) You might like your fancy import beers, or perhaps you prefer your flavourless domestics as I do. After my visit to Texas, I am now a Pabst Blue Ribbon faithful. I was informed last weekend that this beer is actually not that good, and I refused to believe it (Steven, you broke my heart with your harsh words about my beloved PBR.)

Now as many of you know, beer is not only good for drinking on a hot summer day, but it is also great for cooking. Beer batters, marinades, Guiness stews, beer is great ingredient. But my favourite beer recipe has always been beer can chicken.

Growing up at the lake, my dad would always BBQ beer can chicken. I remember thinking how funny the chicken looked perched there his little stool, a beer can. A chef at heart, my dad always did such a wonderful job. The chicken was always so succulent, the best ever, so moist and flavourful. This year, John took a crack at beer can chicken for the first time. As you can imagine, it was to die for! And the best part is that beer can chicken is surprisingly simple.

In a nutshell:

Cover the chicken in a rub and some oil. Drink a few big gulps from a can of beer. Add herbs and seasoning to the can and insert can in chicken. Heat your barbecue to 350 degrees and place chicken on barbecue. While your chicken is cooking, enjoy a beer or two. Barbecue your chicken for about an hour and a half, or until the chicken breast reaches an internal temperature of 165 degrees.

Beer Can Chicken DinnerPictured left: Beer Can Chicken Dinner at the Lake – Roasted Red Pepper Rub, Baby Potatoes with Lemon Herb Aoli, Roaster Asparagus and Coleslaw. This chicken was done in a brine and very tender despite some barbecue issues

As an added bonus, John smoked his chicken with maple. If you don’t have a smoker, consider purchasing a smoker box for you BBQ! John would be glad to answer any questions you may have about smoker boxes and smoking.

TIPS:

–  Use a meat thermometer!
– Try brining your chicken, especially if you are concerned that it may overcook. Although it will be a little saltier, the chicken will be ultimately tender. Steven did this at the cabin the other weekend with a very finicky 20+ year old barbecue, and it was wonderfully tender and delicious!
– Try using any combination of herbs or rubs that you like. John and I have really been enjoying lemon pepper lately. We did one at the lake with this roasted pepper seasoning that my mom got at Costco that was just fantastic too.
– For those of you who don’t have temperature gauges on your barbecues, turn your BBQ to medium on one side of the grill, and place your chicken on the other, using indirect heat.
– I like to freeze my leftover chicken carcass and turn it into a soup later!
– If you are concerned about using aluminium to cook your chicken, you can purchase beer can chicken holders made of steel. John got one at Lowe’s the other day that even has a tray attached to it so you can roast vegetables. We have yet to try it out, but it looks great!

Ingredient I can’t live without:

BEER
Mmm…beer

Herb/spice of the week

LEMON PEPPER RUB
John and I have been loving this rub. We even found it in the bulk section at Save-On-Foods!

So go grab a couple of beers – one for the chicken, and one for you – and enjoy!

Bon appetit,

Julie

Click here to view printable Word version of recipe:
John’s Beer Can Chicken

____________________________________________________________

John’s Beer Can Chicken

Time: About 1.5 hours

Ingredients:

1 whole chicken
1 can beer (we lake Pabst Blue Ribbon)
1/2 cup high heat cooking oil – grape seed oil preferred
Fresh basil, thyme and sage.
Rosemary optional.
3 cloves garlic.
Lemon pepper seasoning

To prepare marinade, combine all ingredients (except lemon pepper) and blend well. Rub chicken with blended mixture then cover with lemon pepper.

Take two big sips of your beer so it is about 1/3 empty. Top off with any remaining herbs and garlic mixture. Insert beer can into upright chicken. Extend chicken’s legs so that it sits upright(like a tri-pod)

BBQ Directions:

1. Heat BBQ or smoker to 350 F.

2. Place chicken on rack/grill.

3. If you are smoking, use maple wood. If using a barbecue, consider adding smoker box with maple chips. Place box on far side of barbecue – under grill away from chicken. (Consult John for more information on smoker boxes.)

4. Cook until chicken breast temperature reaches 165 F. This will take approx. 1.5 hours. This is where your meat thermometer pays off.

5. Remove can from chicken and serve.

Mother’s Day Special – Eggs Benedict with Hollandaise Sauce

Eggs Benedict

Hello everyone,

So what a lovely mother’s day! The sun has finally decided to come out, and things are turning green outside. Winter is even starting to feel like a distant memory (knock on wood!) Gardening season is upon us, so the greenhouses are filled with lovely flowers and potted plants, ready to be purchased for our wonderful mothers for mother’s day (we got my mom a gerbera daisy!)

So as this is the weekend before May long weekend, in our family, this means it is cabin preparation weekend. My mom, Joce, Steven and I all headed out on Saturday.  The boys started up the water and were busy in the yard. My mom was dusting and vacuuming and changing bed sheets. I, recovering from surgery, was unable to spend much time outside in the wind, and forbidden from exposing myself to dust and mouse poop. I attempted to BBQ some sausage and failed quite miserably (being poor at BBQ is a side effect of being the girlfriend of someone who happens to be quite superb at the craft.) So in the end, I spend the afternoon consolidating Monopoly games (we had about four in one box, including my dad’s old set from the sixties complete with wooden pieces, pretty cool.)

Okay enough about cleaning. This is not a cleaning email.

So with Steven living in Calgary, it was a special treat for the two of us to be able to spend mother’s day with our mom. We took advantage of the situation, and decided to plan her an extra-special mother’s day brunch. The menu included fruit salad, hash browns, and featured eggs Benedict, complete with smoked salmon, asparagus and hollendaise sauce from scratch.

Steven and I intended to let my mom sit and relax and enjoy herself while we cooked. Being a mom, she couldn’t sit and watch and got right in there and helped us cook. A lovely morning preparing breakfast with my brother and my mom.

Poaching EggsSo there were two main challenges with this meal. The first was poaching the eggs: we had not done this before. We got a pan of water heated, and added a splash of vinegar. Then it was time to crack the eggs. After some discussion, we elected my mom as the most likely to succeed at performing this critical task – Steve had cracked and egg into the sink in error earlier, and my ability to properly fit 4 eggs into one pan is questionable due to my compromised aim. Mom performed the task flawlessly, and we set the timer for about 3.5 minutes as recommended, before removing the eggs with a  spoon. My mom’s tip for poaching eggs – if the egg floats to the top of the water and the top of the egg doesn’t cook, spoon some of the hot water onto the top of the egg! (See below for eggs being poached, they look like magical fluffy clouds!)

The second challenge was the hollandaise sauce, Steve set up the double boiler and separated 4 egg yolks into a bowl. Then he began vigorously whisking the egg yolks so they don’t harden in the heat. Unfortunately, disaster stuck: after adding the butter, Steven passed to reins to my mom and within moments, the sauce separated beyond repair. (we established this was not my mom’s fault!) Steven says this happened because of two factors: 1 – the heat was on too high, and 2 – we left the sauce on for too long.

TIPS:

– Be very careful not to cook to long or too high, your sauce may turn into scrambled eggs or separate – this is bad!

– Bring extra eggs just in case a second attempt is required!

Mother's Day BreakfastAnyways, the second attempt worked just great, and after adding a little extra lemon juice (Steve calls this the ‘citrus balance’) and a dash of cayenne pepper, we had some killer eggs benedict, topped with cold smoked salmon and oven roasted asparagus. Final verdict on the hollandaise sauce: to die for!

Spice/herb of the week:

CAYENNE PEPPER:

Just a tiny pinch is a great way to add a kick to any dish

Today’s cooking term:

CITRUS BALANCE

In your hollandaise sauce, it is important to add just the right amount of lemon juice. Too little, and your sauce will have an unfortunate buttery-eggy taste. Too much and the lemon will overwhelm the sauce!

So despite a few blips, we enjoyed a wonderful eggs Benedict with the family on mother’s day at the cabin. Special thanks to John for providing the smoked salmon, and to Joce for running to Darwell to buy more eggs!

Bon appetit,

Julie

Click here to view printable version of recipe
Hollandaise Sauce and Poached Eggs

___________________________________________________

Hollandaise sauce

INGREDIENTS:
4 egg yolks
1/2 cup melted butter
1 tbsp lemon juice – more to taste
Salt to taste
Pinch of c ayenne pepper

DIRECTIONS:
1. Heat water in pot on medium low, to be used as a double boiler.
2. Add egg yolks and lemon juice in bowl, not yet over heat. Whisk vigorourlsy until well combined.
3. Place bowl on pot as  double boiler. Heat for approx. two minutes while whisking (you never stop whisking) Avoid too much heat or eggs will cook and scramble, ruining sauce.
4. Slowly add melted butter while continuing to whisk.
5. Continue to whisk until sauce thickens. Sauce should be able to coat the back of a spoon. Remove from heat.
6. Whisk in salt, cayenne pepper and additional lemon juice if required.
7. Keep covered and serve warm
______________________________________________________

Poached Eggs

1. Fill a pan half-full of water and add 2 tsp of white vinegar. This makes the egg white cook faster so it doesn’t spread out and run.
2. Bring water to gentle boil.
3. Crack eggs into water and reduce heat to simmer.
4. Remove eggs after 3.5 minutes with a slotted spoon, which is about a medium-soft yolk.
5. If egg floats to top of water, the top of the egg may not cook. Resolve this by spoon boiling water over the top of the egg.